
Meta Title: MacBook Air Not Turning On? Fast Fixes & Brisbane Repair Guide
Meta Description: Is your MacBook Air not turning on? Follow our step-by-step guide to troubleshoot power issues. For expert MacBook repairs in Brisbane, contact Screen Fixed.
It’s a heart-stopping moment: you press the power button on your MacBook Air, and… nothing. A blank, dark screen stares back at you. Your mind probably jumps to the worst-case scenario—a catastrophic hardware failure, lost data, and a hefty repair bill.
But hold on. Before you panic, take a deep breath. In our experience, the vast majority of "dead" MacBooks aren't dead at all. The culprit is often something surprisingly simple and easy to fix right at home, without any special tools or technical skills. The trick is to troubleshoot methodically, starting with the most obvious possibilities before assuming the worst.
We'll walk through the same initial checks any seasoned technician would, covering everything from your power supply to simple software hiccups that can masquerade as a major hardware problem.
Start With The Obvious: Your Power Supply
First things first, let's rule out the most common offenders. Power-related issues are, by far, the top reason a MacBook Air won't start. Here in Australia, repair shop data consistently shows that between 40% and 50% of these cases trace back to a faulty charger, cable, or even just the wall socket. These components take a beating day in and day out, so it's no surprise they're often the first to fail. If you're curious about how pros tackle these problems, you can get some great insights on Australian Mac repair timeframes.

Alt: A frustrated person looking at their MacBook Air which has a black screen and is not turning on.
Caption: Troubleshooting a MacBook Air power issue in our Brisbane workshop.
Before you go any further, let's run through a quick checklist. This simple process can save you a lot of time and worry.
Initial Troubleshooting Checklist
Here's a quick reference table to guide you through the first and most common checks before moving on to advanced diagnostics.
| Check | What to Look For | Potential Solution |
|---|---|---|
| Wall Socket | Is it live? | Plug in another device (like a lamp) to confirm the outlet works. |
| Charging Brick | Cracks, discolouration, bent prongs. | Try a different, known-working power adapter if you see any damage. |
| Charging Cable | Frays, kinks, or breaks, especially near the ends. | Swap out the cable for one you know is functional. |
| MacBook Ports | Debris or dust inside the USB-C or MagSafe port. | Gently clean the port with a soft, dry brush or compressed air. |
These simple checks solve the problem more often than you'd think.
Pro Tip: The fastest way to isolate the problem is to borrow a completely different charger and cable—one you've seen working with another MacBook. If your laptop springs to life, you've found your culprit without any guesswork.
If everything with your charger seems fine, don't give up just yet. If your MacBook Air's battery is completely, truly flat, it might not power on the instant you plug it in. It often needs a good 5-10 minutes on the charger to build up enough juice to even show a low-battery icon.
So, plug it into a power source you've confirmed is working, and just walk away for a bit. A little patience is often the final step in solving the "my MacBook Air won't turn on" mystery.
Time for a System Reset
So, the basic power and cable checks didn't do the trick. Don't stress just yet. The issue might not be a major hardware failure but something much simpler: a glitch in the low-level controllers that manage your MacBook’s power and startup settings.
Think of these controllers as the part of the brain that handles breathing and heartbeat—they work in the background before macOS even begins to load. A quick reset can often clear out corrupted data and jolt a non-responsive MacBook Air back to life. The best part? These resets are completely safe for your files and don’t require any tools.
Alt: A person's hands on a MacBook Air keyboard, performing a key combination to reset the SMC and NVRAM.
Caption: Resetting the SMC is a common first step for MacBook Air power problems.
Resetting the SMC (For Intel-Based Models)
If you're using an Intel-based MacBook Air (that's most models from 2020 and earlier), the System Management Controller (SMC) is your first port of call. This tiny chip is in charge of a surprising number of physical functions.
An SMC reset is the go-to fix for odd symptoms like:
- Cooling fans spinning at full speed for no reason.
- The keyboard backlight or battery indicator lights acting erratically.
- Your battery refusing to charge or not being recognised at all.
- A complete lack of response when you hit the power button.
Here’s how to reset the SMC on a MacBook Air with a non-removable battery (which is nearly all models from the last decade):
- Shut down your MacBook Air completely and plug in the power adapter.
- On the built-in keyboard, press and hold three keys: Shift (left side) + Control (left side) + Option (left side).
- While still holding those three, press and hold the Power button as well.
- Keep all four keys held down for 10 seconds.
- Release all the keys simultaneously. You might see the light on your MagSafe or USB-C charger flicker for a moment—that’s a good sign it worked.
- Now, try pressing the power button again to see if your MacBook Air starts up.
Believe it or not, these system resets are incredibly effective. On Intel-based MacBook Airs, an SMC or NVRAM reset can resolve up to 30% of non-booting issues. It's a powerful first step before you even think about opening the case.
Clearing the NVRAM or PRAM
Next on the list is the NVRAM (Non-Volatile Random-Access Memory), or PRAM on really old Macs. This is a small slice of memory that stores core settings your Mac needs to boot quickly, like screen resolution, time zone, speaker volume, and which disk to start from. If this data gets scrambled, your Mac can get stuck, leaving you with a blank screen.
This reset is for Intel Macs only. If you have a newer Apple Silicon Mac, skip ahead. For Intel models, here's the process:
- Make sure your Mac is fully shut down.
- Press the power button, then immediately press and hold these four keys: Option + Command + P + R.
- Hold them down for about 20 seconds. On older Macs, you might hear a second startup chime; on newer ones, the Apple logo may appear and disappear.
- Release the keys. Your Mac should now try to boot normally.
For Apple Silicon Macs (M1, M2, and newer), this process is fully automated. The system checks the NVRAM on startup and will attempt a reset on its own if it finds a problem. There's no magic key combination for you to press.
The DFU Restore: A Last Resort for Apple Silicon Macs
If you have a newer MacBook Air with an M-series chip and it’s completely dead to the world, there's one more powerful option: a Device Firmware Update (DFU) restore. This is the Mac equivalent of restoring an iPhone, as it completely reinstalls the low-level firmware that controls the hardware.
This is a last-ditch effort. It requires a second, working Mac and a USB-C cable, and it’s typically only needed if a macOS update was interrupted or the firmware itself is corrupted. While it's often the solution for the toughest software-related problems, the process is quite involved. If you've reached this stage and feel out of your depth, it might be time to call in a professional.
Experts warn that if you've seen sparks, smelled burning plastic, or noticed any other signs of physical damage, stop everything immediately. Do not attempt to supply power again. To better understand the risks, check out this guide on expert advice on Australian Mac repair.
If these resets haven't solved your "MacBook Air not turning on" problem, the issue is likely hiding deeper within the hardware itself.
Examining the Battery and Internal Connections
If the SMC and NVRAM resets didn't coax your MacBook Air back to life, it's time to look at the hardware. The next logical place to investigate is the battery and its connections, as these are incredibly common failure points that can make a device seem completely dead.
A faulty or totally drained battery is the prime suspect when a MacBook Air won't turn on. Sometimes, a battery can fail in such a way that it shorts the entire system, preventing it from starting up even when plugged into a charger you know is working. Your Mac might be giving you absolutely nothing—no chime, no fan spin, no flicker on the screen.
Telltale Signs of a Failing Battery
It’s rarely an instant death. More often than not, a battery will drop hints that it's on its way out long before it completely prevents your Mac from booting.
Keep an eye out for these classic symptoms:
- Works only when plugged in: This is the most obvious one. The moment you unplug the charger, the MacBook dies.
- "Service Recommended" warning: If you were able to get it to boot previously, you might have noticed this little warning in the menu bar. It's your Mac's way of telling you the battery is degrading.
- Sudden shutdowns: The machine might just cut out, even when the battery meter says you've got plenty of charge left.
- Physical swelling: In more serious cases, a failing battery can bloat. This can cause the bottom case of your MacBook to bulge or make the trackpad stiff and difficult to click.
If any of this sounds familiar, the battery is almost certainly the culprit. You can learn more about what's involved in our guide to getting a new battery for your MacBook Air.
Here in Australia, battery problems are more frequent than you might guess. Local repair data suggests that around 35% of MacBook Air models made between 2015 and 2020 run into battery failures that stop them from powering on.
That's a pretty significant number, and it really underscores how often the battery is the real villain. The good news is that a professional replacement, usually paired with a good internal clean, has a very high success rate. You can find more community discussions and repair logs on these common MacBook Air power-on failures.
The Surprising Connection Culprit
While the battery is a usual suspect, there's another, sneakier component that can stop a MacBook Air dead in its tracks: the trackpad cable. It sounds bizarre, I know, but on many models, this cable (sometimes called the I/O board flex cable) is actually part of the startup circuit. If that cable gets damaged or even slightly dislodged, it physically interrupts the signal from the power button to the logic board.
This means you could be pressing the power button all day long, but the "start" command simply never reaches the computer's brain. This kind of damage can happen during a previous repair, from a tiny liquid spill that corroded the connectors, or sometimes just from simple wear and tear.
How Climate and Minor Spills Play a Role
Living in Australia, especially in humid areas like Brisbane, adds another factor to the mix. Humidity can speed up corrosion on internal parts if even a tiny bit of moisture gets inside. That small spill from months ago that you thought was harmless can slowly eat away at sensitive connectors, leading to a surprise failure down the road.
- Corrosion: When you look inside, you might see a greenish or white crust on the logic board connectors, particularly around where the battery and trackpad cables plug in.
- Liquid Damage Indicators (LDIs): Apple places small white stickers inside its devices that turn red or pink on contact with liquid. If you spot one of these, it’s a dead giveaway that moisture has been inside.
If your MacBook Air is out of warranty and you feel confident opening the bottom case, a quick visual inspection can tell you a lot. Sometimes, just disconnecting the battery for a minute and plugging it back in can reset the power management system. Be warned, though—this carries risks if you're not experienced with electronics.
Once you've exhausted the simple resets and your "MacBook Air not turning on" issue persists, the evidence strongly points to an internal hardware problem. At this point, unless you’re a seasoned pro, your best and safest move is to get a professional diagnosis.
Understanding Logic Board and Firmware Faults
So, you’ve wrestled with all the resets, checked your battery, and made sure every connection is snug, but your MacBook Air is still a lifeless brick. Now we’re getting into the deep end of the pool: complex hardware problems. The culprit might be hiding in the logic board or the system's firmware—essentially, the brain and central nervous system of your Mac.
Think of the logic board as the main city grid where everything connects—the CPU, memory, storage, you name it. It's a ridiculously intricate piece of engineering, and if one tiny component blows, it can take the whole system down with it. These aren’t the kind of issues you can fix with a software update; they demand specialised tools and a serious understanding of electronics.
For most DIY repair enthusiasts, this is usually where the journey ends, and for a very good reason. Trying to fix a logic board without proper training is like trying to perform surgery after watching a YouTube video. The risk of causing permanent, irreversible damage is just too high.
Common Logic Board Failures
When a logic board gives up the ghost, it's rarely the entire board that dies at once. More often than not, one single, microscopic component is to blame. One of the classic failures we see in the workshop is a short circuit on a critical power rail. These rails are like the main power lines delivering electricity to different parts of the board.
A perfect example is the PPBUS_G3H rail, a vital circuit that handles the primary power for the whole system. A short here can be caused by almost anything, from a tiny, defective capacitor to liquid damage creating a bridge where there shouldn't be one.
Speaking of liquid damage, it's the number one assassin of logic boards. Even a small spill can leave behind mineral deposits that slowly corrode the delicate electronic pathways. You might not even notice a problem for weeks or months, but eventually, that corrosion creates a short circuit, and poof—your MacBook Air won't turn on.
This flowchart can help you visualise the diagnostic process, walking you through the simple checks before pointing toward a more serious hardware fault.
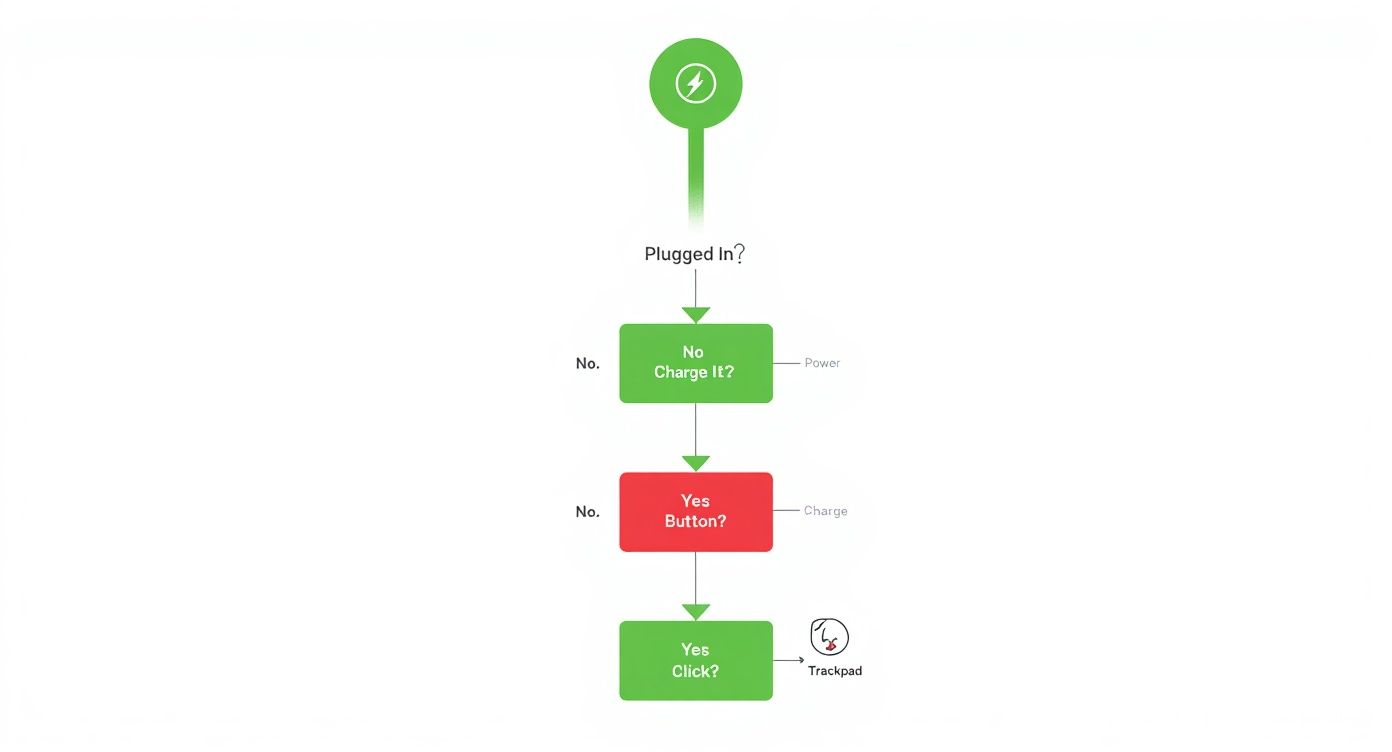
Alt: A flowchart illustrating the troubleshooting steps for a MacBook Air that won't turn on, from checking power to seeking professional help.
Caption: A troubleshooting flowchart helps diagnose MacBook Air power-on issues systematically.
As the flowchart shows, methodically ruling out the simple stuff like power adapters and basic resets naturally leads you to suspect internal hardware, making a logic board issue a prime suspect.
Recognising the Signs of a Deeper Problem
So, how do you know if your "MacBook Air not turning on" nightmare is a logic board fault? While you can’t be 100% certain without professional diagnostic tools, there are some pretty strong clues:
- A History of Liquid Spills: Even a tiny one from ages ago can come back to haunt you.
- A Burning Smell: If you ever caught a whiff of burnt plastic, that’s a massive red flag.
- Completely Dead: No fan spin, no faint sounds, no screen flicker. Absolutely nothing.
- It Died Suddenly: The MacBook was working perfectly one minute and was completely unresponsive the next, with zero warning.
These symptoms often point to a fault that needs board-level diagnosis. Technicians use multimeters and schematics to trace the flow of electricity, hunt down the short, and replace the microscopic component that failed. It’s a delicate dance that requires a steady hand and years of experience. If you're curious about the basics, you can learn how to test continuity with a multimeter, which is a fundamental skill in electronics repair.
When Firmware Corruption Is to Blame
It’s not always a physical problem. Sometimes, the issue is buried in the firmware—the low-level software that acts as a bridge between the hardware and macOS. This has become especially relevant for the newer Apple Silicon Macs (M1, M2, and beyond).
Firmware can get corrupted if a macOS update is interrupted or goes wrong, leaving the system in a state where it can't boot. When this happens, standard tricks like an NVRAM reset are useless because the very core instructions your Mac needs to even begin the startup process are scrambled.
The only way out of this mess is a DFU (Device Firmware Update) restore. This involves connecting your dead MacBook to another Mac and essentially force-reinstalling its foundational software from scratch. It's an advanced procedure, and if you get it wrong, you can definitely make things worse.
DIY vs Professional Repair Decision Guide
Deciding whether to push forward or call in a professional can be tough. This table breaks down common symptoms to help you make the right call and avoid turning a repairable Mac into a paperweight.
| Symptom | Likely Cause | Recommended Action (DIY or Pro) | Risk Level of DIY |
|---|---|---|---|
| No power, no light on charger | Faulty charger, DC-in board, or initial power rail | DIY (Check charger/DC-in), then Pro if issue persists | Low to Medium |
| Fan spins, but no display | Display issue, RAM connection, or minor board fault | DIY (Check display connections), then Pro | Medium |
| Mac died after a liquid spill | Logic board short circuit due to corrosion | Professional | High |
| A faint burning smell was detected | A component on the logic board has failed | Professional | Very High |
| Mac is completely dead, no signs of life | Major logic board failure (e.g., PPBUS_G3H short) | Professional | Very High |
| Won't boot after a failed macOS update | Firmware corruption | Professional (DFU restore) | High |
Ultimately, if you're seeing signs that point to the logic board or firmware, your best and safest move is to step away and consult a specialist. The risk of causing further, more expensive damage is just too great.
When to Trust a Professional Repair Service
So, you’ve tried the resets, you’ve checked the charger, and you might have even peeked inside, but your MacBook Air is still playing dead. This is the point where the DIY road often comes to an end, and it’s time to call in someone with professional expertise. Pushing forward without the right tools and deep knowledge can quickly turn a fixable issue into permanent damage, costing you a whole lot more in the long run.
Diving into intricate internal repairs, especially anything touching the logic board, is a high-stakes game. One tiny slip of a screwdriver or an accidental static shock can permanently fry sensitive components. When that happens, data recovery becomes nearly impossible, and your MacBook becomes a very expensive paperweight. It’s crucial to know the red flags that signal it’s time to step back.
Warning Signs of Severe Hardware Failure
Some symptoms are clear giveaways that the problem is well beyond a simple fix. If you spot any of the following, don't even think about plugging your MacBook in or trying to power it on again.
- A distinct burning smell: This is the unmistakable scent of a component shorting out and failing. Continuing to supply power is just asking for more trouble and can be dangerous.
- Visible scorch marks: If you've opened the case and see black or brown marks on the logic board or other parts, that’s a sure sign of a serious electrical fault.
- Any history of liquid exposure: Even a small spill from months ago can cause slow-burn corrosion that eventually leads to a short circuit. If your MacBook Air has ever had a run-in with liquid, a professional deep clean and assessment is non-negotiable.
- Physical damage or swelling: A bent chassis or a bulging bottom case (usually from a swollen battery) means there’s internal pressure that can easily damage the logic board and other fragile parts.
These aren't problems you can solve by just swapping out a part. They demand a skilled technician with micro-soldering gear and diagnostic equipment to trace the fault right down to the component level.
The Value of Professional Diagnostics
When your MacBook Air is not turning on, a professional repair service offers one thing you simply can’t get at home: a precise diagnosis. Technicians at a reputable centre don't just guess; they use specialised tools like multimeters, oscilloscopes, and thermal cameras to pinpoint the exact point of failure on the logic board.
This diagnostic process is the difference between replacing an entire logic board for hundreds of dollars and replacing a single, tiny capacitor for a fraction of the cost. It ensures you only pay for the repair that’s actually needed.
A professional approach also puts the safety of your data first. Technicians know the correct procedures for handling the delicate solid-state drive (SSD) and its connections, which massively increases the chances of getting your precious files back. This is particularly critical on newer MacBooks where the storage is soldered directly onto the logic board.
Trying to take things apart without proper ESD (electrostatic discharge) protection can also be a disaster. A technician’s workbench is properly set up to ground static electricity safely, protecting all those sensitive microchips inside your device. Even the adhesives holding components in place require specific handling, and knowing how to properly apply double-sided tape for electronics repair is one of those small but vital details that guarantees a fix that lasts.
Ultimately, choosing a professional MacBook repair specialist means you're entrusting your device to someone who lives and breathes these complex repairs. They have the experience for board-level fixes, the right tools to do the job safely, and the knowledge to protect your data. When the stakes are this high, it’s the smartest call you can make.
Frequently Asked Questions
When your MacBook Air refuses to turn on, it's natural to have a heap of questions running through your mind. We get it. Here are some straight answers to the most common queries we hear from customers, designed to give you a clear picture of what to expect.
How Much Does It Cost to Fix a MacBook Air That Won't Turn On in Australia?
This is the million-dollar question, and the honest answer is: it depends entirely on what’s actually wrong. The cost to fix a non-starting MacBook Air is directly tied to the faulty component, so the final bill can vary dramatically.
The best-case scenario is a simple fix like a dodgy charger. An official Apple power adapter and cable will usually set you back between $50 and $120. It’s the cheapest and easiest solution.
If it turns out the battery has given up the ghost, a professional replacement typically falls in the $200 to $400 range, depending on your MacBook Air model. That price covers the new battery itself and the skilled labour needed to fit it properly.
Things get a bit more unpredictable when the logic board is the culprit. A minor board-level repair, like zapping a single burnt-out capacitor, might start from around $400. However, if the damage is more extensive, the repair costs could climb towards $1,000 or even more. To avoid any nasty surprises, your best bet is to get a professional diagnostic quote from a service like Screen Fixed Brisbane to find out exactly what you’re dealing with.
Can I Recover Data If My MacBook Air Is Dead?
In most cases, yes, your data is recoverable. If the problem is something simple like a dead battery, a faulty charging port, or a bad power adapter, your files on the solid-state drive (SSD) are almost certainly safe and sound. Once the hardware is sorted, you'll have access to everything again.
When the logic board is the problem, it’s a bit trickier, but don't panic just yet. Skilled technicians can often perform micro-soldering repairs to get temporary power back to the board—just enough to perform a full backup of your important files. It’s a delicate operation that focuses on data retrieval without necessarily needing a full, permanent fix.
Important Note: Newer MacBooks with a T2 security chip or Apple Silicon (M1/M2/M3) have the SSD soldered directly onto the logic board. This design makes data recovery much harder if the board is completely dead, but for a specialist with the right gear, it's not always a lost cause.
Will Using a Cheap Charger Damage My MacBook Air?
Absolutely. Using a cheap, uncertified charger is one of the biggest risks you can take with your MacBook. These knock-offs often lack the proper circuitry to deliver a stable, clean power supply, and that can cause serious, long-term damage.
The inconsistent voltage and electrical "noise" from a poor-quality charger can slowly fry the sensitive components on the logic board, especially the chips that manage charging and power. At our Brisbane repair centre, we see a huge number of power-related logic board failures that can be traced directly back to long-term use of cheap, non-genuine chargers. Stick with an original Apple charger or a reputable, certified third-party brand that meets Australian safety standards.
My MacBook Air Got Wet and Won't Turn On—What Do I Do?
Okay, take a breath. What you do right now is critical for saving your machine.
First and most importantly: do not plug it in or try to turn it on. Pushing electricity through wet circuits is the quickest way to cause a short and kill components for good. Unplug it from everything immediately.
Forget the old "put it in a bag of rice" trick. It’s a myth. Rice doesn’t work effectively and can even introduce dust and starch into the machine, making things worse. The best thing you can do is get it to a professional repair service as fast as you can. Technicians will open it up, properly clean the internal parts with specialised solutions to stop corrosion, and then figure out the extent of the damage. When it comes to liquid damage, every second counts—the faster you act, the better the odds of a successful and affordable repair.
If you've run through these checks and your MacBook Air is still playing dead, it’s time to call in the professionals. Screen Fixed offers expert diagnostics and repairs to bring your device back to life. Book your repair with Fixo today.
Disclaimer: Screen Fixed is an independent repair service and is not affiliated with Apple Inc. MacBook, MacBook Air, and Apple are trademarks of Apple Inc.