
Ever had that frustrating moment when a device still won't power on, even after a fresh screen replacement? More often than not, the hidden culprit is a tiny, faulty capacitor lurking on the logic board. This is a common problem our team sees with devices brought in for repair. Learning how to check a capacitor properly is one of those non-negotiable skills that separates a good repair from a great one. It's a game-changer that will save you time, money, and your hard-earned reputation.
Why Capacitor Testing Is a Crucial Repair Skill
Think of capacitors as the tiny, unsung heroes of a circuit board. They’re basically miniature batteries, charging and discharging in fractions of a second to ensure a stable, clean power supply reaches critical components like the CPU and memory. When one of these little guys fails, it can unleash a whole range of baffling issues, from a completely dead device to intermittent boot loops or the dreaded no-backlight problem.
 alt="A technician using a probe to test components on a circuit board, highlighting the process of checking a capacitor."
Simply swapping major parts like screens or batteries without digging deeper is often a dead end. You're just throwing expensive parts at a problem you haven't diagnosed. For any serious technician, getting good at capacitor diagnostics is the key to unlocking more complex—and profitable—board-level repairs.
The Role of Capacitors in Modern Devices
Crack open a modern logic board from an iPhone or Samsung Galaxy, and you'll find a few different types of capacitors, each doing a specific job.
- Decoupling Capacitors: These are placed right up close to integrated circuits (ICs). Their job is to filter out high-frequency noise and act as a local power reservoir for sudden current demands. A failed decoupling cap can cause all sorts of instability and random crashes.
- Filtering Capacitors: Usually a bit larger, these components are there to smooth out the voltage coming from the power supply, turning a fluctuating DC input into a clean, stable line. If one of these gives up, you're likely to see display glitches or straight-up power failures.
- Coupling Capacitors: You'll find these in audio and radio frequency (RF) circuits. They're designed to let AC signals pass between different stages of a circuit while blocking any DC voltage.
Knowing these roles is half the battle. It helps you make an educated guess about what might be wrong. For instance, if you've got an audio issue, your first instinct should be to check the coupling capacitors in that part of the circuit, guided by the schematic.
Key Takeaway: A single faulty capacitor is often the root cause of seemingly unrelated electronic failures. Knowing how to test them allows you to perform true board-level repairs instead of just replacing modules.
For a busy shop that handles a lot of iPhone repairs in Brisbane, efficient diagnostics are everything. Being able to quickly pinpoint a shorted capacitor on a main power rail can turn a potential write-off into a successful, profitable repair. It's this level of skill that builds customer trust and sets your business apart.
This guide will walk you through the essential techniques, from simple visual checks to using a multimeter, giving you the confidence to tackle these common but critical failures head-on.
Assembling Your Capacitor Diagnostic Toolkit
Before you can confidently test a capacitor, you need the right gear. Trying to tackle intricate board-level diagnostics without the proper tools is like trying to perform surgery with a butter knife—it's messy, ineffective, and you'll probably do more harm than good. Putting together a solid toolkit makes the process safer and drastically improves your accuracy, turning a frustrating guessing game into a methodical diagnosis.
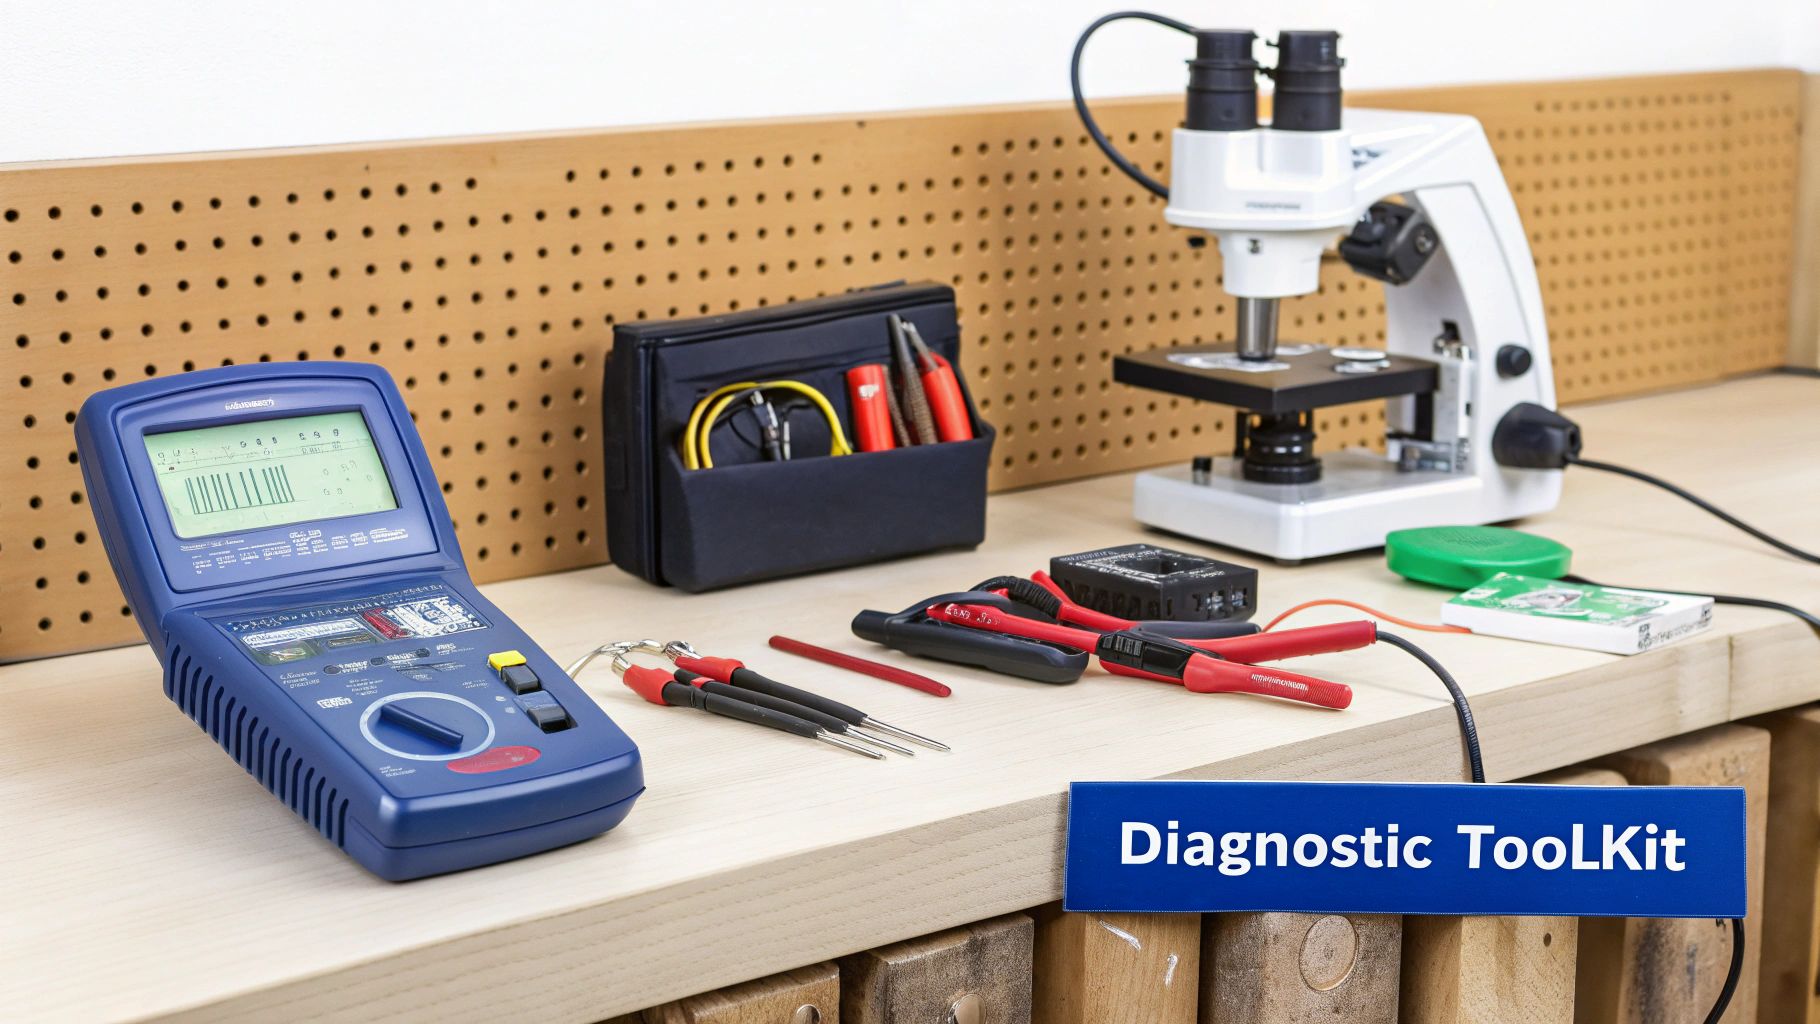 alt="An organised electronics repair workstation featuring a multimeter, microscope, and other essential tools for checking capacitors."
This isn’t about splashing out on the most expensive equipment you can find. It’s about choosing smart, functional tools that match the work you’re doing, whether you're a weekend tinkerer or running a professional repair shop.
And of course, safety is paramount. Before you even touch a circuit, you need a firm grasp of appliance servicing safety tools and procedures. Capacitors, especially in power supplies, can hold a dangerous charge long after the power is off. Always respect the electricity.
The Everyday Workhorse: The Digital Multimeter
The digital multimeter (DMM) is the absolute cornerstone of any electronics toolkit. It’s the first thing you’ll grab to get a quick health check on a component. A decent DMM will measure voltage, current, and resistance, but for our purposes, its most valuable functions are capacitance measurement and continuity testing.
Most modern multimeters have a dedicated setting for testing capacitance, giving you a direct reading in farads (or, more realistically, microfarads, nanofarads, or picofarads). This is your quickest way to see if a capacitor’s value has drifted outside its specified tolerance. If you're new to this essential tool, our guide on how to use a multimeter for beginners will get you up to speed.
But a multimeter has its limits. It won’t always catch a capacitor that’s failing under load or at high frequencies. That's where the more specialised gear comes in.
Specialised Tools for Deeper Diagnostics
When a multimeter check comes back fine but you're still suspicious, it’s time to dig deeper. This is where professional technicians in places like Screen Fixed Brisbane rely on advanced equipment to get the complete picture of a capacitor's health.
Here’s a quick rundown of the key tools and what they do.
Capacitor Testing Tools At a Glance
| Tool | Primary Function | Best For | Skill Level |
|---|---|---|---|
| Digital Multimeter (DMM) | Measures basic capacitance, voltage, and continuity. | Quick, initial checks and identifying dead shorts or opens. | Beginner |
| ESR Meter | Measures Equivalent Series Resistance (internal resistance). | Finding failing filter capacitors in power circuits that still show good capacitance. | Intermediate |
| LCR Meter | Provides highly accurate inductance, capacitance, and resistance readings at various frequencies. | Precision diagnostics, component matching, and engineering-level analysis. | Advanced |
| Stereo Microscope | Magnifies the board for detailed visual inspection. | Spotting physical damage on tiny SMD components and guiding microsoldering work. | Intermediate |
| Hot Air Rework Station | Applies focused heat to desolder and resolder components. | Safely removing and replacing surface-mount capacitors without damaging the board. | Advanced |
As you can see, each tool has its place. The DMM is your starting point, but an ESR meter is what separates the pros from the amateurs when it comes to power supply repairs.
For any serious repair work, an ESR meter is non-negotiable. It will find faulty capacitors that a standard multimeter completely misses, saving you hours of headaches. It's the difference between a good guess and a definitive diagnosis.
Essential Gear for Microsoldering Work
Checking a capacitor on a modern smartphone logic board is a whole different beast. The components are microscopic, demanding tools that offer pinpoint precision and control.
- Stereo Microscope: You simply can't fix what you can't see. A good microscope is absolutely essential for inspecting tiny SMD (Surface-Mount Device) capacitors for cracks, corrosion, or signs of heat damage.
- Precision Tweezers: A steady hand is useless without a set of fine-tipped, anti-static tweezers to handle these minuscule components without zapping them or sending them flying into the abyss.
- Hot Air Rework Station: This is your go-to for safely removing and replacing SMD capacitors. It lets you apply focused heat exactly where you need it, melting the solder without cooking the PCB or nearby components.
Building out this toolkit means you can tackle any capacitor-related issue with confidence, from a beefy through-hole cap on a power supply to a speck-sized SMD on an iPhone logic board.
The First Line of Defence: Mastering Visual Inspection
Before you even think about reaching for a multimeter, your most powerful diagnostic tool is already in your hands—your eyes. A thorough visual inspection is the fastest, most efficient way to spot an obviously failed capacitor, potentially solving your problem in seconds without any complex testing. It’s a foundational skill that every technician needs to nail down.
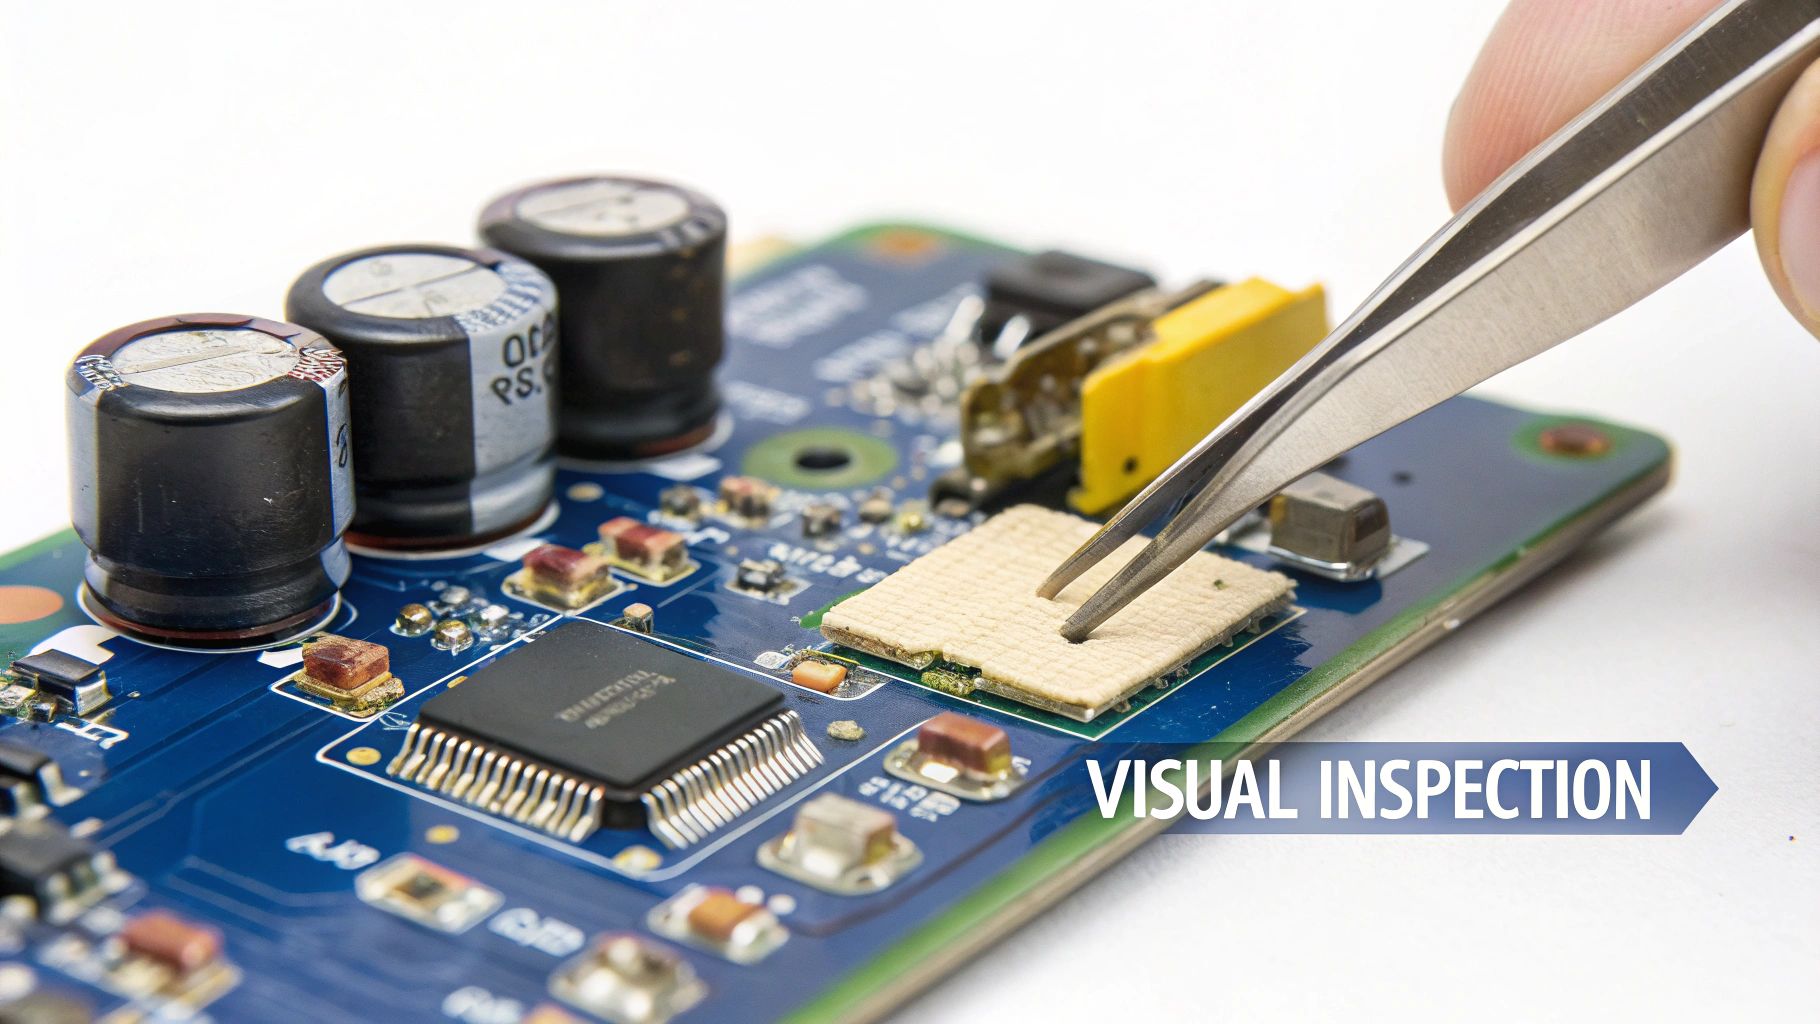 alt="A close-up shot of a technician using tweezers to visually inspect a small capacitor on a blue circuit board."
Now, this technique won't catch every faulty component. Some capacitors fail internally without showing any outward signs. But it will instantly pinpoint the most catastrophic failures. This simple first step saves precious time, especially when you're working on a customer's device and need a quick turnaround.
Spotting a Bad Electrolytic Capacitor
Electrolytic capacitors—those cylindrical "can" style components common in power supplies and older electronics—are notorious for showing their failures in very obvious ways. They contain a liquid electrolyte that can break down over time, especially with heat and age, causing internal pressure to build up.
When you're inspecting these, keep an eye out for these classic symptoms:
- Bulging Top: The flat, metal top of the capacitor should be perfectly level. If it's domed or bulging outwards, that’s a dead giveaway the internal pressure has hit a dangerous level. This is easily the most common sign of failure.
- Leaking Fluid: Look for a crusty, brown or rust-coloured substance around the base of the capacitor or leaking from the vents on top. This is dried electrolyte that has escaped, meaning the internal seals have failed.
- Pushed-Out Rubber Seal: Check the black rubber bung at the bottom where the leads come out. If it looks like it's being pushed out from the metal can, the capacitor is on its last legs.
These signs are definitive. A capacitor showing any of these symptoms is 100% bad and has to be replaced. Don't even bother with electrical testing; the component has clearly failed. This visual check is a critical part of learning how to check a capacitor effectively.
Identifying Damage on SMD Capacitors
On modern logic boards, like the ones in an iPhone or Google Pixel, you won't find those bulky electrolytic cans. Instead, you’ll be dealing with tiny Surface-Mount Device (SMD) capacitors, which are usually small, rectangular, and brown (ceramic) or black/yellow (tantalum). Their failure signs are much more subtle and often require a microscope to see clearly.
Pro Tip: Never underestimate the power of a good clean. Use isopropyl alcohol and a soft brush to gently clean the area of the board you're inspecting. Flux residue, dust, and grime can easily hide hairline cracks or discolouration.
Look closely for these clues:
- Cracks and Chips: Even a tiny hairline crack or a chipped corner can be enough to cause a short circuit or an open line. Run a pair of fine-tipped tweezers gently over the surface to feel for any imperfections.
- Discolouration: Scan for components that are a darker shade than their neighbours. This often points to overheating, a common sign of a capacitor that's failing under load.
- Heat Damage on the PCB: Check the board area immediately surrounding the capacitor. Any scorching, bubbling, or darkening of the PCB itself is a major red flag that the component has been running extremely hot.
For instance, when you're troubleshooting a backlight issue on an iPhone, a common failure point is a filter capacitor near the backlight driver IC. A quick scan under the microscope might reveal a slightly darkened capacitor that tests fine for continuity but is actually breaking down under voltage. Finding this visually saves you from having to desolder and test multiple components.
Speaking of tools, having the right ones for the job is essential, which is why understanding different screw drive types is just as important for the disassembly phase of any repair.
Using a Digital Multimeter for Capacitor Testing
With the visual inspection out of the way, it’s time to grab the workhorse of any electronics bench: the digital multimeter (DMM). This single tool gives you a few solid ways to test capacitors, going beyond what you can see to get hard electrical data. Getting these techniques down is key to learning how to check a capacitor like a pro.
Before you touch any probes to a component, we need to talk about safety. Capacitors, particularly the bigger ones in power supply circuits, can hold a dangerous electrical charge long after a device has been unplugged.
Safety First: Always discharge a capacitor before you test it. The simplest way is to carefully short its leads with an insulated screwdriver. For bigger caps, a dedicated discharge tool with a built-in resistor is safer. Skip this, and you risk a nasty shock or frying your multimeter for good.
Once you’re absolutely sure the capacitor is discharged and safe to handle, you can get to testing.
The Direct Capacitance Measurement Method
For a quick health check, the capacitance mode on your multimeter is your best friend. It’s designed to give you a straight-up reading of a capacitor's value, which you can immediately compare to the numbers printed on its casing.
In repair workshops across Australia, the DMM's capacitance mode is the go-to for fast diagnostics. Technicians just dial it into the 'capacitance' setting, connect the probes, and get a reading. For the fast-paced mobile repair industry in places like Brisbane, Sydney, and Melbourne CBDs, this method is a lifesaver. It’s quick, requires minimal training, and gets you an answer in seconds—perfect for high-volume work. You can find more technical details on this method in Keysight's technical guide.
Here's how to do it:
- Turn your multimeter dial to the capacitance symbol (-|(–).
- For a clean reading, make sure the capacitor is out of the circuit.
- Connect the red probe to the positive lead (anode) and the black probe to the negative (cathode). For non-polarised ceramic caps, orientation doesn’t matter.
- Give the reading a moment to settle. The value you see is its measured capacitance, usually shown in microfarads (µF), nanofarads (nF), or picofarads (pF).
Now, compare that number to the value printed on the capacitor itself. Most caps have a tolerance rating (like ±10% or ±20%). If your reading is way off, you've probably found your dead component.
Resistance and Continuity Tests for Deeper Insights
While the capacitance mode is great for a quick pass/fail, it doesn't tell the whole story. A capacitor can read the correct capacitance value but still be faulty because of an internal short or a break. That’s where resistance and continuity tests come in handy, especially if your multimeter doesn’t have a capacitance function.
To run a resistance test:
- Set your DMM to a high resistance range (something like 200kΩ or higher).
- Connect the probes to the capacitor leads (pay attention to polarity for electrolytics).
- What you should see is the resistance value starting low and then climbing steadily as the multimeter's internal battery charges the capacitor.
A healthy capacitor does exactly this, with the resistance eventually hitting "OL" (over limit) or infinity. If the reading just sits at zero, the cap is shorted. If it immediately jumps to "OL" and stays there, it’s open. This charging behaviour is a classic sign of a good cap. For a deeper dive into a related diagnostic skill, check out our guide on how to test continuity with a multimeter.
Practical Application: Checking a Filter Capacitor
Let's put this into a real-world context. Imagine you're troubleshooting a Samsung tablet that refuses to power on—a common job for our team that handles iPhone Repairs Brisbane. A visual inspection shows nothing obvious, so you start suspecting an issue on the main power rail.
Pulling up the board schematics, you pinpoint a 100µF tantalum filter capacitor. You desolder it to test it out-of-circuit. First, you hit it with the capacitance mode on your multimeter. The reading settles at 95µF, which is perfectly fine for a cap with a ±10% tolerance.
But then you switch to resistance mode. You connect the probes, and the reading jumps to 1.5Ω... and just sits there. It doesn't climb. That's the smoking gun. A good capacitor should charge up towards infinite resistance, but this low, steady reading points to an internal leakage or a partial short.
Even though its capacitance value looked "good," the capacitor is definitely bad and is likely the reason the power rail is being pulled down. This two-step process—checking both capacitance and resistance—gives you a far more reliable diagnosis than just one test alone. It’s this methodical approach that helps you nail those tricky faults. After mastering capacitor testing, you can apply similar logic to other components, like learning how to test an RV converter.
Advanced Testing Techniques for Professional Technicians
When a basic multimeter test just doesn't cut it, it’s time to pull out the specialised gear. For any technician aiming for dead-on diagnostic accuracy, a multimeter is only the starting point. The best repair shops rely on more sophisticated tools to hunt down those sneaky, intermittently failing capacitors that cause the most headaches.
Getting your head around these advanced techniques is what separates a good tech from a great one. It’s how you solve those complex, board-level mysteries that other people might just write off as unfixable.
The Power of ESR Testing
One of the most revealing measurements you can take is Equivalent Series Resistance (ESR). You can think of ESR as the capacitor's own internal resistance. In a perfect world, this would be zero, but in reality, every capacitor has a tiny bit of resistance built-in.
A low ESR is absolutely critical, especially for capacitors in high-frequency circuits like the power supplies in MacBooks or the main power rails on a smartphone. These components have to charge and discharge thousands of times a second. If the ESR creeps up, the capacitor can't dump its charge fast enough, causing it to overheat and leading to system instability or total failure.
Here’s the kicker: a capacitor can have a dangerously high ESR while still showing a perfectly "good" capacitance reading on a standard multimeter. This is where a dedicated ESR meter becomes an essential bit of kit. It’s designed specifically to measure this internal resistance, letting you pinpoint faulty components that would otherwise fly completely under the radar.
Using an ESR Meter in Practice
An ESR meter works by sending a small AC signal (usually around 100kHz) through the capacitor to measure its impedance. The beauty of this is that you can often test capacitors while they are still in the circuit, which is a massive time-saver.
Let's look at a real-world scenario:
- The Problem: A MacBook keeps randomly shutting down when it's under a heavy load. You test the main filter capacitors on the CPU power rail with a multimeter, and their capacitance looks fine.
- The ESR Test: You grab your ESR meter and test the same capacitors in-circuit. Most of them give a healthy reading of 0.05Ω, but one stands out with a reading of 0.8Ω.
- The Diagnosis: That single high-ESR capacitor isn't filtering the power supply properly when the CPU demands a sudden burst of current. This causes a voltage drop that triggers the shutdown. Swapping out that one component fixes the issue completely.
A low ESR reading is a sign of a healthy capacitor, especially in power circuits. A high reading, even if the capacitance value is correct, points directly to a failing component that needs replacement.
Gold Standard Diagnostics: Electrochemical Impedance Spectroscopy
For the absolute highest level of precision, technicians and engineers turn to even more advanced methods. In Australia's high-precision electronics labs, Electrochemical Impedance Spectroscopy (EIS) is the go-to for analysing complex capacitor systems. According to technical standards, EIS is the best method for measuring the ESR of supercapacitors, and it can also assess capacitance values and other non-ideal behaviours. For repair shops and DIYers working on modern mobile devices, it’s crucial to understand that different testing methods can give different results.
To see how this data is presented in a lab setting, you can explore the full technical application notes from Gamry.
This infographic breaks down the core workflow for a standard multimeter test, covering the essential steps of discharging, testing, and reading the results.
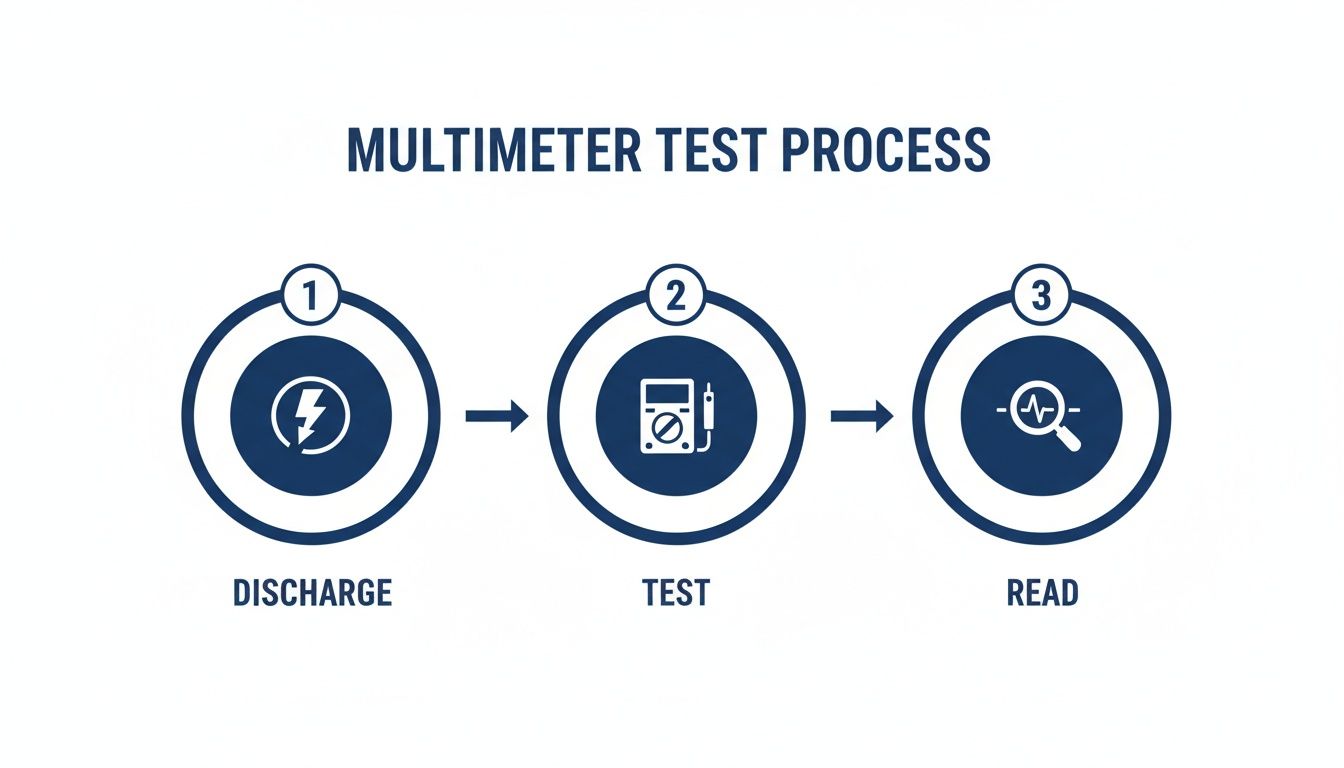 alt="An infographic outlining the three key steps to test a capacitor with a multimeter: discharge, test, and read the results."
It’s a great reminder that safety (discharging) is always the first step, protecting both you and the equipment from any unexpected jolts.
While you probably won't have an EIS setup in your workshop, knowing about these gold-standard methods gives you valuable context. It underscores why a simple multimeter reading is just one piece of a bigger puzzle. Investing in a good ESR meter is a practical next step that can seriously boost your repair success rate, bringing your workshop's capabilities that much closer to a professional diagnostic standard.
Interpreting Your Results and When to Replace
Getting a reading from your meter is a great start, but it's only half the battle. The real skill is turning that raw data into a confident repair decision. Knowing how to correctly interpret your results is what translates all that diagnostic effort into a successful fix, stopping you from replacing perfectly good components or leaving faulty ones on the board.
This final step is where you connect the dots between the numbers on your screen and the health of the capacitor. It’s about understanding not just what the values are, but what they mean in the context of the circuit you're working on.
Understanding Capacitance Tolerance
When you measure a capacitor, the reading will rarely match the value printed on its body exactly. That's perfectly normal. Every capacitor is manufactured with an acceptable range of error, known as its tolerance. This is usually marked with a letter code or a percentage, like ±10% or ±20%.
Take a 100µF capacitor with a ±20% tolerance, for example. It’s considered perfectly healthy if its measured value falls anywhere between 80µF and 120µF.
- Rated Value: 100µF
- Tolerance Value: 20% of 100µF = 20µF
- Acceptable Range: 80µF to 120µF
If your measurement falls outside this calculated range, the capacitor has drifted out of spec and it's time to replace it. A value significantly lower than the minimum means the cap is losing its ability to hold a charge. A much higher value is unusual, but it also points to an internal failure.
What Your Meter Readings Really Mean
Beyond simple capacitance, different tests reveal specific, and often disastrous, failure modes. A shorted capacitor is a common culprit in no-power situations, as it creates a direct path from a power line to ground and effectively kills the entire circuit.
Here’s a quick guide to what your meter is telling you:
- Shorted Capacitor: On a multimeter’s continuity test, you'll get a continuous beep and a resistance reading near zero ohms. This is a dead short. The component is toast.
- Open Capacitor: In resistance mode, the reading will immediately jump to "OL" (over limit) without the slow, steady climb you'd expect from a healthy capacitor charging up. In capacitance mode, it will read zero or a very low, unstable value.
- High ESR: An ESR meter reading that's way higher than the standard for that capacitor type and voltage rating points to a failing component. While there isn't one universal "bad" number, comparing a suspect capacitor to a known good one or consulting an ESR chart can confirm the fault.
A critical pitfall to watch for is in-circuit testing. When a capacitor is still on the board, other components connected in parallel can seriously skew your results, often making a bad cap look good. For a definitive diagnosis, you've got to desolder the component and test it out of circuit.
Making the Final Call to Replace
So, when do you pull the trigger and replace a capacitor? The decision should be based on a combination of what you see and what your meter tells you.
You should replace a capacitor if it meets any of these conditions:
- Obvious Visual Damage: Any bulging, leaking, or physical cracks are non-negotiable signs of failure. Don't even bother testing it—just replace it.
- Out-of-Tolerance Capacitance: The measured value is significantly above or below the manufacturer's specified range.
- Shorted or Open Circuit: The component fails a basic resistance or continuity test.
- High ESR: The Equivalent Series Resistance is too high, especially in power-critical applications like power supplies or filter circuits.
Confidently identifying a faulty capacitor is a massive step forward in any electronics repair. It moves you from guesswork to precision diagnostics, which is essential for tackling complex issues in devices from iPhones to MacBooks. The ability to correctly interpret these test results is a cornerstone skill for any technician providing professional iPhone Repairs Brisbane.
If you've identified a tricky board-level fault and need an expert hand, don't hesitate to reach out. Book your repair with Screen Fixed Brisbane today and let our experienced technicians get your device back to peak performance.
Disclaimer: Screen Fixed is an independent repair service and is not affiliated with Apple, Samsung, Google, or any other third-party brands mentioned. All trademarks are the property of their respective owners.