
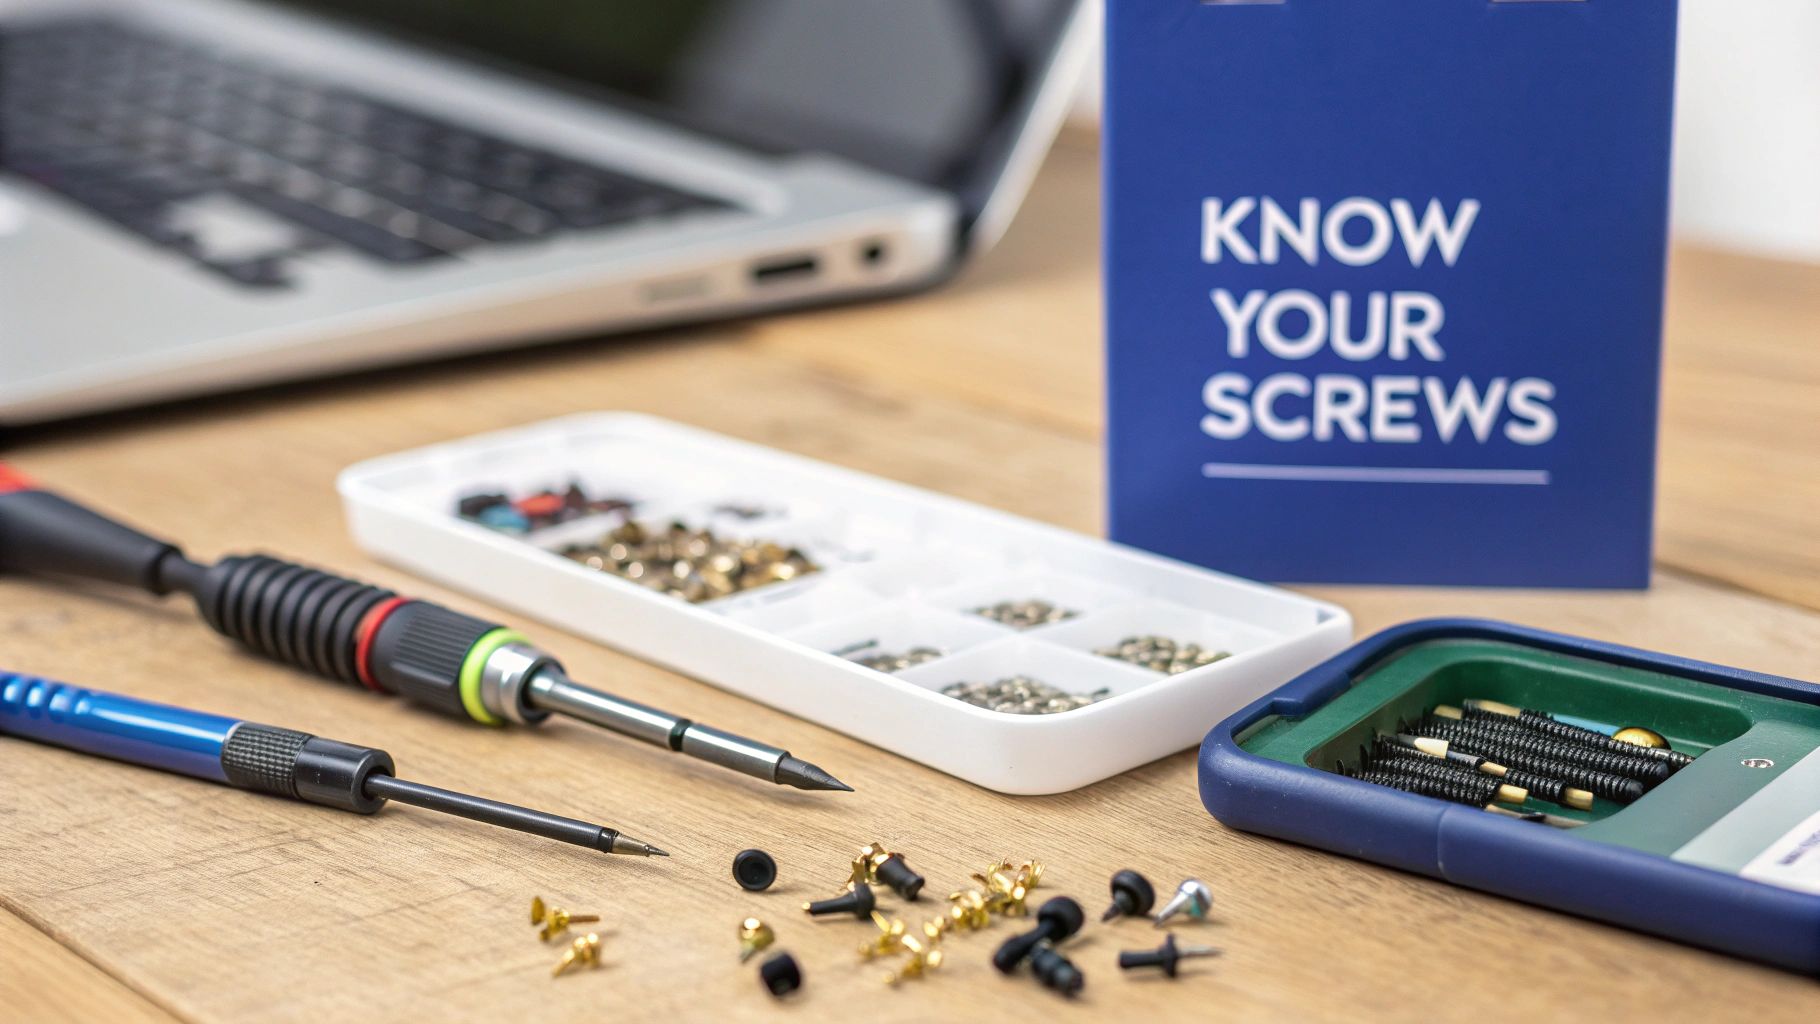
Ever tried to fix a smartphone and been stopped in your tracks by a tiny, weird-looking screw? You're not alone. Using the wrong screwdriver on a specialised screw is a recipe for disaster, often leading to a stripped head that turns a simple repair into a costly nightmare.
The world of electronics is held together by a surprising variety of screw drive types, and using the right tool for the job is the first step to any successful fix. This guide will walk you through the different screws you'll encounter, explaining why your trusty old Phillips screwdriver isn't always going to cut it and how to tackle the job like a pro.
Why Matching Screw Types Matters
Trying to use the wrong screwdriver on a tiny, specialised screw is like trying to open a lock with the wrong key—all you get is frustration and damage. In fact, the number one cause of a stripped screw head is a mismatched driver, which can turn a five-minute task into a massive headache.
For any successful repair, the very first step is to correctly identify the screw drive and grab the perfectly matched tool. This is non-negotiable, whether you’re a DIYer tackling a screen replacement at home or a pro technician handling complex internal repairs. Getting to know the difference between these tiny fasteners is the foundation of good repair work.
Your Guide to Screw Drive Types
This guide will walk you through the most common—and the most secure—screw drive types you’ll find in mobile phones, laptops, and other gadgets. We'll get into:
- Common Screw Heads: From the classic Phillips to the more robust Torx.
- Security Screws: The reasons why companies like Apple use strange Pentalobe and Tri-Point screws.
- Best Practices: How to avoid stripping screws and what to do when you run into one that just won't budge.
By the end of this, you'll be able to spot these tiny components with confidence. Knowing your fasteners is a huge part of many common jobs, something we touch on in our overview of https://www.fixo.com.au/blogs/news/mobile-phone-repairs. And if you want to see just how many different types are out there, check out DigitalRC's comprehensive collection of screws for some real-world examples.
When you picture a screw in your head, you're probably thinking of one of these three. They’re the old guard, the classics that form the foundation of fasteners. You'll still find them in plenty of electronics, even if they're tucked away inside. Getting to know their unique quirks—their strengths and weaknesses—is the first real step in any successful repair.
The Classics: Phillips, Pozidriv, and Slotted Screws
The oldest of the bunch is the simple Slotted drive, defined by that single, straight line. While it looks straightforward, it's notorious for letting your screwdriver slip out, especially when you apply a bit of force. This makes it a risky choice for delicate circuit boards or brittle plastic cases where one slip could cause a whole lot of damage.
Phillips: The Global Standard
That iconic cross-shaped Phillips head was a clever fix for the Slotted drive's slipping problem. It was designed to "cam out," which is a fancy way of saying the screwdriver tip intentionally pushes itself out of the screw when it gets too tight. This was a brilliant feature for automated assembly lines because it stopped machines from over-tightening and breaking things.
For repair work, though, this feature is more of a headache. It's the very reason Phillips heads are so easy to strip if you push too hard. You'll still find them holding down brackets and other chunky components inside older laptops and game consoles. Industry analysis shows that modern Torx screws, for instance, reduce cam-out by 45% compared to Phillips, making them far better for high-torque situations. You can dig deeper into these trends by checking out the latest findings on the screwdrivers market report.
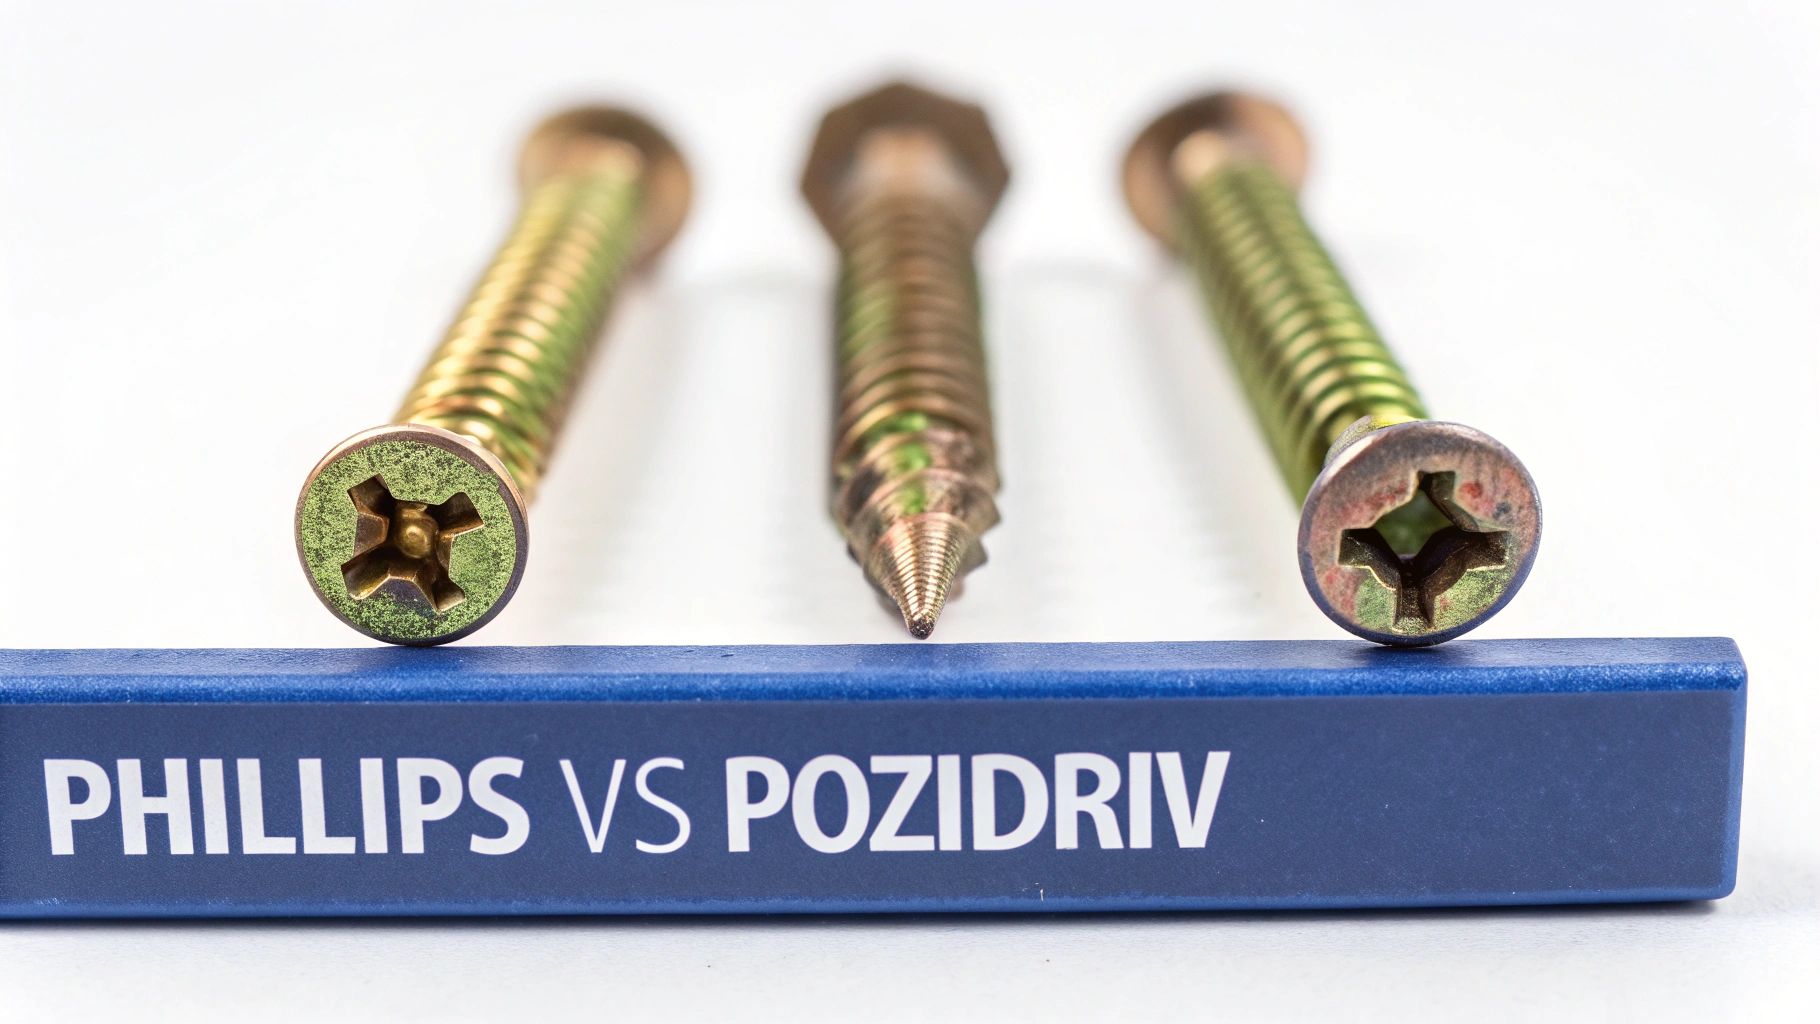
Pozidriv: An Important Upgrade
At a quick glance, a Pozidriv screw looks just like a Phillips. But look closer, and you'll spot the critical difference: a second, much smaller set of "wings" etched between the main cross shape.
This tiny design tweak makes a massive difference. Those extra contact points give the driver a much more solid grip, drastically reducing the chance of cam-out and letting you apply more torque safely.
Trying to use a Phillips driver in a Pozidriv head is one of the most common mistakes in the book, and it almost always ends in a stripped, unusable screw. Before you start turning, always check for those extra little lines. It’s a small detail that can save you a world of frustration.
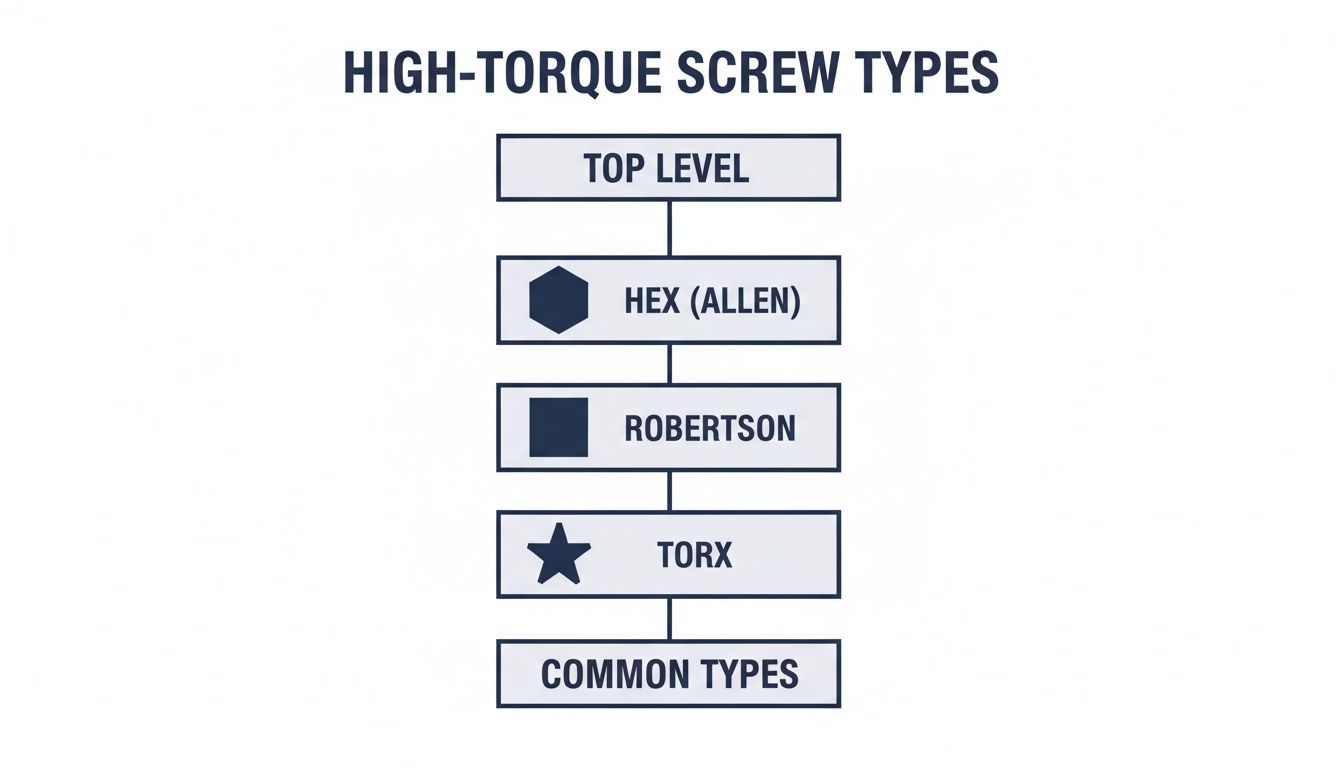
When the delicate touch of a Phillips head just isn’t going to get the job done, it's time to bring in the heavy hitters. High-torque fasteners are designed around one simple idea: maximising the contact between the driver bit and the screw itself. This bit of physics lets you apply a whole lot more force without the driver slipping and rounding out the screw head.
This family of screw drives is built for security and strength. You’ll find them all over modern electronics where components need to be locked down tight with zero room for movement. Three designs, in particular, lead the pack.
The Hex or Allen Drive
You've almost certainly come across the hexagonal recess, better known as an Allen drive. It’s everywhere, from assembling flat-pack furniture to securing the casings on laptops. Its six points of contact give you a solid, dependable grip that spreads the turning force out evenly.
This even distribution is the secret to avoiding the stripping that so often plagues simpler screw types. The main drawback, though, is that the sharp corners on the driver can wear down over time, especially with cheaper tool sets. This leads to a sloppy fit and, eventually, potential damage to the screw head.
The Robertson or Square Drive
Next up is the Robertson drive, which features a square-shaped socket and is a massive favourite in manufacturing and construction in some parts of the world. Its real genius is in its slightly tapered design, which has a self-centring effect.
What this means is the driver literally “wedges” itself into the screw head. This creates an incredibly secure, non-slip fit that even allows for one-handed operation. While you won't see it as often in tiny electronics, its remarkably efficient and stable design paved the way for the high-torque drives we rely on today.
The Robertson's ability to cling to the driver bit was a genuine game-changer for production lines. It proved how simple tweaks to geometry could massively boost efficiency and cut down on fastener damage.
The Torx or Star Drive
The true star of modern electronics, without a doubt, is the Torx drive. That unmistakable six-pointed star shape delivers the best of all worlds: it has plenty of contact points, no sharp internal corners that can wear out, and a design that all but eliminates the risk of the driver camming-out.
This makes it the go-to choice for locking down sensitive and valuable parts in devices like MacBooks, game consoles, and high-end smartphones. It allows technicians to apply precise, high levels of torque without worrying about a slip that could wipe out a nearby component on a motherboard.
The aerospace fasteners market in Australia makes heavy use of specialised drive types like Torx and Hex, and this has influenced the kinds of high-precision tools that cross over into the electronics repair world. You can find out more about these industry trends by reading up on the development of aerospace fasteners.
A common variation you’ll run into is the Security Torx, which has a small pin right in the centre of the star recess. This needs a special driver with a matching hole, which acts as a simple but effective anti-tampering measure—a must-have feature for any professional repair shop doing iPhone repairs in Brisbane or anywhere else.
The Security Specialists: Pentalobe And Tri-Point
If you've ever thought about diving into an Apple repair, you've probably realised it's a whole different ball game. The familiar Phillips and Torx screws you see everywhere else are nowhere to be found. Instead, you'll come face-to-face with two security specialists designed to keep you out: the Pentalobe and the Tri-Point.
These aren't your Bunnings-variety fasteners. They were put there for a reason—to stop untrained hands from getting into delicate electronics and causing more harm than good. Trying to open an iPhone or MacBook without the right drivers for these is a surefire recipe for a stripped screw and a much bigger headache.
The Pentalobe: The Five-Pointed Gatekeeper
Take a look at the bottom of almost any iPhone, right by the charging port. Those two tiny screws with the five-pointed star pattern? Those are Pentalobe screws. They're Apple's first line of defence, holding the external casing together on everything from iPhones to the latest MacBooks.
Their unique shape makes them impossible to grip with a standard flathead or Phillips. These screws are also notoriously shallow, so trying to force it with the wrong tool will instantly shred the head. This can turn a simple battery swap into a nightmare repair. You absolutely need a precision-matched Pentalobe driver; there's no way around it.
The Tri-Point: The Internal Guardian
Once you get past the outer Pentalobe screws and lift the screen, you'll meet the next layer of security: the Tri-Point screw. Often called a Y-type, this fastener has three wings and is used to lock down critical internal parts.
You'll spot Tri-Point screws securing the small metal shields that cover the battery, display, and other sensitive connectors. These parts are crucial to the phone's operation, and the screws make sure they stay put, even if the device takes a tumble. For a closer look, our guide on Pentalobe screwdrivers for iPhone and Macbook repairs gets into the nitty-gritty.
Using the wrong driver on a Tri-Point screw is asking for trouble. Their shallow, three-winged design gives a screwdriver very little to grab onto, making them incredibly easy to strip. Once they're stripped, getting them out requires specialised tools and a lot of patience.
You can see how drives like Hex, Robertson, and Torx are built for superior torque. In contrast, security screws like Pentalobe and Tri-Point are intentionally designed to fail under high torque to prevent forced entry. They prioritise security over strength, which is why having the exact, specialised tool is non-negotiable for a successful repair.
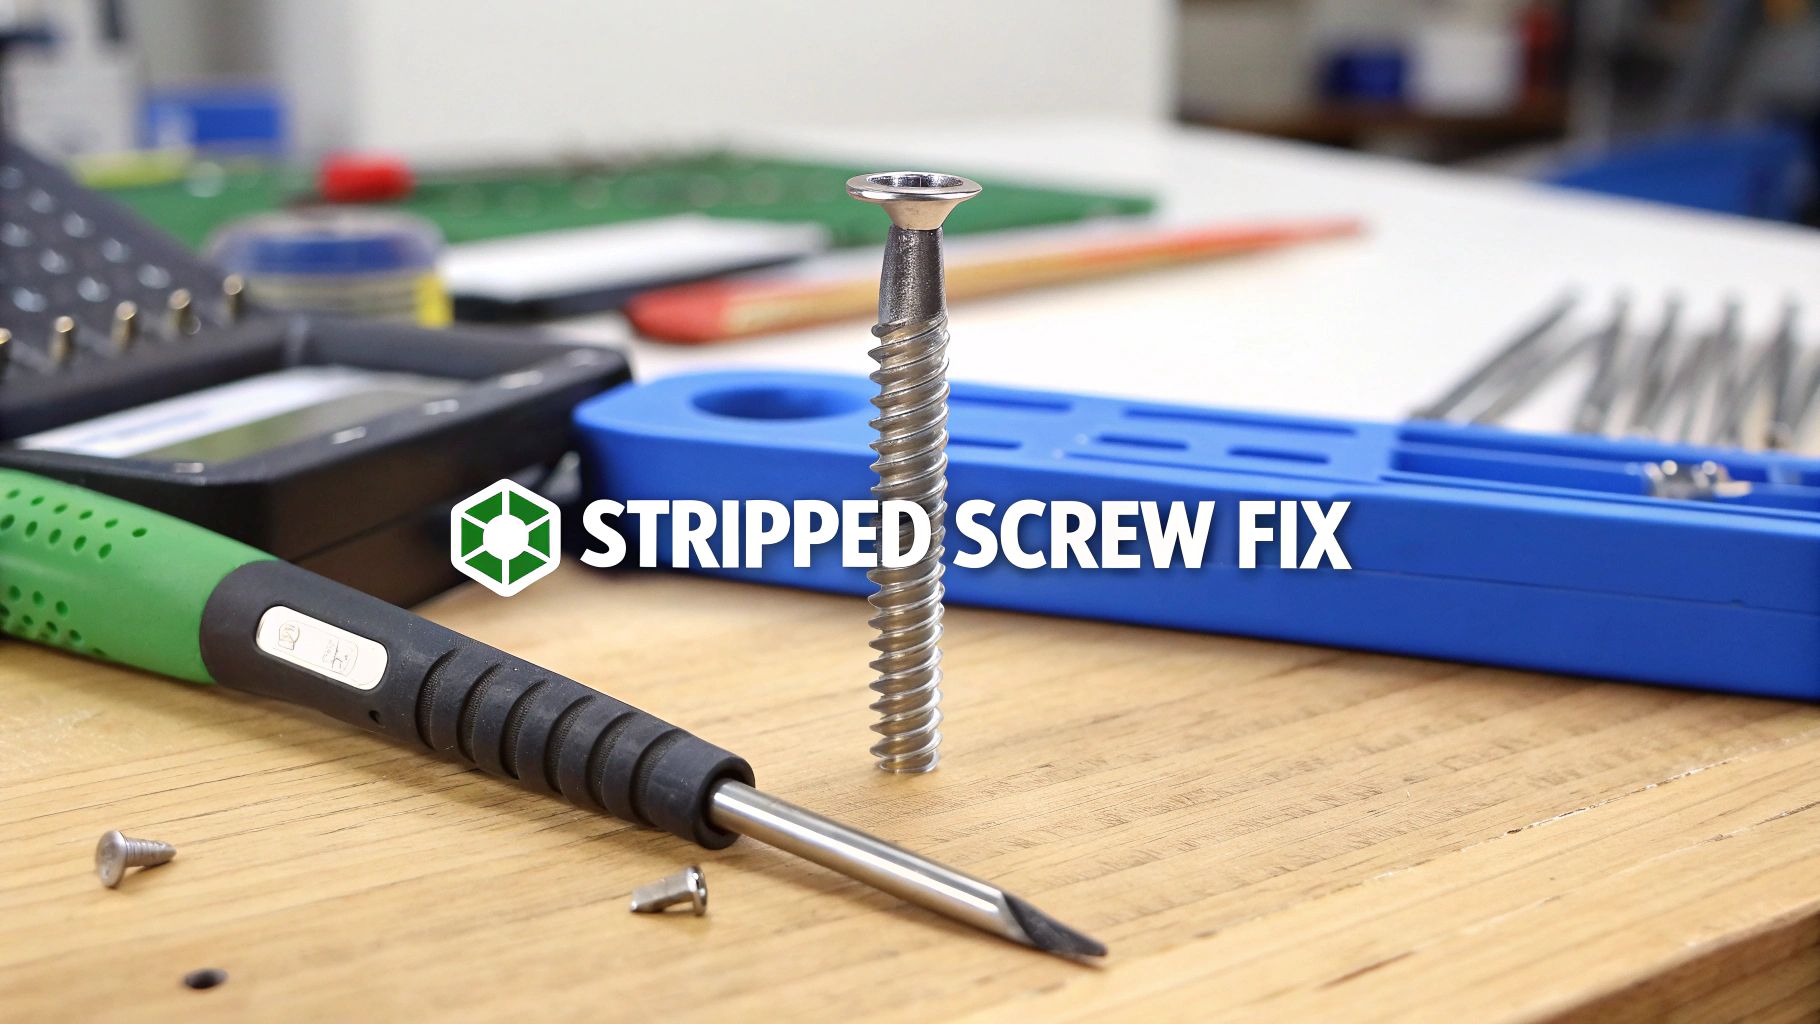
How to Handle Stripped and Stubborn Screws
Knowing your screw drive types is one thing, but theory flies out the window the second you hit a real-world snag. Nothing stops a repair dead in its tracks faster than a screw that’s stripped, seized, or just flat-out refuses to budge. This is where a bit of patience and the right technique can save you from turning a simple job into a complete disaster.
Before you jump to the heavy-duty solutions, there are a few simple tricks that can often give you the extra grip you need. The idea behind these methods is to fill the damaged recess in the screw head, giving your screwdriver bit something to properly grab onto.
First-Aid for a Stripped Screw
The moment you feel that gut-wrenching slip of the driver, stop what you’re doing. Pushing through will only grind away more metal and make the problem worse. Instead, take a breath and try one of these low-risk techniques to get things moving again.
- The Rubber Band Trick: This one’s a classic for a reason. Place a small piece of a wide rubber band over the stripped screw head. Press your screwdriver firmly into the band and turn slowly and deliberately. The rubber compresses into the stripped gaps, often providing just enough friction to catch and turn the screw.
- Apply Firm, Downward Pressure: A lot of the time, stripping happens simply because the screwdriver isn't seated properly. Make sure the bit is the correct size, press down firmly into the screw with your body weight, and then apply slow, consistent turning force. This prevents the driver from camming out and further mangling the head.
- Try a Slightly Larger Bit: Sometimes, going up one bit size can make all the difference. For example, if a PH0 bit is slipping, a slightly larger PH1 might just be able to bite into the damaged metal where the original couldn't. Just be careful not to use excessive force, as this can worsen the stripping if it doesn't catch.
When Simple Tricks Aren’t Enough
If that little monster still won't budge, it's time to escalate your tactics. These next steps require a bit more care—and sometimes specialised tools—but they're your last line of defence before you have to drill the screw out entirely, which is a job best left to the pros.
A dedicated screw extractor is an absolute lifesaver here. These are special bits with reverse threads that are designed to dig into a damaged screw head as you turn them anti-clockwise. The more you turn, the deeper they bite, giving you a powerful grip to remove even the most butchered screws.
The real key to successful screw removal is patience and control. Rushing or using brute force is usually what causes the damage in the first place. Slow, steady, and firm pressure is almost always the answer.
We've put together a quick guide to help you decide which method to try first when you're faced with a stubborn fastener.
Troubleshooting Stripped and Seized Screws
| Method | Description | When to Use | Risk Level |
|---|---|---|---|
| Rubber Band | Place a rubber band over the screw head before inserting the driver to add grip. | For slightly stripped screws where the bit just starts to slip. | Very Low |
| Firm Pressure | Apply strong downward force while turning slowly to keep the bit seated. | When the bit is camming out but the screw head isn't completely rounded. | Low |
| Larger Bit Size | Use the next size up of the same driver type (e.g., PH1 instead of PH0). | For moderately stripped screws where the original bit no longer engages. | Low |
| Screw Extractor | A specialised, reverse-threaded bit that bites into the damaged head. | For badly stripped screws where no standard bit can find purchase. | Medium |
| Drilling | Completely drilling out the centre of the screw to destroy it. | As a last resort when the screw is completely mangled or seized. | High |
Always start with the least invasive method and work your way up. With the right approach, you can conquer even the most difficult screws without damaging your device.
Finally, for any repair, staying organised is non-negotiable, especially when you're dealing with lots of different screw types. A magnetic mat is a godsend, letting you map out exactly where each screw came from. This simple step eliminates guesswork during reassembly and is a hallmark of professional repair work, whether you're a DIY enthusiast or a dedicated service like Screen Fixed Brisbane.
Finding the Right Tools for the Job
Now that you have a solid handle on all the different screw types you'll encounter, the next logical step is getting the right tools for the job. Investing in a proper, high-quality screwdriver kit is one of those non-negotiable things for anyone serious about DIY repairs. It’s often the deciding factor between a smooth, successful fix and a frustrating, stripped-screw disaster.
When you're shopping for a kit, your first priority should be the quality of the metal. Look for bits made from tough, durable materials like S2 steel. Cheaper, softer metals might save you a few dollars upfront, but they wear down incredibly fast, which is the fast track to stripping a screw and damaging the very device you're trying to fix. A professional-grade kit will also have thoughtful design features that make working on tiny electronics so much easier.
What to Look for in a Repair Kit
A really good toolkit is much more than just a box full of bits. You'll want to look for these key features that can seriously streamline the repair process:
- Ergonomic Spinning Handle: This lets you apply precise, one-handed control when you're dealing with those impossibly small screws.
- Magnetic Tips: Absolutely essential for holding onto minuscule fasteners. It prevents them from falling and getting lost forever inside a device.
- Comprehensive Bit Set: Make sure the kit has all the modern essentials, especially Pentalobe, Tri-Point, Torx, and a good range of Phillips sizes.
A well-made tool just feels right in your hand—it’s balanced, solid, and gives you that crucial tactile feedback. This is what allows you to apply just the right amount of force without overtightening or stripping a delicate screw.
For anyone keen to tackle their own projects, a purpose-built smartphone repair tool kit is the way to go, as it bundles all these critical components into one package. Once you've got your tools, it’s also a great idea to check out some effective ways to organize garage tools to keep your workspace tidy and efficient.
Common Questions About Screw Drive Types
Even with a comprehensive guide, there are always a few questions that pop up more than others. Here are some quick-fire answers to the most common queries we hear from fellow repair enthusiasts and professionals.
What's the real difference between Phillips and Pozidriv screws?
At first glance, they look almost identical, but the devil is in the details. A Phillips head has a simple four-point cross, designed to let the screwdriver slip out (or 'cam-out') when too much torque is applied. A Pozidriv, on the other hand, has the same four main slots but also features four smaller ribs in between. These extra contact points give it a much better grip, reducing the risk of slippage. Trying to use a Phillips driver in a Pozidriv screw is one of the most common repair mistakes—it’s a one-way ticket to a stripped head.
Why do companies like Apple bother with special screws?
It really boils down to two things: security and control. When companies like Apple use proprietary screws such as the Pentalobe and Tri-Point, they're creating a barrier. It's a deliberate choice to discourage people without the right training from opening up devices and accidentally frying sensitive components. This approach ensures that repairs are, ideally, handled by qualified technicians who have the specialised tools needed to do the job without causing more damage.
What actually happens if I use the wrong size screwdriver?
Using the wrong screwdriver size is probably the quickest way to turn a simple job into a nightmare. If the bit is too small, it'll just spin uselessly inside the screw head, grinding away the metal until there’s nothing left for any driver to grip. If the bit is too big, it won't sit deep enough in the recess. The moment you apply any real force, it will slip and round off the edges of the screw head, leaving you in a similar, stripped-out mess.
The golden rule of repairs is simple: a perfect fit is non-negotiable. Taking a moment to match the bit size correctly saves you from the massive headache of dealing with a stripped screw later on.
What screwdrivers are essential for phone repair?
If you're just getting started with mobile phone repairs, you don't need a massive collection, but you do need the right tools for the job. Your go-to kit should definitely cover the main screw types found in today's devices.
Here's the essential lineup:
- Pentalobe (P2, P5): You simply can't open iPhones or MacBooks without these.
- Tri-Point (Y000): This one is crucial for getting at internal components in Apple watches and newer iPhones.
- Phillips (#000, #00): Still a workhorse for holding down various internal brackets and components in almost all electronics.
- Torx (T3-T6): Very common in Android smartphones and many laptops.
Understanding the different screw drive types is the first step towards a successful repair, but sometimes a job is best left to the experts. If you've run into a stripped screw or a repair that feels out of your depth, our team at Screen Fixed is here to help. Book your repair with Screen Fixed Brisbane today for fast, professional service you can trust.
Disclaimer: All third-party trademarks (including logos and icons) referenced by Screen Fixed remain the property of their respective owners. Unless specifically identified as such, Screen Fixed’s use of third-party trademarks does not indicate any relationship, sponsorship, or endorsement between Screen Fixed and the owners of these trademarks.