

Your TV still powers on. The standby light behaves normally, the remote gets a response, and audio may even be coming through the speakers. But the screen looks dead. That's the moment thoughts turn to pricing a replacement set, even though one of the most common faults is far narrower than “the TV is gone”.
A proper tv backlight repair starts before you buy a single strip, board, or tool. The expensive mistakes usually happen in the first hour. People assume the LEDs are bad, order the wrong parts, crack the panel during teardown, or discover too late that the fault sits elsewhere in the image path. The job is often repairable, but only if the diagnosis is disciplined and the economics make sense for that specific set.
Table of Contents
- Your TV Screen Is Black But You Still Have Sound
- Diagnosing the Black Screen of Death
- Gathering Your Tools and Sourcing the Right Parts
- The Teardown Process A Guide to Safe Disassembly
- Replacing the Backlight Strips and Testing Your Work
- Cost Analysis When to Repair and When to Replace
Your TV Screen Is Black But You Still Have Sound
If the TV has sound, reacts to the remote, and seems to boot normally, a failed backlight jumps high on the suspect list. The set may still be generating a picture, but you can't see it because the LCD panel no longer has illumination behind it. To the owner, it looks like total display failure. To a technician, it's a narrower fault until proven otherwise.
That symptom pattern matters because it's very different from a TV with no standby light, no boot response, and no audio at all. A fully dead set often points toward a power issue. A set with normal behaviour but a black screen often points toward the lighting system or the path that drives it.
Older TVs may use CCFL lighting, while most sets you'll see on the bench use LED strips. The repair logic is similar at the front end. Confirm whether the panel is producing an image first. Don't start with parts ordering.
If you're dealing with the classic “audio yes, picture no” complaint, this guide on TV has sound but no picture is a useful quick reference before you open the rear cover.
A black screen with working sound doesn't automatically mean the panel is dead. It often means the panel image is there, but the light behind it isn't.
The good news is that backlight faults are often more practical than full panel failure. The bad news is that access to the strips usually requires nearly complete panel disassembly. That's where the job stops being simple.
Diagnosing the Black Screen of Death
What the symptoms actually suggest
The first goal is diagnostic confidence. If you skip that and order strips because “it's probably the backlight”, you can waste time and money fast.
The standard checkpoint is the flashlight test. A repair guide explains that if you shine a flashlight close to the screen and can faintly see menu outlines or shapes, the LCD panel is still generating an image and the fault is likely in the backlight system. The same guide says proper diagnosis then moves to visual inspection, voltage testing at the driver section, and testing individual LED strips with a backlight tester. In tested examples, backlight circuits were operating around 60 volts, including 58.8 V and 59.1 V readings on two circuits, which is a good reminder that this isn't a low-risk toy repair (TV Parts Today's backlight diagnosis guide).
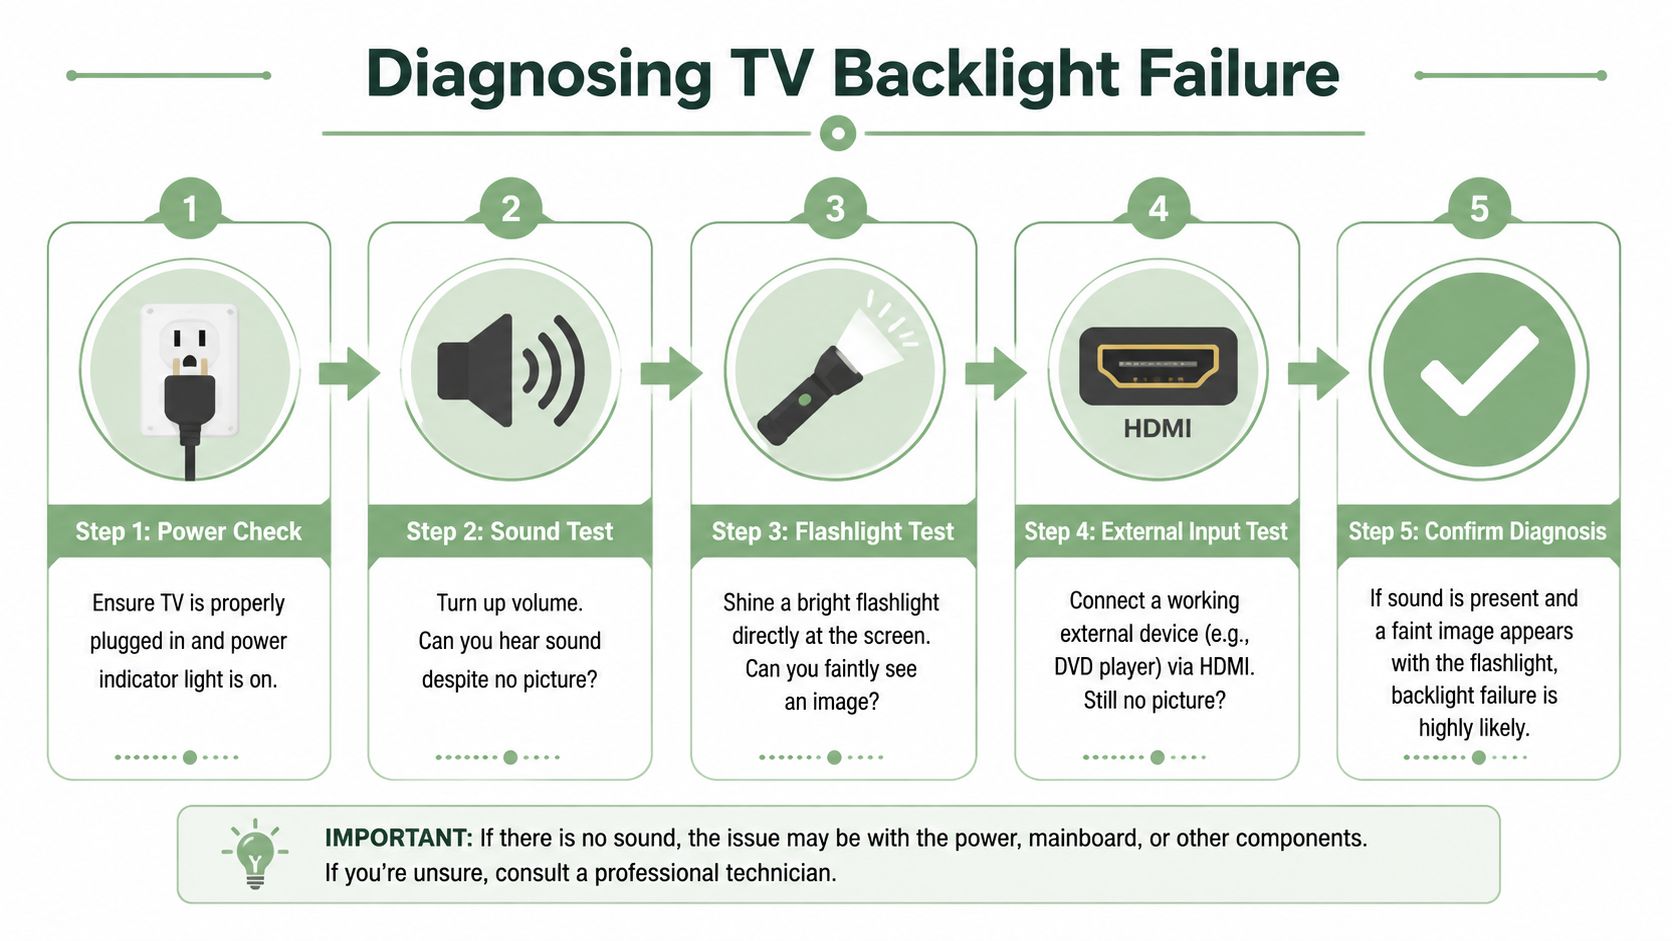
A failed main board can also leave you with no visible image. So can a signal-path fault. The difference is what the screen tells you when you actively test for a faint image.
A diagnostic workflow that avoids wrong parts
Use a sequence that rules things out in order:
-
Confirm basic power behaviour
Check that the standby light behaves normally and the set responds to the power button or remote. -
Listen for boot activity
Raise the volume. If there's sound, channel change noise, menu sounds, or input switching response, the TV is doing more than just sitting in standby. -
Perform the flashlight test
Shine a bright torch at close range across different areas of the screen while the set is on. Look for faint menus, icons, or movement. -
Check an external source
Feed the TV from a known-good HDMI source. If there's still no visible picture, don't assume the streaming box or input source is the fault. -
Move to internal testing only if the basics line up
Once the symptom pattern points toward backlight failure, open the set safely and test the backlight rail and strips.
For anyone new to meter work, this beginner's guide to using a multimeter is worth reviewing before you probe a live chassis.
A practical split looks like this:
| Symptom | Most likely direction |
|---|---|
| Sound present, faint image visible with flashlight | Backlight system |
| Sound absent, no faint image, no clear boot response | Main board, power, or broader fault path |
| Intermittent flicker before black screen | Often still worth checking backlight and driver path |
| TV powers but behaviour is inconsistent across tests | Stop guessing and verify board outputs |
Bench rule: If the flashlight reveals a picture, stop suspecting the LCD glass first. The image path is telling you it's alive.
Once you've confirmed the set is trying to display an image, the repair becomes a parts and handling problem, not a mystery.
Gathering Your Tools and Sourcing the Right Parts
A backlight job fails as often from poor preparation as from poor soldering or poor strip fitting. By the time the panel is out, you want every tool on hand and every part verified. Stopping halfway to guess a strip number is how diffuser sheets get dusty, mixed up, or creased.
Tools that make the job safer
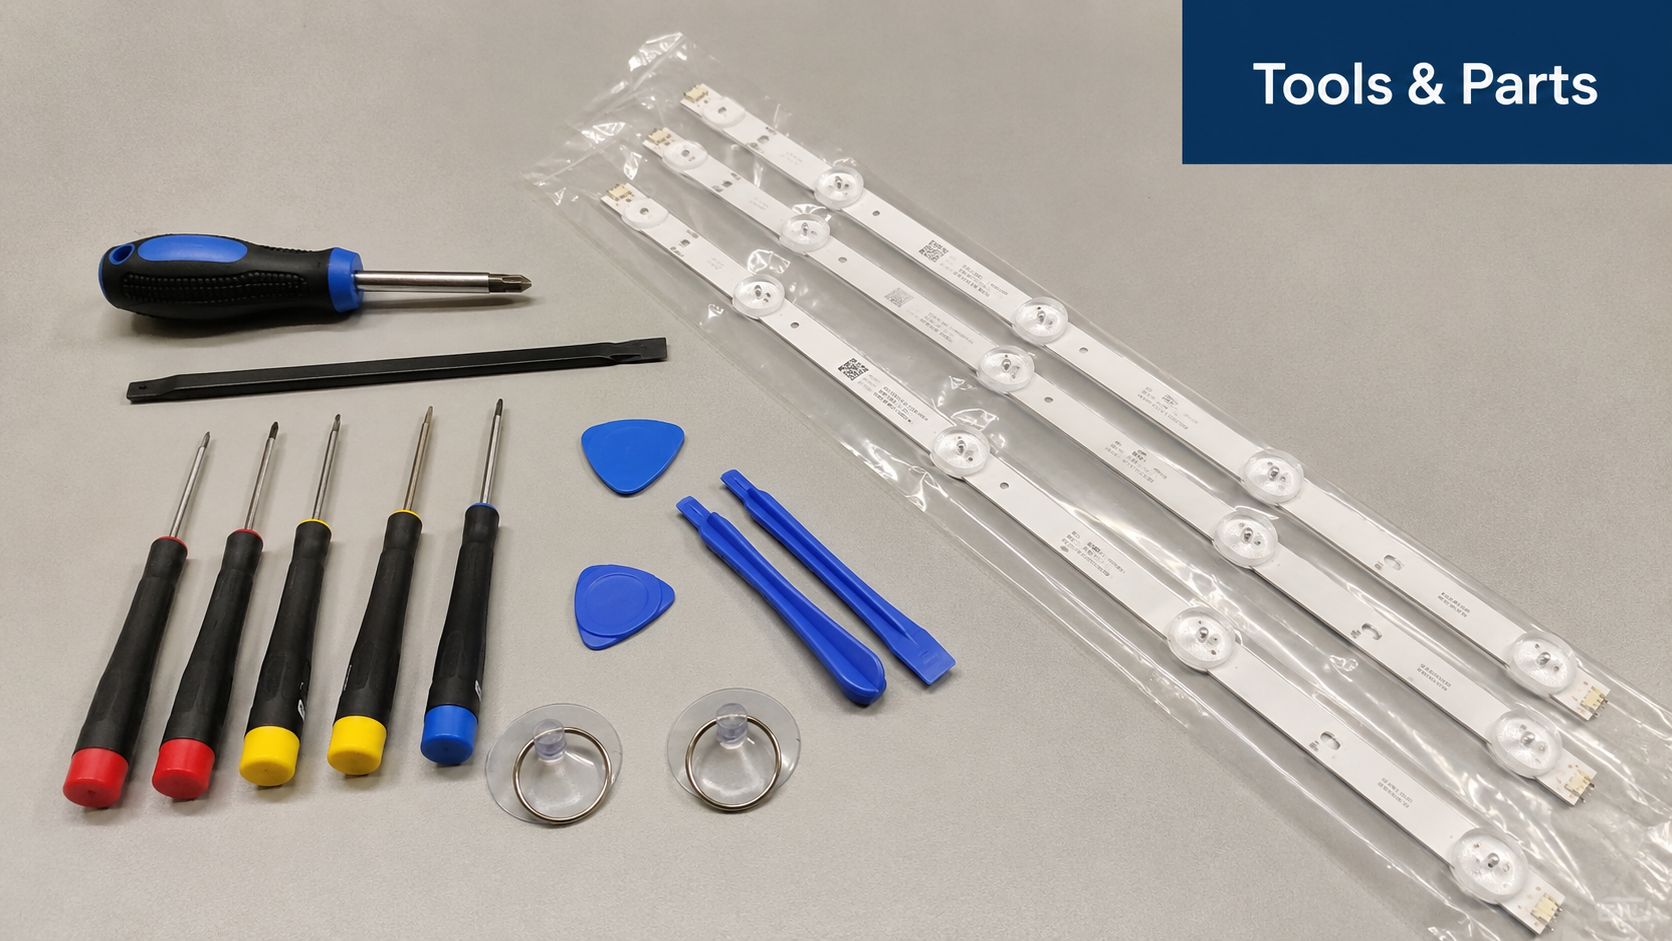
A capable DIYer can do this job without a full workshop, but a few tools move it from risky to manageable.
- Precision screwdrivers and drivers for rear cover screws, board screws, and frame fasteners.
- Plastic pry tools so you're not levering bezels and clips with metal blades.
- Containers or a screw map because TV screw lengths vary, and the wrong screw in the wrong spot can mark a panel or housing.
- A multimeter for basic continuity and rail checks.
- A dedicated backlight tester because it actively drives the LED string in a way a standard multimeter doesn't.
- Soft clean surface area large enough to support the panel flat.
- Gloves or finger cots if you want less chance of fingerprints on diffuser layers.
- Low-tack labels for left, right, top, and layer order.
If the set is large, suction cups and a second pair of hands help. The glass may survive careful handling, but flex is what kills it.
Parts matching is where many repairs go wrong
Strip replacement is not just “same size, same connector”. Repair guidance on part compatibility warns that technicians often need to test individual LEDs and verify polarity. It also notes that replacing a full strip can expose brightness mismatches or hidden thermal damage, and many consumer guides oversimplify the sourcing problem, especially in Australia (video discussion on LED compatibility and polarity).
That lines up with what shows up on the bench. Two strips can look nearly identical and still differ in connector orientation, lens position, polarity marking, or output characteristics. A strip that physically fits but doesn't match correctly can leave you with uneven illumination or a no-start condition.
Use this checklist before ordering:
- Model number first, strip number second. The TV model narrows it down, but the strip part number is the definitive match point.
- Check left and right positions. Some sets use mirrored strips or different end connectors.
- Confirm connector style and cable reach. Don't trust photos alone.
- Inspect for heat damage patterns. If multiple LEDs show stress, replacing the full set is usually safer than chasing one weak point.
- Avoid mystery mixed lots unless you're deliberately building a salvage repair and accept the trade-off.
If you can't verify the exact strip identity, pause the job. Ordering “close enough” parts is cheaper only until you open the panel twice.
The Teardown Process A Guide to Safe Disassembly
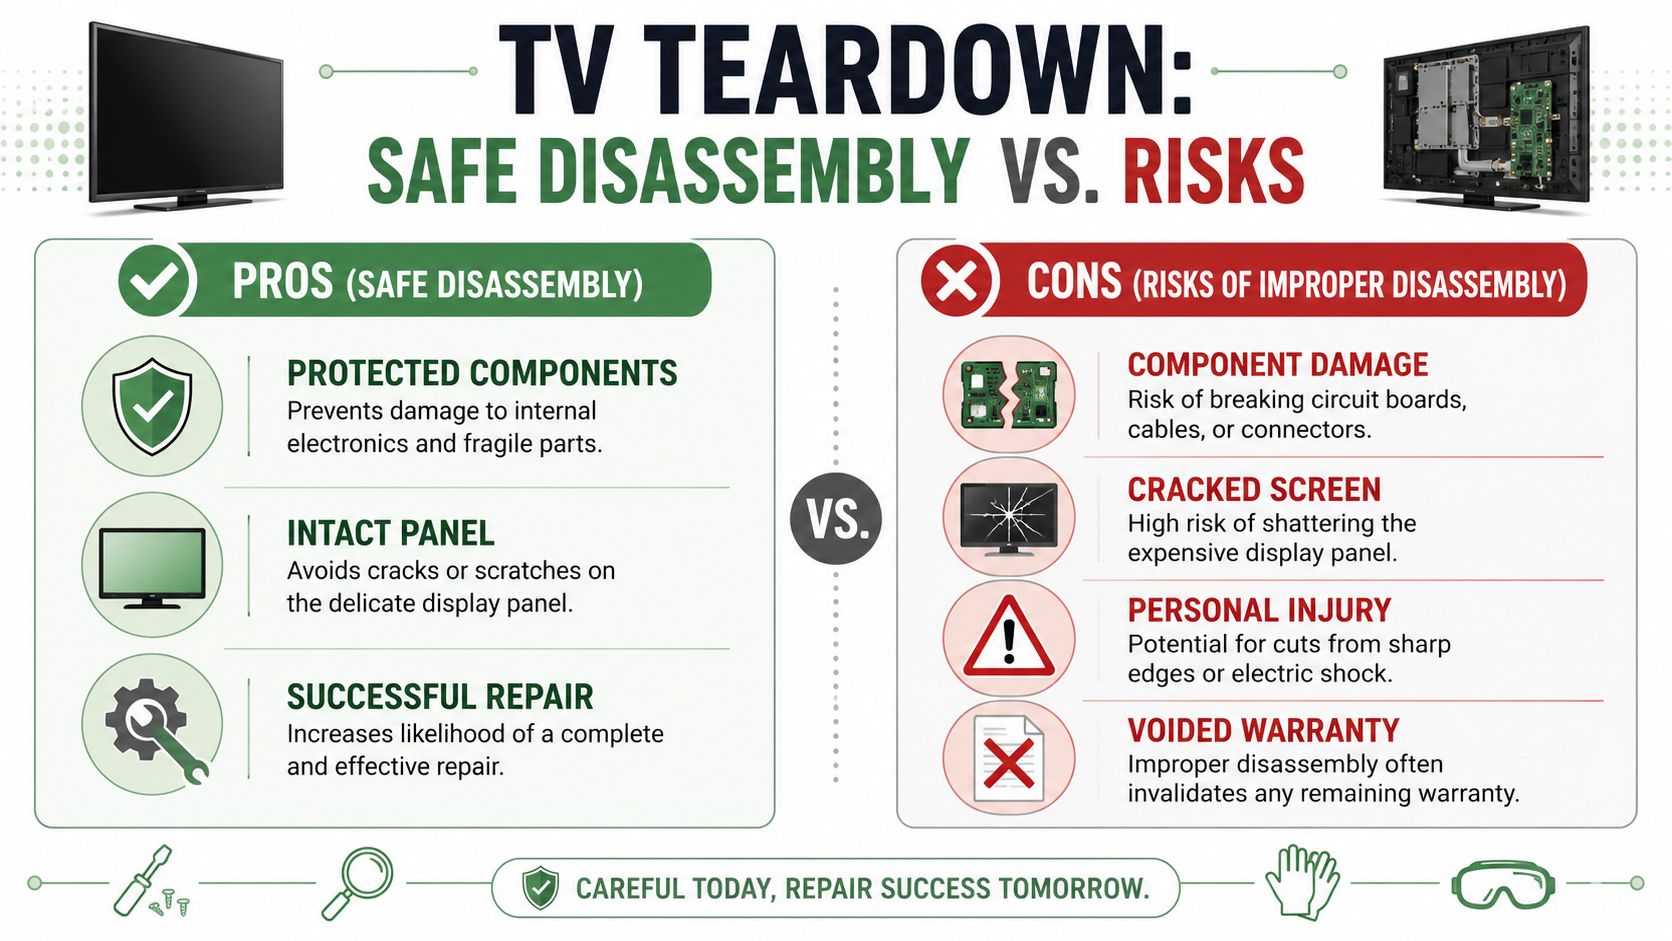
Due to mechanical challenges, most otherwise repairable TVs get turned into scrap. The electronics part is usually straightforward compared with the mechanical risk. A cracked LCD panel, scratched polariser, or creased diffuser layer can end the job immediately.
Before the panel comes out
Unplug the TV and give yourself room. Clear a clean bench or floor area large enough for the panel and the internal layers to sit flat. Remove the stand, rear cover, and any shielding carefully. Take photos as you go, especially before disconnecting ribbon cables and speaker leads.
At this stage, work like you expect to stop and resume tomorrow. Label connectors. Group screws by location. Don't rely on memory once the frame is off.
A practical order is:
- Remove rear cover and stand hardware
- Photograph all board and cable locations
- Disconnect speakers, Wi-Fi modules, keypads, and harnesses as needed
- Remove boards or brackets that block panel frame release
- Release the front bezel or retention frame without twisting it
Critical warning: Don't pry aggressively against the LCD stack. Pressure that feels minor at the edge can crack the panel or mark the layers underneath.
Guidance from an iFixit repair discussion highlights two common traps. One failed LED can disable an entire strip, so replacing only one obviously burnt LED may not be reliable. It also warns that prying the LCD stack or diffuser sheets too aggressively is a frequent cause of panel damage, turning a repairable TV into e-waste (iFixit discussion on broken TV backlights).
Handling the LCD stack without ruining it
Once the bezel or front retaining frame is off, the panel itself becomes the danger zone. Lift it evenly. Don't pick it up by one corner. Don't let it sag. If the panel is large, use two people.
Under the LCD glass or panel assembly, you'll usually find multiple diffuser and prism sheets. Their order and orientation matter. If you mix them up, flip one, or trap dust and fingerprints between layers, the TV may power on with poor uniformity even if the LEDs are perfect.
Use a simple handling routine:
- Mark one corner of the stack orientation before lifting layers.
- Keep the sheets flat on a clean surface.
- Don't separate layers unnecessarily if they can remain aligned as a pack.
- Avoid wiping unless needed because cleaning can scratch or introduce static dust.
The panel is often the most expensive part of the TV. Treat every movement around it as if replacement isn't an option.
Exposing the strips
With the optical layers removed, the reflector tray and LED strips are finally accessible. This is the point where people think the hard part is over. It isn't. Before you peel anything, inspect how each strip is mounted. Some are clipped, some use adhesive, and some use both.
Look for:
- Burn marks or darkened spots near failed LEDs
- Corrosion or residue around connectors
- Warped strip sections from heat
- Lens displacement that could create bright spots later
Test each strip individually with a backlight tester if you have one. If several strips are weak, replacing one strip can become a false economy. Uniformity depends on the whole array, not just whether one string lights.
Replacing the Backlight Strips and Testing Your Work
Strip replacement is simple only when the diagnosis was right, the parts match exactly, and the tray is clean. If any of those three are off, the TV may still assemble into a problem.
Remove and fit strips methodically
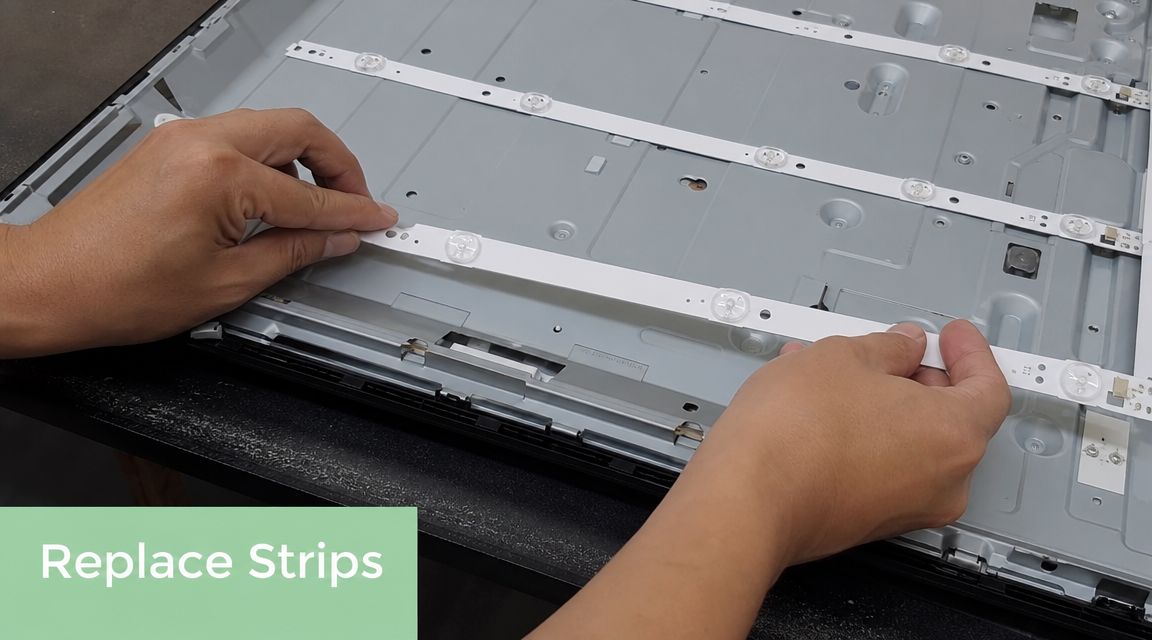
Repair guidance on strip-level work is consistent on one point. The reliable method is match-and-replace. Technicians identify the exact strip number and position, test each strip individually, replace the full set if multiple LEDs are weak, and then reassemble the diffuser layers in original order. The same guidance says the post-repair benchmark is visual uniformity with no dim bands, no flicker, and no hot spots, and it warns against running the TV at excessive brightness because higher settings shorten LED life (TV Parts Today's replacement guide).
When removing old strips, work slowly. Adhesive-backed strips can bend if you rush them. Bent strips don't always sit flat again, and poor seating can affect lens alignment.
If the strips use adhesive, fresh double tape adhesive for electronics repairs can help secure replacements cleanly instead of reusing tired original bonding.
Use a consistent install sequence:
- Dry-fit first. Confirm screw holes, clips, and cable orientation before peeling adhesive backing.
- Respect left and right positions. Some strips look interchangeable and aren't.
- Check polarity and connector seating before applying pressure.
- Keep the reflector tray clean so raised debris doesn't telegraph through the optical stack.
Test before final closure
Before the LCD panel goes back in, perform an intermediate test if the set design allows safe partial power-up. You want to see whether the full array illuminates evenly. It's far better to catch a dead strip, reversed strip, or bad connector now than after complete reassembly.
This walk-through shows the strip replacement stage in action:
Then reassemble in strict reverse order. Put the diffuser layers back exactly as removed. Seat the panel evenly. Refit the bezel without forcing it. Only then do the final power-on and image checks.
Your pass or fail criteria are simple:
| Check | What you want to see |
|---|---|
| Full-screen illumination | Even brightness |
| Dark scenes and menus | No bright pools or obvious hotspots |
| White or pale backgrounds | No bands or patchy dim areas |
| Running stability | No flicker after warm-up |
If the repair succeeds, lower the backlight setting from the TV menu rather than driving the new strips as hard as possible. Maximum brightness often shortens LED life, and there's no prize for making a repair work at the harshest settings.
Cost Analysis When to Repair and When to Replace
The economics of tv backlight repair in Australia are more honest when you separate parts cost from labour cost. The strips themselves usually aren't the main issue. The time spent diagnosing, opening, handling the panel, and reassembling the optical stack is what turns the job into a meaningful repair rather than a quick swap.
According to a repair cost guide, TV backlight repairs in Australia commonly sit around $100 to $200+, while overall TV repair averages are $100 to $350 depending on the fault. The same guide lists labour at $60 to $125 per hour, which explains why backlight jobs are usually assessed as mid-range repairs rather than minor parts replacements (HomeGuide TV repair cost breakdown).
When repair is the sensible call
Repair usually makes sense when the set is otherwise healthy and the fault is tightly isolated.
Good candidates include:
- A TV that boots normally and clearly points to the backlight path during diagnosis
- A set with compatible strips available from a reliable source
- A larger or newer TV where replacement cost still feels disproportionate
- A workshop job where you already have the tester, handling space, and panel discipline
In those cases, the repair can be rational because you're solving one defined fault rather than gambling on a whole chain of unknowns.
When replacement is the better decision
Replacement is often the smarter choice when the backlight failure is only part of the problem. If the set also has panel damage, uncertain board behaviour, poor part availability, or obvious prior repair tampering, the risk shifts fast.
Walk away or hand it to a specialist when:
- You can't confirm the fault path
- You don't have a backlight tester
- The panel is too large to handle safely alone
- Exact strips can't be matched with confidence
- The TV is old enough that one successful repair still leaves you with a tired set
The key trade-off isn't just the quoted repair bill. It's whether the repair has a clean path to a durable result. If the answer is yes, backlight work can be worthwhile. If the answer is “maybe, if nothing else goes wrong”, replacement starts looking sensible.
If you're sourcing tools, adhesives, or repair parts in Australia, Fixo is worth a look. Fixo supports trade technicians and capable DIYers with repair gear, parts, and practical how-to resources, which makes the prep side of a backlight job much easier to get right.