
That heart-stopping moment when your Samsung Galaxy S22 Ultra tumbles to the ground is a feeling we all know too well. A cracked screen isn't just a cosmetic issue; it can make your premium device frustrating, or even impossible, to use. Figuring out the extent of the damage is the first step toward getting your phone back to its best.
Figuring Out How Bad the Screen Damage Is
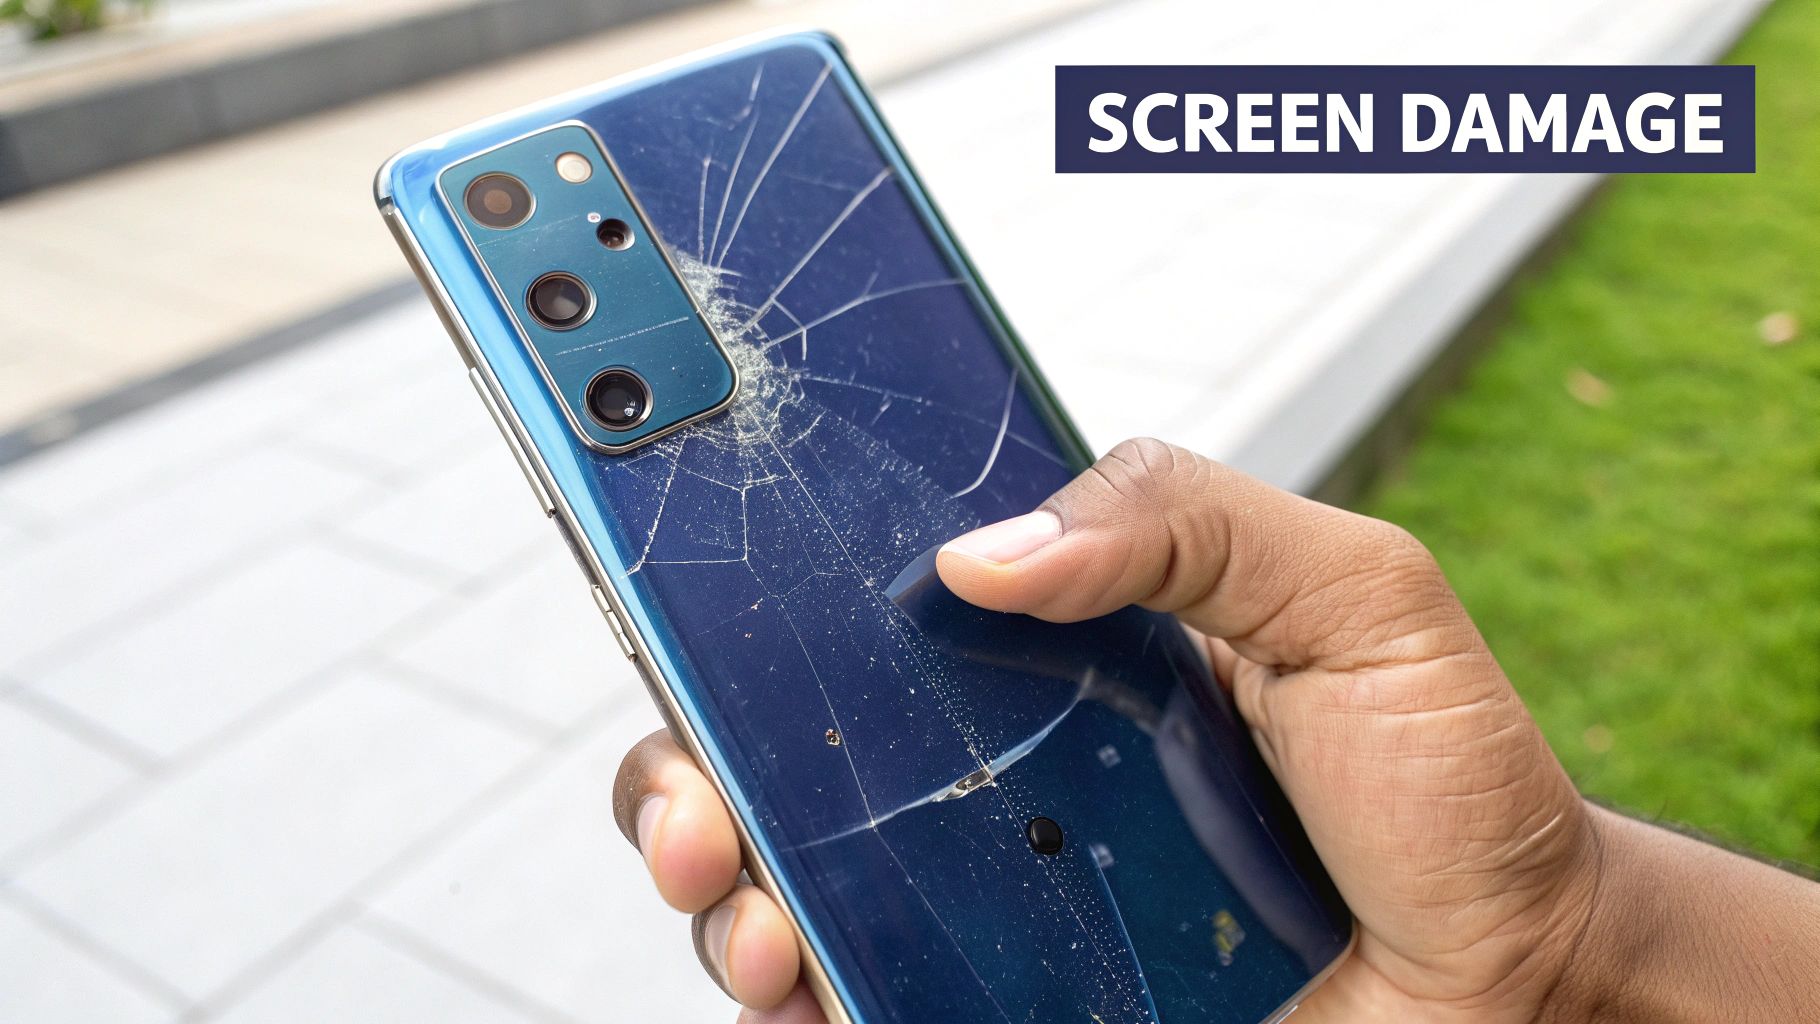
Caption: A Samsung S22 Ultra with significant damage, a common sight for screen replacements in Brisbane.
Before you jump to the worst-case scenario, take a moment to properly assess your phone's display. Not every blemish means you need a costly repair, and a quick diagnosis can save you a fair bit of time and money. The damage usually breaks down into three common scenarios.
Think of it like a car windscreen. A tiny stone chip is annoying, but you can drive just fine. A huge crack spreading across your line of sight, however, makes the car unsafe. It's the same principle with the S22 Ultra's gorgeous Dynamic AMOLED 2X display.
Minor Cosmetic Flaws
This is the most common and least worrying type of damage. We’re talking about light scratches or faint scuffs on the glass surface, usually picked up from daily life—sharing a pocket with keys or sliding across a table.
- What it looks like: You'll see faint lines or marks, but they're typically only noticeable when the screen is off and you catch the light just right.
- Impact on functionality: Almost always zero. Your touch response, colours, and brightness will be completely normal because the display panel underneath is untouched.
- What to do: For this, you can probably just live with it. A good quality screen protector will often make these minor scratches invisible and, more importantly, stop any new ones from appearing. A full Samsung S22 Ultra screen replacement is definitely not needed here.
Spiderweb Cracks and Impaired Touch
This is a much more serious situation. A solid drop onto a hard surface like concrete or tiles often results in those classic "spiderweb" cracks that spread out from the point of impact. The phone might still turn on, but actually using it becomes a different story.
The top glass and the digitiser (the layer that senses your touch) are fused together. When the glass shatters, it often damages this critical layer, leading to phantom touches or dead spots. You might find that one part of your screen works perfectly while another is completely unresponsive, making the phone incredibly frustrating to use.
Total Display Failure
This is the worst-case scenario. It means the delicate OLED panel itself has been broken, not just the glass sitting on top. This level of damage comes from a severe impact that has wrecked the screen’s internal components.
Don't ignore what seems like a small issue, like a single dead pixel or a flickering green line. These are often the first signs of a failing OLED panel, and they can spread across the entire display without warning, leaving you with a useless phone.
Here are the tell-tale signs of total display failure:
- Black spots or "ink blots" that seem to grow over time.
- Bright green, pink, or white lines running vertically down the screen.
- A screen that flickers constantly or is completely black, even though you can hear notifications or feel the phone vibrate.
If you’re seeing any of these symptoms, there’s no two ways about it: a complete Samsung S22 Ultra screen replacement is the only way forward. The entire screen assembly needs to be swapped out. If this is where you're at, your best bet is to get a professional opinion from a service like Screen Fixed Brisbane.
DIY Repair vs Professional Service
So, you’ve come to terms with the fact your Samsung S22 Ultra screen needs replacing. Now you're at the biggest crossroad of the whole repair journey: Do you roll up your sleeves and go the DIY route, or do you hand your premium phone over to a professional?
It’s the classic head-versus-heart debate, usually boiling down to saving a few bucks versus having complete peace of mind.
The appeal of a DIY repair is strong, no doubt. The main driver is almost always the potential cost savings. You spot a replacement screen kit online for a fraction of what a pro quotes and think, "How hard can it really be?" Taking this path gives you total control and that undeniable satisfaction of fixing your own gear.
But be warned, this road is littered with potential disasters. The Samsung S22 Ultra is an intricate piece of engineering. Components are crammed in there, all connected by impossibly fragile ribbon cables. One clumsy slip with a pry tool can instantly escalate a simple screen repair into a far more costly motherboard or battery replacement.
The True Cost of a DIY Screen Repair
When you start tallying up the actual expenses, the initial savings of a DIY job can evaporate pretty quickly. It's never just about the cost of the screen itself; you need a whole arsenal of specific tools just to get started.
- Heat Gun or iOpener: Absolutely essential for softening the tough adhesive that seals the back glass and screen.
- Precision Screwdriver Kit: The S22 Ultra is held together with tiny Phillips head screws that your standard household screwdriver will chew up in a second.
- Prying Tools and Spudgers: You need plastic, non-conductive tools to safely pop open connectors without causing a short circuit.
- High-Quality Adhesive: To properly reseal the phone, you’ll need specific T-7000 glue or, better yet, pre-cut adhesive strips. Without the right stuff, your phone loses any hope of retaining its dust and moisture resistance.
Buying all these tools separately adds up. Even then, you’re missing the single most valuable asset a professional has: experience. A technician at Screen Fixed Brisbane has done this exact repair hundreds of times. They know the precise temperature to use, exactly how much force to apply when prying, and how to handle a delicate battery without puncturing it—which is a very real fire hazard.
The biggest hidden cost of a DIY repair isn't money; it's risk. Voiding your warranty, causing secondary damage, or ending up with a phone that's poorly sealed are all real possibilities. You could easily end up with a much bigger problem than just a cracked screen.
Weighing Up a Professional Service
Choosing a professional repair service like Screen Fixed completely changes the game. You're not just paying for a part; you're investing in expertise, safety, and a guarantee. The process is simple: you drop off your busted device, and a trained expert takes care of the complex surgery.
This immediately eliminates the risk of you causing more damage. Technicians work in controlled environments with specialised gear, dramatically lowering the odds of anything going wrong. On top of that, any reputable repair shop will offer a warranty on their work. If the new screen is faulty or an issue crops up from the repair, they’ll sort it out at no extra charge. That’s a safety net you just don't get when you go it alone.
Cost and Time Comparison DIY vs Professional Repair in Brisbane
To put things in perspective, let's break down what you're really looking at when comparing a DIY project to a professional service for your S22 Ultra screen.
| Factor | DIY Screen Replacement | Professional Repair (Screen Fixed) |
|---|---|---|
| Estimated Cost | $250 - $400+ (screen, tools, adhesive). Can rise if you cause more damage. | $350 - $500 (all-inclusive price). The price is fixed and includes parts, labour, and warranty. |
| Time Commitment | 3-6 hours for a first-timer, plus time for tool/part delivery. | 1-2 hours typically. You can often drop it off and pick it up the same day. |
| Risk of Damage | High. Risk of damaging the motherboard, battery, cameras, or failing to reseal properly. | Very Low. Performed by experienced technicians, and any accidental damage is covered by the repairer. |
| Warranty | None on your labour. You might get a limited warranty on the part, but not if you break it during install. | Yes. A comprehensive warranty is provided on both the part and the labour, offering total peace of mind. |
As you can see, while the initial parts cost for DIY might seem lower, the professional option provides significant value in terms of time, safety, and guaranteed results.
Making the Final Call
So, what's the verdict? The right choice really hinges on your technical confidence, your tolerance for risk, and how much you value your time. If you're an experienced tech tinkerer who understands what's at stake and already has the right tools, a DIY repair could be a satisfying project. For a deeper dive, check out this guide on Samsung screen replacement costs.
For the vast majority of people, though, going with a professional is the smarter, safer, and ultimately more reliable option. That extra cost buys you a guaranteed, stress-free result without the risk of very expensive mistakes.
Beyond the immediate choice, it's also worth thinking about the bigger picture. By choosing to fix your device—whether yourself or with expert help—you're taking part in the broader 'Right to Repair' movement and its role in reducing e-waste. It's a powerful step towards a more sustainable, less wasteful future.
Sourcing the Right Screen and Tools
Caption: Essential tools for a Samsung S22 Ultra screen replacement laid out on a workbench.
Alright, so you've decided to tackle the Samsung S22 Ultra screen replacement yourself. Good on you. But let's be clear: your success completely hinges on the quality of the parts and tools you use from here on out.
Trying to save a few bucks on a cheap screen or a flimsy tool kit is a false economy. It almost always leads to a disappointing result, from awful colour accuracy to a new screen that starts lifting off the frame after just a few weeks. Let's break down what you actually need to do this properly.
Choosing Your Replacement Screen
Not all replacement screens are created equal. The market is absolutely flooded with options that vary wildly in price and, more importantly, performance. The S22 Ultra has a sophisticated Dynamic AMOLED 2X display, and replicating its quality is no simple task. Understanding the lingo is crucial.
You're essentially looking at one of three choices:
- OEM / Service Pack: This is the gold standard, no question. A genuine Samsung service pack is the exact same part they use in authorised repairs. It often comes pre-assembled in a new frame, which makes the job much easier. This guarantees perfect colour, brightness, and touch response, but you'll pay a premium for it.
- Refurbished Original: This is a solid middle-ground. These screens use an original Samsung OLED panel salvaged from another phone. The broken top glass is professionally shaved off and replaced. The display quality is typically excellent and almost identical to OEM, though you might find minor cosmetic scuffs on the frame or glass.
- Aftermarket: Here be dragons. This is your budget option, made by third-party companies trying to copy the original. While a few high-quality aftermarket screens exist, many suffer from lower brightness, washed-out colours, and big problems with features like the ultrasonic fingerprint scanner.
For a premium device like the S22 Ultra, grabbing a cheap aftermarket screen is a recipe for regret. The drop in visual quality can be jarring, turning your once-vibrant display into a dull, lifeless version of its former self.
Assembling Your Essential Toolkit
Once you've got your screen sorted, you need the right gear. Trying to pry this phone open with tools from your shed is going to end badly. You need a specific set of precision instruments to safely open the device and handle its tiny, delicate components.
Here’s your must-have checklist:
- Heat Gun or iOpener: The S22 Ultra is sealed with some seriously strong adhesive. A controlled heat source is non-negotiable. You need it to soften the glue without frying the phone's internals or cracking the back glass.
- Precision Screwdriver Set: Get a quality set with a Phillips #000 bit for the tiny screws inside. A magnetic tip isn't a luxury; it's a lifesaver that will stop you from losing those microscopic screws.
- iFlex or Plastic Prying Tools: Putting metal tools near the motherboard is asking for a short circuit. Flexible plastic spudgers or thin steel prying tools are essential for safely separating components without scratching the frame.
- Suction Cup: A small, strong suction cup gives you the grip needed to gently lift the back glass or screen assembly after you've heated the adhesive.
- Spudger and Tweezers: A nylon spudger is perfect for popping off fragile ribbon cables without tearing them. You'll also need fine-tipped tweezers for handling all the tiny brackets and screws you're about to encounter.
- High-Quality Adhesive: To seal the phone back up properly, you need more than just superglue. T-7000 adhesive or, even better, pre-cut adhesive strips designed for the S22 Ultra are what you need for a secure, dust-resistant bond.
If you want to dive deeper into display tech, check out this guide on the difference between LCD, OLED, and AMOLED replacement screens. Getting this first step right is half the battle.
A Practical Walkthrough of the Replacement Process
Alright, let's get to the main event: the actual Samsung S22 Ultra screen replacement. This is a real-world guide based on countless repairs, pointing out those make-or-break moments where a job goes smoothly or turns into an absolute nightmare.
Any successful phone repair starts long before you even touch a screwdriver. Getting the prep work right is what separates a clean fix from a costly disaster. First things first: back up all your data. While a screen swap shouldn't touch your files, accidents happen. Don't risk it.
Next, we need to talk safety. It is absolutely crucial to run the phone’s battery down to below 25% before you start. This massively drops the risk of a thermal event—basically, a fire or explosion—if you accidentally poke the battery with a tool. It's rare, but it's a serious hazard that every professional takes steps to avoid.
This quick graphic breaks down the core stages of the job: getting the device ready, removing the old screen, and fitting the new one.
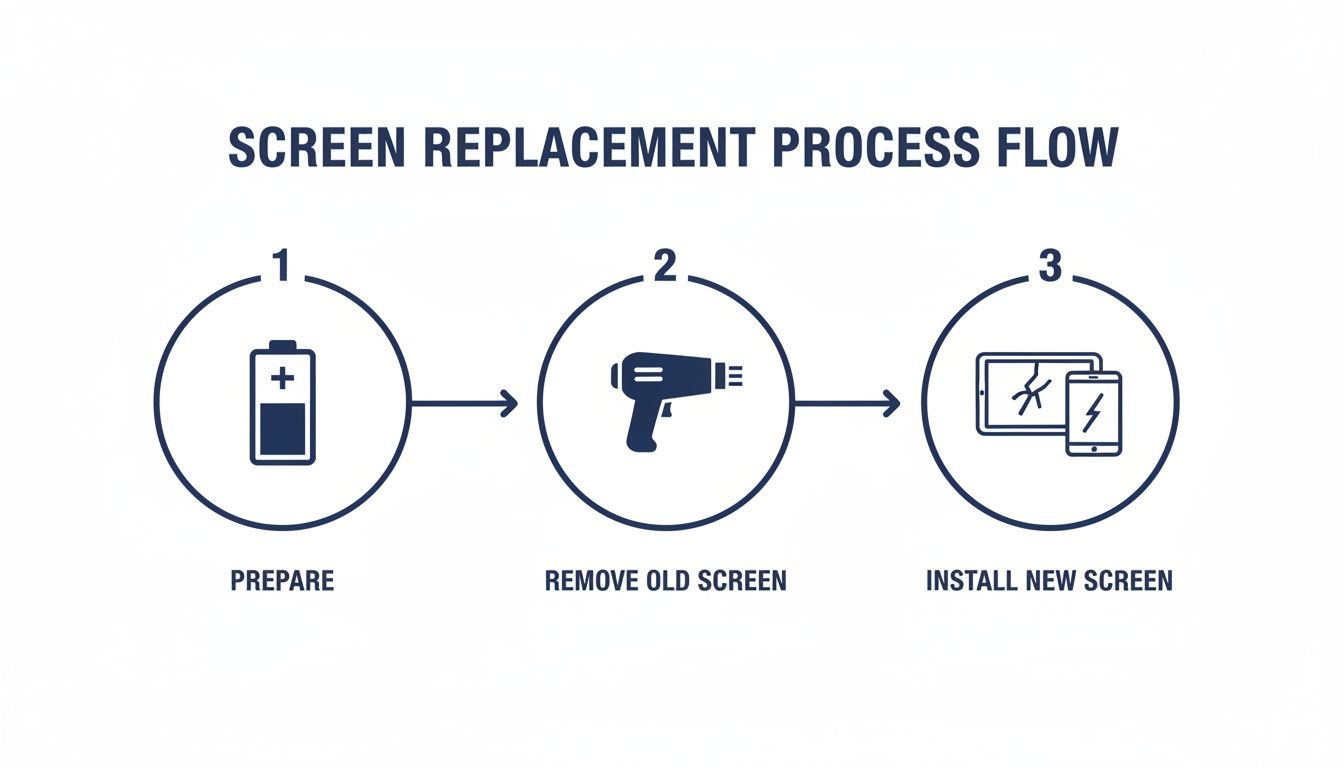
Caption: A diagram illustrating the key steps of a professional phone screen replacement.
As you can see, each phase is distinct. Each demands its own set of techniques and precautions to get the job done right.
Applying Heat and Removing the Back Glass
To get that water-resistance rating, Samsung seals the S22 Ultra with some seriously strong adhesive. Your first big hurdle is breaking that seal without breaking anything else. This is where a heat gun or an iOpener becomes your best friend.
Gently work your way around the edges of the back glass, applying even heat. You aren't trying to cook the phone. The goal is just to warm up the adhesive enough to make it soft and gummy. A good rule of thumb is to keep the heat gun moving; the back should be warm to the touch, but not so hot you can't hold your finger on it for a couple of seconds.
Once the glue has softened, use a suction cup to gently lift and create a tiny gap between the back glass and the frame. Slide a thin plastic pick into that gap and carefully work it around the phone's perimeter, slicing through the adhesive. Be patient. Using too much force here is a surefire way to shatter the back glass, adding another expensive part to your shopping list.
Disconnecting Components and Managing Screws
With the back cover off, you're looking at the phone's internals. The next job is to systematically take out the wireless charging coil and a few plastic covers hiding the motherboard and battery connectors.
This is where a magnetic screw mat is worth its weight in gold. The S22 Ultra has over a dozen tiny screws, and many are slightly different lengths. Mixing them up is a classic DIY mistake that can cause catastrophic damage—like screwing straight through the battery or cracking your brand-new screen from behind during reassembly.
A pro tip from our technicians in Brisbane: always, always disconnect the battery connector first before you touch anything else. This cuts the power to the board and prevents accidental short circuits that can instantly fry the motherboard, turning a simple screen repair into a very expensive paperweight.
Once the battery is safely disconnected, you can unclip the delicate ribbon cables for the screen, S Pen, and other parts. Use a plastic spudger for this, never a metal tool, and apply gentle, even pressure. These connectors are incredibly fragile.
Removing the Shattered Screen
If your new screen came with a frame already attached, you're in luck—this part is much easier. You'll just need to transfer all the components (motherboard, battery, cameras, etc.) over to the new housing.
But if you're doing a screen-only replacement, it's time to repeat the heating process, this time on the front of the phone. Carefully warm the edges of the broken display to soften that tough adhesive holding it in place. This step is especially dicey with a shattered screen, as little glass shards can fly off. Always wear safety glasses.
After heating, you’ll need to patiently work your prying tools around the screen's edge to separate it from the frame. The curved "waterfall" display on the S22 Ultra makes this particularly challenging. Take your time to avoid bending or scratching the phone's metal frame.
Cleaning and Applying New Adhesive
For a repair that lasts, the frame has to be perfectly clean. It's non-negotiable. Before you even think about installing the new screen, you have to meticulously remove every last trace of old adhesive residue. Use isopropyl alcohol and a small brush or lint-free cloth to get it spotless.
Even a tiny bit of leftover gunk will stop the new screen from sitting flush. This creates gaps that not only kill any hope of moisture resistance but can also cause the new display to lift up over time. This is one of the most common failure points in a DIY Samsung S22 Ultra screen replacement.
When the frame is pristine, it’s time for new adhesive. For the best result, use pre-cut adhesive strips made specifically for the S22 Ultra. These give you an even, strong bond that helps restore some of the phone's original dust and moisture seal. It won't be quite as good as the factory seal, but it's infinitely better than using generic craft glue.
Finally, you'll set the new screen in place, reconnect all the internal parts in reverse order, and seal the phone up. The real key to this whole process is patience and precision. Rushing any of these steps is the quickest way to cause more damage and turn a manageable project into a total repair nightmare.
Post-Repair Checks and Troubleshooting
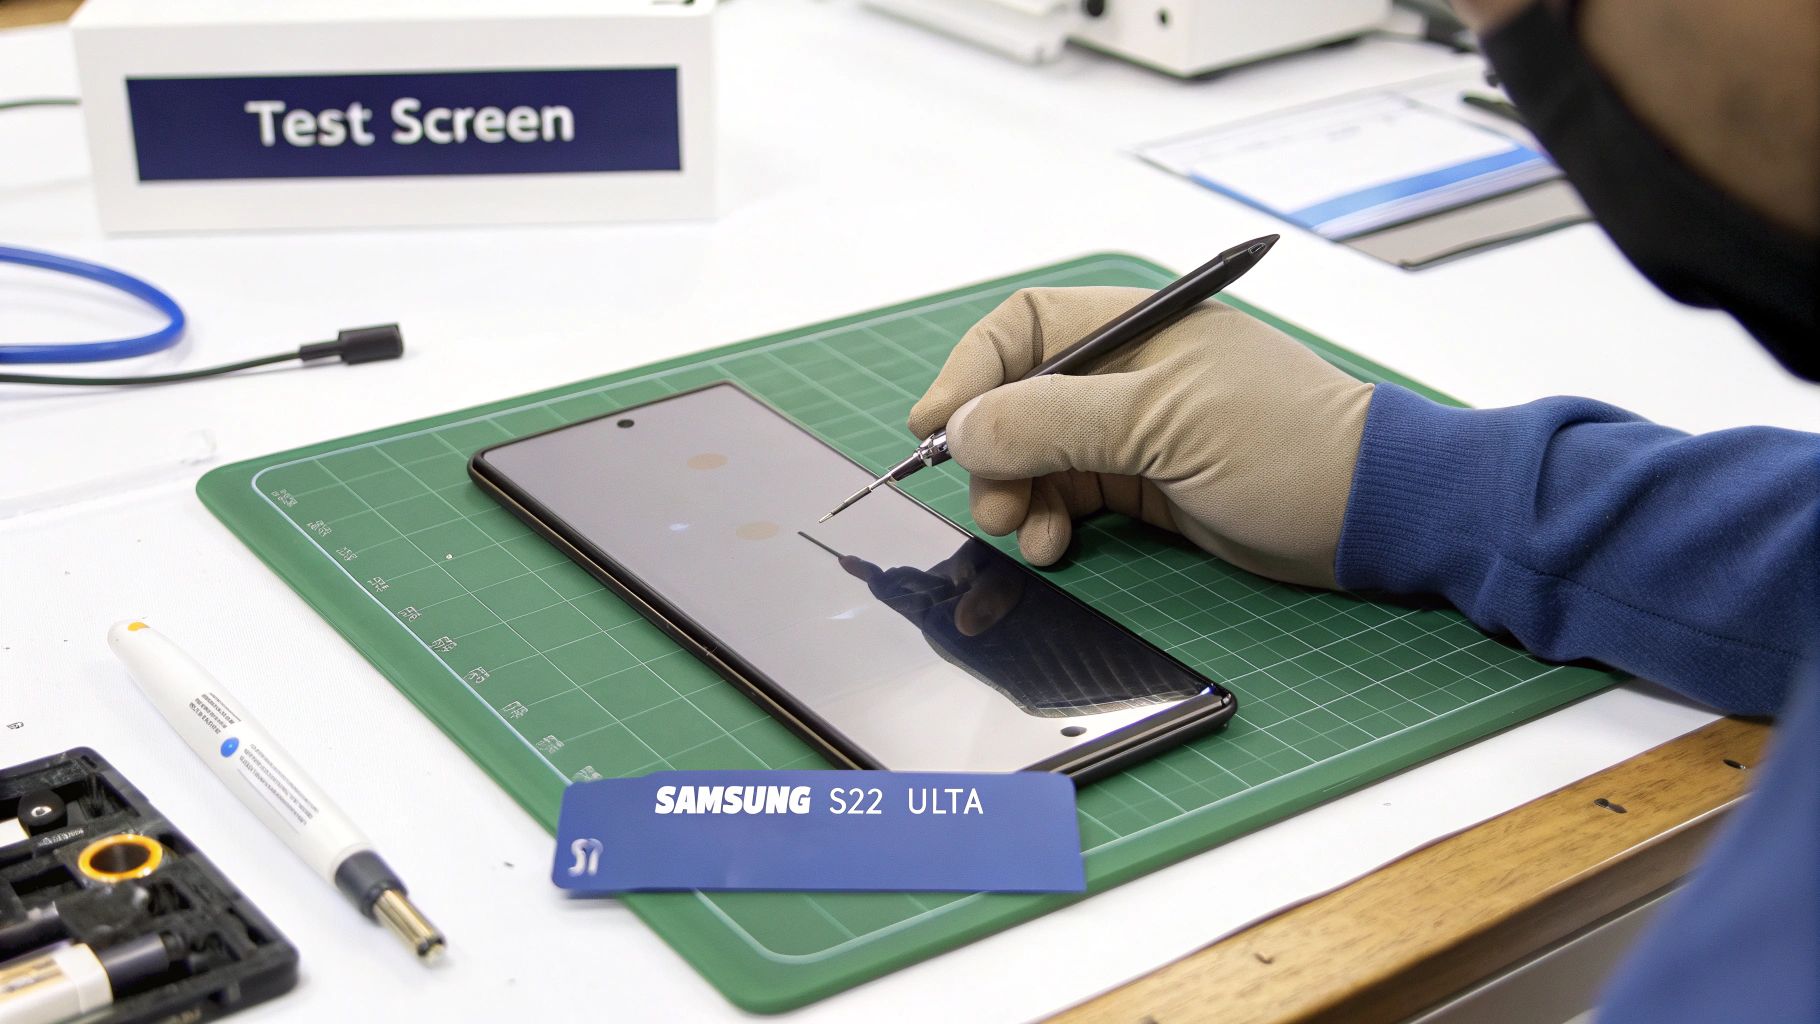
Caption: A technician testing a new Samsung S22 Ultra screen after a replacement in Brisbane.
You’ve carefully navigated the delicate internals of your S22 Ultra, the new screen is seated, and the back glass is sealed. It's tempting to call it a day, but the job isn't quite finished. The final, and arguably most critical, phase is a thorough check to ensure everything is working exactly as it should.
Skipping these post-repair diagnostics is a rookie mistake that can lead to major frustration. There's nothing worse than discovering a faulty fingerprint scanner or a dead spot on the screen after you've fully reassembled and sealed the device. That's a headache you can easily avoid with a methodical testing process.
Your Essential Post-Repair Checklist
Before you sit back and admire your handiwork, power on the device and run through a systematic series of tests. This confirms every feature connected to the display is fully operational and validates the success of your Samsung S22 Ultra screen replacement.
First things first, open an app with a plain white background, like the phone's settings menu, and crank the brightness to the max. Carefully scan the entire display for any inconsistencies.
Here's what you're looking for:
- Dead or Stuck Pixels: Check for tiny black dots (dead pixels) or pixels stuck on a single colour like red, green, or blue.
- Discolouration or Bright Spots: Look for any yellowish tints, dark patches, or unusually bright areas. These can indicate pressure points or a faulty panel.
- Light Bleed: Pay close attention to the curved edges of the screen. Any light "bleeding" out is a sure sign the screen isn't seated perfectly in the frame.
Next up is the touch functionality. The easiest way to do this is to press and hold an app icon on your home screen until it "detaches," then slowly drag it across every square centimetre of the display. If the icon suddenly drops, you've just found an unresponsive spot.
Verifying Key S22 Ultra Features
The S22 Ultra’s screen is more than just a display; it's a central hub for some of the phone's most advanced features. Verifying these is non-negotiable.
Start with the ultrasonic fingerprint scanner. Head into your security settings and try registering a new fingerprint. If the sensor can't read your print or is way less accurate than before, it usually points to one of two things. Either the sensor's flex cable wasn't reconnected securely, or the aftermarket screen you've installed isn't compatible with this sensitive bit of tech.
Now, grab your S Pen. Open a notes app and draw across the entire screen, from corner to corner and edge to edge. Watch the line you're drawing closely to ensure it's smooth and unbroken. Any gaps mean you've found dead zones for S Pen input—another common problem with lower-quality replacement screens.
A perfectly executed repair should feel seamless. If the new screen's colours seem "off," touch feels laggy, or the S Pen is glitchy, it's a sign that something in the repair process or the part itself isn't right. Don't settle for a subpar result after all your hard work.
Troubleshooting Common Post-Repair Problems
Even with the most careful work, things can go wrong. If you run into an issue after your Samsung S22 Ultra screen replacement, don't panic. Most problems come down to a few common culprits that are often surprisingly simple to fix.
If the screen is completely black or unresponsive, the most likely cause is a loose display cable. Power the phone down completely, reopen it, and carefully reseat the main screen connector, making sure you feel it click firmly into place.
Are you experiencing "phantom touches," where the screen acts on its own? This can be caused by a poorly seated screen putting uneven pressure on the digitiser. It might also be a sign of static buildup or, unfortunately, a straight-up faulty display panel.
Another frustrating one is a visible gap or lifting along the screen's edge. This almost always comes down to improper adhesive application. You might need to reopen the device, give the frame another thorough clean, and reapply the adhesive for a secure bond. For a solid, professional-grade seal, understanding the nuances of repair adhesives is key; this guide on using double-sided tape adhesive provides more detail on getting it right.
Got Questions About Your S22 Ultra Screen Repair?
If you're staring at a cracked Samsung S22 Ultra, you've probably got a few questions running through your mind. It's a high-end device, and the thought of repairing it can be daunting. Let's tackle some of the most common queries we hear from customers to help you figure out the best path forward.
How Long Will I Be Without My Phone?
This really comes down to who's doing the work. If you bring it to an experienced technician, like our team at Screen Fixed Brisbane, you’re looking at a pretty quick turnaround. We can usually have the entire job done in just 1 to 2 hours. For most people, that means getting your phone back on the same day.
Now, if you're planning to tackle this yourself, be prepared to set aside a good chunk of your day. For a first-timer, this isn't a quick job. Realistically, you should block out anywhere from 3 to 5 hours. That's not even counting the time you'll spend waiting for parts and tools to show up in the mail.
It's not just about speed; it's about precision. Rushing a delicate repair is the quickest way to cause secondary damage, turning a straightforward screen swap into a much more complex and expensive problem.
What Happens to the Water Resistance?
Let's be upfront about this: yes, the water resistance will be affected. The moment that original factory seal is broken to open the phone, its IP68 rating is gone. While a professional will use high-quality, pre-cut adhesives to reseal everything as tightly as possible, it's impossible to guarantee it'll be as water-tight as it was when it left the factory.
A DIY repair, especially if you're not using the correct pre-cut adhesive strips, is almost certain to leave your S22 Ultra vulnerable to dust and moisture. It's one of the biggest risks of doing it yourself.
Can't I Just Replace the Glass on Its Own?
This is a common question, and the simple answer is no, not really. The display on the S22 Ultra is a complex, fused assembly. It’s not just a piece of glass; it’s the glass, the touch digitiser, and the stunning Dynamic AMOLED panel all laminated together into one unit.
While "glass-only" repairs technically exist, they require incredibly expensive and specialised machinery to separate these layers without destroying the fragile OLED panel underneath. It’s a process that's extremely difficult and risky, even for many professional shops, let alone someone at their kitchen table.
The only reliable, industry-standard solution is to replace the entire screen assembly. This is the only way to ensure perfect touch response, vibrant colours, and flawless functionality. It's the method we stand by for a quality, long-lasting repair.
When it comes to getting a professional, reliable Samsung S22 Ultra screen replacement in Brisbane, you want experts you can trust. Screen Fixed handles every repair with precision and care, using top-quality parts to get your device back to looking and feeling new.
Disclaimer: Screen Fixed is an independent repair service and is not affiliated with Samsung. All brand names and trademarks are the property of their respective owners.
Book your repair with Screen Fixed Brisbane today and let our experts handle the rest.