
Ever tried to do a simple repair, only to be stopped dead in your tracks by a screw with a bizarre, alien-looking head? That's an anti-theft screw. They aren't your typical Phillips or flathead screws; they're designed to be a massive headache to remove with standard tools, deliberately making life difficult for anyone who shouldn't be poking around inside your gear.
Why Are These Screws Suddenly Everywhere?
It all comes down to one thing: security. Manufacturers use them to protect valuable components, discourage tampering, and block unauthorised access. Think about the inside of an iPhone or a laptop – these screws act as gatekeepers, safeguarding sensitive parts from DIY repairs that could cause more harm than good. It's a deliberate barrier to protect proprietary tech and prevent warranty fraud.
This principle extends beyond just our gadgets. You'll see similar physical security measures, like trail camera locking cables, used to stop theft and tampering of expensive equipment left out in the open.

Alt Text: A close-up of three different anti-theft screw types on a wooden surface.
It’s not just about electronics, either. You’ll find these fasteners in public spaces holding up signs, securing bathroom fixtures, and on public transport to fight vandalism. But here in Australia, one of the biggest drivers for their popularity is vehicle security, especially for number plates.
A thief can whip off a standard number plate in seconds, and the crime stats show they're doing it a lot.
In Victoria, for example, number plate thefts shot up by a massive 46% in a single year, with over 73 plates stolen every day. Crooks then use these plates to get away with petrol theft or avoid road tolls, leaving the original owner to deal with the fines and the mess.
Key Takeaway: Anti-theft screws are all about creating a barrier. They're designed to slow down or completely stop thieves and unauthorised tinkerers, making whatever they're protecting a much less attractive target.
Getting to Know the Main Culprits
Before you can even think about how to remove one of these screws, you have to know what you’re looking at. While there are heaps of different designs out there, you’re most likely to run into just a handful of common types.
Take a look at this quick guide. It'll help you figure out what you're up against.
Common Anti-Theft Screw Types and Their Identifiers
| Screw Type | Visual Description | Commonly Found On |
|---|---|---|
| One-Way (Clutch Head) | Looks like a standard flathead screw, but the slots are ramped on one side. You can tighten it, but you can't easily undo it. | Vehicle number plates, public signs, security gates. |
| Spanner (Snake-Eye) | A flat head with two small, round holes (or "eyes"). Requires a special two-pronged driver bit. | Lifts, public bathrooms, electronics, security cameras. |
| Security Torx (Pin-In Torx) | A standard six-pointed star (Torx) shape but with a small metal pin sticking up from the centre. | Game consoles (like Xbox), computers, car parts. |
Once you've identified the screw type, you're halfway there. Knowing which one you're facing determines the exact tool and the right technique you'll need to get it out without wrecking your device or your patience.
Building Your Security Screw Removal Toolkit
Trying to tackle a security screw without the right gear is a recipe for disaster. It’s like trying to pick a tricky lock with a paperclip – you’ll probably just end up frustrated and with a damaged device. Getting the job done right comes down to having the correct tools on hand, and it's worth understanding why a specific tool is the best choice for the job.
Your first, and most important, investment should be a comprehensive security bit set. This isn't your average collection of Phillips and flathead bits from the local hardware shop. A proper set will be packed with dozens of specialised heads designed to perfectly match the odd patterns of security fasteners, including all those pin-in Torx, spanner (or 'snake-eye'), and tri-wing screws you find in modern electronics. Think of it as your master key for almost any security screw you'll come across.
The Essential Tools for the Job
While a good bit set will get you through most common jobs, some devices require more specialised equipment. If you often work on Apple products, for example, you'll need drivers that are designed specifically for their ecosystem. While not technically "anti-theft" screws, their proprietary design serves a similar purpose of keeping people out. You can learn more about these unique fasteners in our guide to Pentalobe screwdrivers for iPhone and MacBook repairs.
Here’s what a solid, well-rounded toolkit should look like:
- Security Bit Set: This is the heart of your kit. Aim for a set with at least 50 pieces made from high-quality steel (like CR-V or S2 steel) to stop the bits from stripping or snapping under pressure.
- A Quality Screwdriver Handle: A comfortable, magnetic-tipped handle that takes interchangeable bits is absolutely essential. It gives you the precision and control you need for delicate work.
- Spudgers and Pry Tools: Usually made of plastic or nylon, these are your best friends for safely separating fragile electronic components without leaving a scratch or crack once the screws are out.
When Standard Tools Aren't Enough
Every now and then, you'll hit a wall. You'll face a screw that's rusted, stripped, or just so mangled that even the right bit won't grip it. This is where you need to bring in the heavy hitters – tools designed for extraction, not just simple unscrewing.
As our Fixo technicians in Brisbane will tell you, spending a little extra on quality tools upfront saves you from the costly headache of a damaged device later. A cheap bit that strips a screw head can turn a ten-minute job into a two-hour ordeal.
For these tough situations, you’ll need to add a few more items to your arsenal:
- Screw Extractor Set: This is your go-to for stripped screws. These clever bits have reverse threads that dig into the damaged screw head, letting you turn it anti-clockwise and pull it right out.
- Left-Handed Drill Bits: These operate in reverse. As you drill into a stubborn screw, the anti-clockwise motion can sometimes generate enough torque to grab the fastener and unscrew it without needing a separate extractor.
Putting together a proper toolkit is the first real step in mastering how to unscrew anti-theft screws safely and effectively. With these items in your possession, you're ready for pretty much any challenge a manufacturer can throw at you.
Proven Techniques for Damage-Free Screw Removal
Alright, you've got the tools. Now it's time to get those stubborn security screws out without wrecking anything. The key isn't brute force; it's about using the right technique with a bit of patience. Each type of security screw needs its own special touch to avoid damaging the fastener or the device it's supposed to be protecting.
The golden rule for almost any security screw is to make sure your bit is fully and firmly seated before you even think about turning the handle. For fiddly things like a pin-in Torx or a spanner screw, you need to apply solid, consistent downward pressure. This simple move stops the bit from slipping out and "camming out"—which is the number one reason heads get stripped and a simple job turns into a nightmare.
This flow chart breaks down the process, showing how you should escalate your approach when a screw just won't budge.
Alt Text: A process diagram showing the steps for removing anti-theft screws: start with bits, then extractors, and finally drill as a last resort.
As you can see, the path is clear: always start with the correct bit. If that fails or the screw is already damaged, move on to an extractor. Only when all else fails should you even consider getting the drill out.
Mastering One-Way Screws
One-way screws are a real pain. You often see them on vehicle number plates, and they're designed to go in easily but not come back out. There's a good reason for it, too. Neighbourhood Watch Victoria reports a staggering 20,000 number plate thefts each year. Thieves often use stolen plates to hide their tracks while committing other crimes, so these screws are a first line of defence.
Because you can't just unscrew them the normal way, you need a different game plan.
- The Dremel Method: If the screw is big enough and you can get to it easily, a rotary tool like a Dremel is your best bet. You can carefully cut a brand-new slot straight across the screw head. This effectively turns it into a standard flathead screw, which you can then remove with a regular screwdriver.
- The Extractor Method: The cleanest and safest approach is to use a dedicated one-way screw extractor tool. These specialised tools are designed to grip the unique sloping head, letting you apply anti-clockwise force to back the screw out without any need for cutting or grinding.
Pro Tips for Corroded or Stuck Screws
Sometimes the screw itself is the problem. It might be rusted, seized up with thread-locking compound, or just ridiculously overtightened. Before you reach for the drill, try a couple of tricks our team at Screen Fixed Brisbane uses almost every day.
A single drop of penetrating oil, like WD-40, can work miracles. Just apply it right onto the screw head and give it 10-15 minutes to work its way into the threads. This helps break down any rust and lubricates the threads, often loosening the screw's death grip.
Expert Insight: For really stubborn screws in metal housings, a little bit of heat can do the trick. A heat gun on a low setting for a few seconds can make the surrounding metal expand just enough to break the bond. You have to be extremely careful doing this on electronics, though, as it's easy to melt plastic or fry sensitive components.
Handling Different Screw Drive Types
There's a massive variety of screw heads out there, and grabbing a bit that's just ‘close enough’ is a one-way ticket to a stripped head. A tri-wing is not a Phillips, and trying to use the wrong one will just chew up the fastener.
If you're ever looking at a screw and aren't sure what it is, take a moment to identify it properly. It's worth getting familiar with the different designs. We've put together a handy visual guide in our article covering various screw drive types. Knowing what you're dealing with is fundamental to picking the right tool and getting the job done without any damage.
The Last Resort: The Drill-Out Method
Sometimes, you’ll come up against a screw that’s completely beyond saving. It might be rusted solid, fused to the device's frame, or the head is so chewed up that no screwdriver bit or extractor has a hope of getting a grip. When every other trick in the book has failed, it's time to pull out the final, most aggressive option: drilling the screw out.
Let's be clear, this method isn’t about finesse; it's controlled destruction. The whole point is to obliterate the screw head, freeing whatever component it was holding down. You'll still have to deal with the leftover screw shank afterwards. This is a high-risk, high-reward move that demands extreme caution, especially when you're working on delicate electronics or a pricey device.
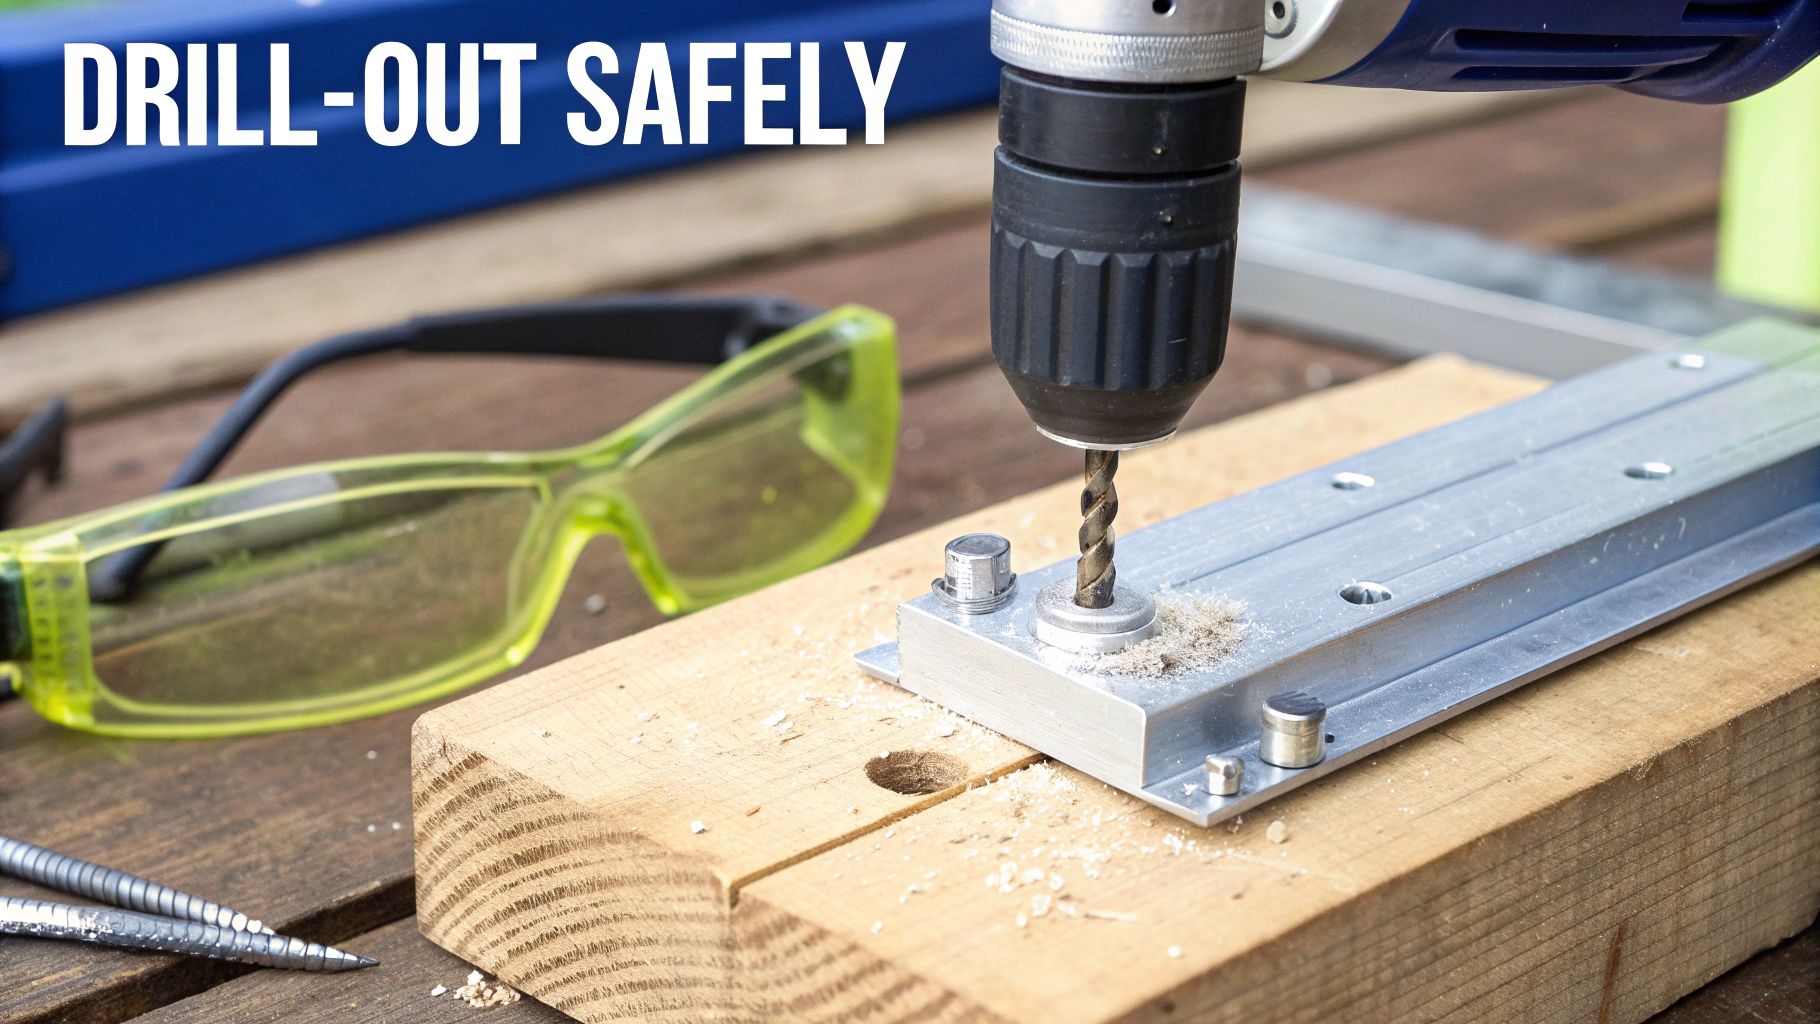
Alt Text: A power drill with a metal bit drilling out an anti-theft screw, with safety glasses nearby.
Before you even think about plugging in the drill, your first priority has to be safety and preparation. This is not a task you want to rush.
Setting Up for a Safe Operation
The biggest danger when drilling out a screw is the bit "wandering" across the surface, scratching or gouging the very material you’re trying to protect. A tiny slip can cause major cosmetic damage in a heartbeat. The second risk is overheating, which can easily melt plastic components or fry sensitive electronics nearby.
To stop this from happening, you need to create a small guide point for your drill bit. Grab a centre punch and a small hammer to make a distinct dimple right in the middle of the screw head. This little indentation gives the tip of your drill bit a secure place to start, making sure it stays exactly where you want it.
Critical Safety Warning: Metal shavings and tiny fragments can fly off at high speed. You absolutely must wear proper safety glasses—not just your regular eyeglasses—to protect your eyes from serious injury. This is non-negotiable.
The Drilling Process, Step by Step
Once you're set up and protected, the process itself is pretty straightforward but requires a steady hand and a bit of patience.
- Choose the Right Drill Bit: You'll want to start with a metal drill bit that is just slightly smaller than the shank (the threaded part) of the screw. If you use a bit that's too large, you risk destroying the screw threads in the housing, making it impossible to install a replacement screw later.
- Use Low Speed and Firm Pressure: Set your drill to its lowest speed setting. High speeds generate way too much heat and can cause the bit to snap. Apply steady, firm pressure as you drill directly into the mark you made with the centre punch.
- Drill Just Enough: Your goal is only to drill through the screw head itself, not deep into the device. As soon as the head separates from the shank, the component should come free.
After the head is gone, you'll still have the threaded part of the screw stuck in the hole. You can often grab the remaining shank with a pair of locking pliers and simply twist it out. If it’s sitting flush with the surface, you might need a proper screw extractor to finish the job.
Knowing how to unscrew anti-theft screws sometimes means knowing when to stop drilling. If you feel like you're getting out of your depth, it’s far better to consult a professional at Screen Fixed Brisbane than to risk causing irreparable damage.
Troubleshooting Common Removal Problems
Even when you have the perfect toolkit and a patient approach, you can still run into trouble. An anti-theft screw can be a stubborn opponent, particularly if it’s old, damaged, or wedged into a tight spot. This is where knowing how to troubleshoot common issues can save you from a world of frustration and potentially expensive damage.
One of the most frequent problems you’ll face is a stripped screw head. This is what happens when your bit slips and grinds away the drive recess until there's nothing left for the tool to grip. Before you panic and reach for the drill, try this simple trick: place a wide rubber band over the screw head and then press your bit firmly into it. The rubber can often fill those stripped-out gaps, giving you just enough traction to get the screw moving.
When the Screw Just Won't Budge
A rusted or seized screw is a completely different challenge. Brute force is your enemy here; cranking on it with too much torque is a fast way to snap the bit or the screw head clean off. Instead, a bit of finesse is required.
- Penetrating Oil: A small amount of penetrating fluid can work wonders on rust. Apply a drop and give it at least 15 minutes to seep deep into the threads.
- Gentle Tapping: Sometimes, a few light taps on the screwdriver handle with a small hammer can help break the corrosion's seal. That little vibration can be just enough to loosen its grip.
Another frustrating scenario is when one part gets stuck inside another, like a SIM tray that stubbornly refuses to eject. While not strictly a screw issue, the diagnostic process is similar—patience over power. For insights on handling delicate, stuck components, check out our guide on how to remove a stuck SIM card tray.
Dealing With Broken Bits and Bigger Problems
What if your bit breaks off inside the screw head? This is a tough one. You’ll need fine-tipped needle-nose pliers or a pair of strong tweezers to carefully try and pull the fragment out. If that fails, the job has probably escalated to a drill-out situation.
The growing use of these screws is a direct response to security needs. A recent report highlighted the soaring demand for anti-theft screws in Australia, particularly driven by the automotive industry to combat number plate theft. This demand fuels a parallel industry for specialised removal tools, which are essential for tackling tough one-way screws.
The single biggest mistake is using the wrong size bit. A bit that's too small will never get enough purchase and will strip the screw almost instantly. Always test-fit your bit before applying any force to ensure it's a perfect, snug match.
Your Anti-Theft Screw Questions Answered
Even with the best guide in front of you, a few questions are bound to pop up. When you're trying to figure out how to get an anti-theft screw out, especially if it's your first time, getting a quick, clear answer can be a lifesaver. We've pulled together the most common questions our technicians hear and laid out some straightforward advice to help you get the job done right.
Think of this as your go-to cheat sheet for those moments you get stuck and just need a bit of expert advice.
Can I Unscrew Anti-Theft Screws Without a Special Tool?
Look, it's sometimes possible to MacGyver a solution with something like a Dremel to cut a new slot, but I have to be honest—it’s a high-risk play. More often than not, these improvised methods end up stripping the screw head or, even worse, gouging the device's housing. For a clean, damage-free removal, using the correct security bit is always the best approach.
Spending a few dollars on a proper toolkit isn't just about avoiding frustration; it's about protecting your valuable electronics from a costly slip-up. The right tool gives you a perfect fit, letting you apply the torque you need without any risk of it slipping and causing chaos.
What Is the Best Way to Remove a Stripped Security Screw?
Once a security screw head is stripped, your best friend is a screw extractor kit. These things are purpose-built for this exact nightmare scenario. They work with reverse-threaded bits that literally bite into the damaged metal, creating a brand-new grip so you can turn the screw anti-clockwise and back it out.
If the extractor just can't get a grip, your absolute last resort is to carefully drill the head off the screw. This is the most destructive method, and you should only even think about it when every other option has failed.
Always start with the least aggressive solution first. An extractor gives you control, while drilling is the point of no return.
Where Can I Buy the Right Tools in Australia?
You’ll find comprehensive security bit sets, extractor kits, and professional-grade drivers at specialised suppliers like Screen Fixed Brisbane. We stock a massive range of tools designed for everything from fiddly mobile phone repairs to bigger automotive jobs.
With fast, same-day dispatch from our warehouses across Australia, including Sydney and Melbourne, you can get the right tools delivered to your door in no time. Don't let a stubborn little screw bring your whole project to a grinding halt.
If you've truly hit a wall and need a hand with a tough screw or a more complex repair, don't risk making things worse. The expert technicians at Screen Fixed have the specialised gear and experience to tackle any challenge safely and efficiently, offering professional iPhone Repairs Brisbane and other device services.
Book your repair with Screen Fixed Brisbane today
Disclaimer: All third-party brand names and trademarks (e.g., iPhone, MacBook, Xbox, Dremel, WD-40) are the property of their respective owners. Their use in this article is for informational purposes only and does not imply endorsement or affiliation with Screen Fixed.