
Is your MacBook Pro's battery life not what it used to be? Perhaps you feel constantly chained to the power adapter, or the machine shuts down without warning, even when the battery meter shows plenty of charge. These aren't just minor annoyances; they're clear signals your battery is on its last legs, a common problem for busy professionals who rely on their Mac day in and day out.
Figuring out if you need a replacement isn't always as obvious as a pop-up notification. Often, the signs are more subtle, weaving themselves into your daily workflow until performance becomes a real problem.
 Alt: A technician checking the battery health on a MacBook Pro in a Brisbane workshop.
Sometimes, a failing battery can even mimic other issues. Your MacBook might start running unusually hot, or the cooling fans could suddenly kick into high gear during simple tasks like web browsing. For a professional, these subtle clues can be incredibly frustrating.
Imagine a video editor whose render times have mysteriously doubled. The software is the same, the project files are standard, yet everything just feels sluggish. The culprit is often a degraded battery that can no longer supply the consistent peak power the processor needs, forcing macOS to throttle performance to prevent a sudden shutdown.
Beyond the "Service Recommended" Warning
The most direct indicator from your Mac is the "Service Recommended" message that pops up in your battery status menu. This is Apple's clear signal that the battery's health has significantly degraded. But honestly, you shouldn't wait for this warning to appear, as performance can suffer long before it does.
To help you pinpoint the issue, we've put together a quick checklist of common symptoms.
MacBook Pro Battery Health Checklist
| Symptom | What It Means | Recommended Action |
|---|---|---|
| Drastically Reduced Runtime | The battery's maximum capacity has faded. A full charge just doesn't last like it used to. | If runtime is impacting your work, it's time for a replacement. |
| Sudden Shutdowns | The battery can no longer provide stable voltage under load, causing the Mac to power off to protect components. | This is a clear sign of failure. Replace the battery immediately. |
| Physical Swelling | Gases have built up inside the battery cells, causing them to expand. This is a serious fire hazard. | Stop using the device. Do not charge it. Get the battery replaced by a professional ASAP. |
| Sluggish Performance | macOS is throttling the CPU to prevent shutdowns because the weak battery can't handle power spikes. | A new battery will restore the system's ability to draw peak power and return performance to normal. |
If you're noticing any of these, especially physical swelling or sudden shutdowns, it's definitely time to act.
Checking Your Battery Cycle Count
One of the most valuable metrics for assessing your battery's health is its cycle count. Think of a cycle count as one full 100% discharge and recharge of the battery. This doesn't have to happen all at once; using 50% of your battery today and another 50% tomorrow counts as one complete cycle.
It's easy to check this on your MacBook Pro:
- Hold down the Option key on your keyboard.
- Click the Apple menu () in the top-left corner of your screen.
- Select System Information.
- In the new window, find the Power section under the "Hardware" heading.
- You'll see the "Cycle Count" listed right under "Health Information".
Most modern MacBook Pro batteries are designed to last for about 1,000 cycles before they're considered consumed. Once you get close to this number, you can expect its ability to hold a charge to drop to around 80% of what it was when it was new.
For professionals like coders or designers in Australia, hitting this threshold within 3-4 years is pretty common. However, we've seen plenty of cases where issues like erratic battery percentage jumps (e.g., from 50% to 20% in an instant) signal failure long before reaching 1,000 cycles. You can discover more insights about these warning signs from local Australian repair experts at Fixntalk.
Ultimately, if your battery is holding you back, it's time for a replacement. A fresh battery will bring back the performance and freedom you depend on.
Sourcing the Right Tools and Parts in Australia
Alright, so you’ve confirmed your MacBook Pro battery is on its last legs. The next step is getting everything you need for the swap, and this is where you don't want to cut corners. Going for the cheapest tools or a dodgy-looking battery is a recipe for disaster. A bargain-basement screwdriver can easily strip a tiny screw head, and a low-quality battery might fail in a few months—or worse, become a safety hazard.
This is exactly why finding a trusted Australian supplier is so critical. When you source your parts locally, you're not just buying a component; you're buying confidence. You get fast dispatch from warehouses right here in Australia (like Brisbane or Sydney), and you have access to real, local support from people who actually know these products inside and out. It makes a world of difference.
Identifying Your Exact MacBook Pro Model
First things first: you absolutely have to know your MacBook Pro's precise model. Apple uses different batteries and screws across various years and sizes, so getting this wrong means you'll have a part that simply won't fit.
Here’s the quickest way to find what you need:
- Check the bottom case: Flip your MacBook over. You'll see the model number (like A1990) printed in tiny text near the hinge.
- Look in macOS: Click the Apple logo () in the top-left corner and go to "About This Mac." The overview window will show you the model name and year, for example, "MacBook Pro (15-inch, 2018)".
Once you have that info, you can confidently find the exact battery made for your machine on a supplier's website, guaranteeing it's a perfect match.
The Essential Toolkit for a DIY Replacement
Having the right tools on hand is non-negotiable if you want the job to go smoothly. For a MacBook Pro battery replacement, a basic kit will need a few key items.
- P5 Pentalobe Screwdriver: This is for those unique star-shaped screws Apple uses on the bottom case. Your standard Phillips head screwdriver won't touch them.
- T5 Torx Screwdriver: You'll run into these holding down various internal bits, like battery connectors and other logic board components.
- Plastic Pry Tools (Spudgers): Absolutely essential for safely popping off delicate ribbon cables without tearing them. Metal tools are a big no-no here.
- Suction Cups: These make it much easier to lift the bottom case off once all the screws are out.
- Isopropyl Alcohol and Plastic Cards: These are your best friends for breaking down the incredibly strong adhesive that holds the old battery in place. A few old credit cards or guitar picks work great.
Investing in a decent tool kit will save you from stripped screws and damaged parts, turning what could be a headache into a manageable project. If you're not sure about the different screwdriver types, have a look at our guide on Pentalobe screwdrivers for iPhone and MacBook repairs to get familiar.
Sourcing locally does more than just get your parts to you faster; it also supports the right-to-repair movement here in Australia. When you buy from an Australian supplier, you're investing in a local economy that champions sustainable, affordable repairs over just throwing away old devices.
As you look at different places to buy your battery and tools, keep in mind that shipping costs can really add up. It's worth taking a moment to compare courier rates in Australia to find a good deal on delivery. Plus, data from the Australian market clearly shows that independent repairers, using wholesale parts, offer massive savings. Going the DIY route can cut your costs by 25-40% on average compared to going through official channels. You can read the full report on MacBook battery replacement costs in Australia for a complete breakdown.
A Practical Walkthrough of the Battery Replacement
Alright, with your new battery and tools laid out, it's time to get your hands dirty. This part of the guide is all about the actual replacement process, focusing on the key steps and safety checks that the pros use. We’ll take it stage by stage, from prepping your workspace to the final button-up, so you feel confident the whole way through.
The aim here isn't just to swap a part; it's to do it safely and get it right the first time. Take it slow, keep things organised, and stick to the steps.
Setting Up a Safe and Organised Workspace
Before a single screw comes out, your first job is to set up your workspace. A cluttered or poorly lit area is just asking for trouble. Find a clean, flat surface with plenty of light—a big desk or a clear kitchen table is perfect.
If you have an anti-static mat, lay it down now. If not, you can still minimise the risk of static discharge by working on a wooden surface and staying off the carpet. It’s also a good habit to periodically touch a grounded metal object, like a radiator, to discharge any static you've built up.
Last but not least, get organised. Use a magnetic mat or even just a few small containers to keep track of every screw. MacBook Pros are notorious for using screws of different lengths, and forcing a long screw into a short hole can permanently damage the logic board. Don't risk it.
Opening the MacBook Pro Case
With your workspace ready to go, it’s time to crack open the machine. First, make absolutely sure your MacBook Pro is fully shut down—not just asleep—and unplugged from everything.
Grab your P5 Pentalobe screwdriver and carefully remove all the screws from the bottom case. As you take them out, place them on your magnetic mat in the exact pattern they were on the case. This simple trick makes reassembly a breeze.
Once the screws are out, use a suction cup near the centre of the bottom edge to lift it just enough to create a tiny gap. Slide a plastic pry tool or a thin plastic card into that opening and gently work it along the sides to release the clips holding the case down. Lift the bottom cover off slowly and set it somewhere safe.
Patience is everything here. Never force anything; the clips will pop free with gentle, steady pressure.
The Critical Battery Disconnection
This is, without a doubt, the most important step in the entire process. Before you touch anything else inside, you must disconnect the battery from the logic board. Skipping this can cause a short circuit, which could fry your logic board and turn a simple battery swap into a very expensive headache.
Find the battery connector on the logic board; it’s usually a wide, flat connector sitting close to the battery cells. Depending on your model, you might need to peel back a small bit of protective tape to get to it.
Technician's Tip: Use a plastic spudger or the flat end of a pry tool to lift the connector straight up and out of its socket. Never, ever use a metal tool for this. It’s far too easy to cause a short if it touches multiple contact points at once. Once it's disconnected, make sure the connector can't accidentally fall back into place.
After the battery is safely disconnected, I always recommend pressing and holding the power button for about five seconds. This drains any leftover charge from the system's capacitors, making it even safer to work on.
Removing the Old Battery Cells
Now for the most physical part of the job: getting that old battery out. Apple uses incredibly strong adhesive strips to hold the battery cells in place. If you just try to pry them out with brute force, you’ll likely bend the cells, which is extremely dangerous and can lead to a thermal event (that’s a fire, in plain English).
This is where your isopropyl alcohol and plastic cards are essential.
- Start with one of the outer battery cells. Carefully apply a small amount of isopropyl alcohol (99% is best) around its edges. Give it a minute or two to seep underneath and start dissolving the adhesive.
- Gently slide a plastic card (an old gift card works great) under the edge of the cell. Wiggle it slowly, working it deeper bit by bit.
- Keep adding a few more drops of alcohol as you go. You'll literally feel the adhesive start to give way.
- Repeat this process for every single battery cell until the entire assembly is free.
This step is all about patience. Rushing is your worst enemy. A slow, steady approach with the solvent and gentle pressure is the safest and most reliable way to get it done. For a slightly different take, you might find our guide on how to replace the battery in a MacBook Air useful, as it follows similar principles.
To make sure your repair gets off to the right start, this flowchart breaks down how to source the correct parts for your specific machine.
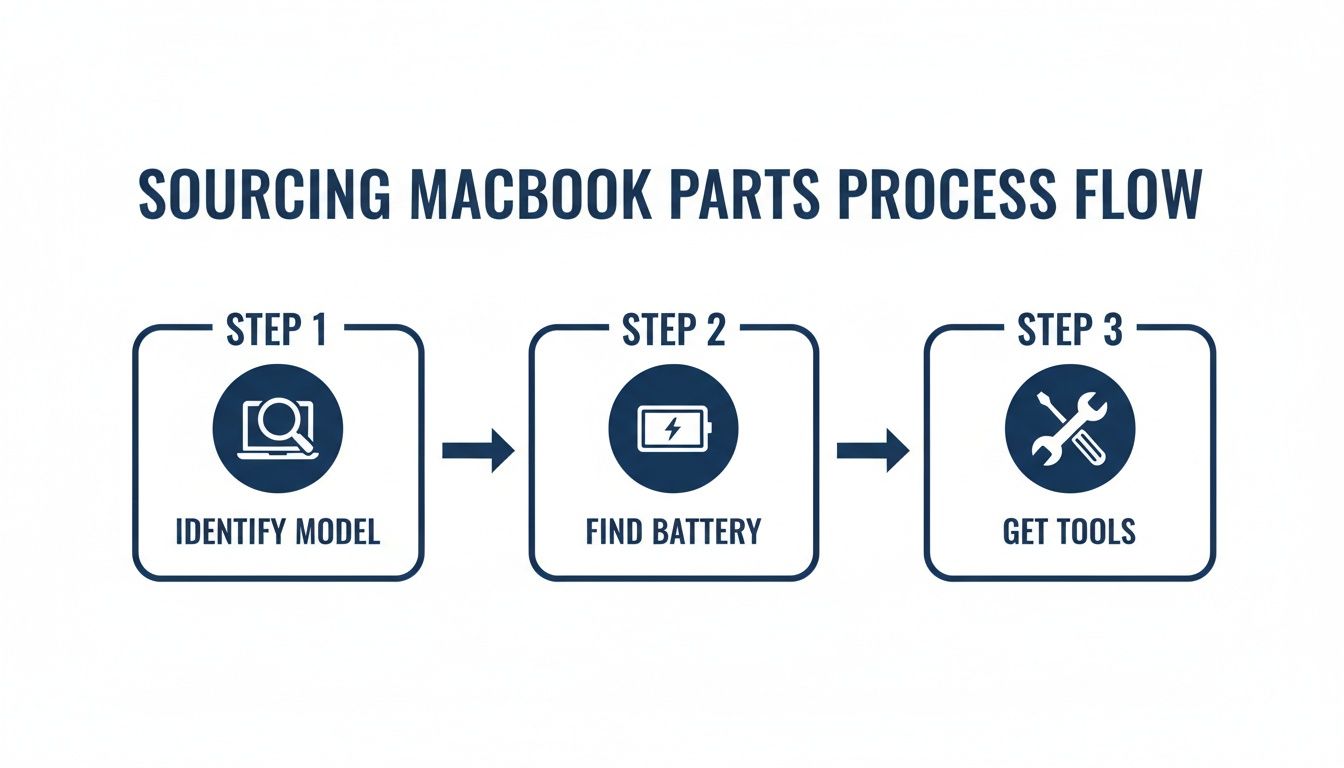 Alt: A flowchart showing the process for sourcing MacBook Pro replacement parts in Australia.
As the graphic shows, a successful repair starts with properly identifying your model to ensure you have the right battery and tools from the get-go.
Installing the New Battery and Reassembly
With the old battery finally out, take a moment to clean up any leftover adhesive residue from the chassis. This ensures the new battery sits perfectly flat. Most quality replacement batteries come with fresh adhesive strips already applied, which makes installation much simpler.
Carefully peel the backing from the new adhesive and align the new battery perfectly in its designated spot. Once it’s in position, press down firmly on each cell to create a strong bond.
Now you just have to reverse the process:
- Reconnect the battery connector: Carefully line it up over the socket and press down firmly with your spudger until you feel a solid click.
- Replace the bottom case: Set it back in place and press gently around the edges to snap all the clips back in.
- Re-insert the screws: Using your organised screw map, put each screw back into its original hole with your P5 screwdriver. Don’t overtighten them—just make them snug.
Once it's all sealed up, plug in your Mac and power it on. Your MacBook Pro should fire right up with a new lease on life, ready for a few more years of solid performance.
Handling Swollen Batteries and Other Complications
Sometimes, a straightforward MacBook Pro battery replacement can hit a snag. While most repairs go off without a hitch, being ready for the unexpected is what separates a successful DIY job from a disaster. The most serious issue you could possibly run into is a swollen battery—a problem that demands your full attention and extreme care.
A swollen battery is a massive red flag. It means the internal lithium-ion cells are failing and releasing gas, creating a very real fire risk. This isn't something to mess around with. If you pop the bottom case off your MacBook and see the battery looking like a puffy pillow, you have to proceed with caution. Your number one priority is safety.
 Alt: Safety equipment including gloves and glasses for a MacBook Pro battery repair.
Safely Managing a Swollen Battery
When you’re facing down a spicy pillow, your next moves are critical. The biggest danger is puncturing one of the cells, which can trigger a thermal runaway event—a rapid, violent chemical reaction that can lead to fire or even an explosion.
Follow these safety rules without fail:
- Gear Up: At the very least, wear safety glasses. You don't want any chemical spray getting in your eyes. Nitrile gloves are also a very good idea.
- Get Some Air: Work in a well-ventilated space. If you can, take it outside onto a non-flammable surface like concrete. This will help disperse any nasty fumes that might escape.
- No Metal Tools: Whatever you do, don't use metal tools to pry at the battery. One slip is all it takes to puncture a cell. Stick to your plastic spudgers and cards.
Removing it requires a huge amount of patience. You'll use the same technique with isopropyl alcohol and plastic cards, but you need to be ten times more gentle. Douse the adhesive with alcohol and give it plenty of time to work its magic. Never, ever apply forceful pressure directly onto the swollen cells. Instead, work slowly from the edges and let the solvent do the heavy lifting for you.
If you feel unsafe at any point, or if the battery casing looks like it's been compromised, stop immediately. A swollen battery is a genuine hazard. In these cases, getting professional help from a service like Screen Fixed Brisbane is the smartest, safest call you can make.
Troubleshooting Common Repair Frustrations
Beyond the serious threat of a swollen battery, a few other common frustrations can pop up during the replacement. Knowing how to deal with them calmly can stop a minor hiccup from turning into a major headache.
A stripped screw is a classic DIY nightmare. If you find a screw head that your driver just spins in, don't keep trying to force it—you'll only make it worse. A neat trick is to place a wide rubber band over the screw head before putting your screwdriver in. The rubber often gives just enough extra grip to get it moving. For really stubborn ones, you might need a specialised screw extractor kit.
Another common pain point is a stuck connector. Sometimes, a ribbon cable or the battery connector itself just refuses to budge. The key is to apply even, gentle pressure straight up. Wiggling it side-to-side is a quick way to damage the delicate pins or the socket on the logic board. A little bit of extra leverage with a plastic spudger on both sides at the same time can often pop it loose.
Interestingly, here in Australia, battery swelling is a critical issue in about 15-20% of MacBook Pro repairs, especially in humid coastal cities like Brisbane. Data from local techs shows this often pushes the trackpad up from below and can create serious fire risks. While Apple confirms all Pro models are eligible for battery replacement, independent repair shops handle around 65% of these jobs much faster, using top-quality parts.
Calibrating and Caring for Your New Battery
You’ve tightened that last screw and your MacBook Pro is purring away with its new battery. It’s a great feeling, but the job isn't quite done yet. To squeeze every bit of performance and life out of your new power source, a couple of post-installation steps are non-negotiable.
Think of a new battery like a new pair of running shoes—it needs a bit of breaking in. This initial "calibration" helps the battery's tiny internal brain sync up with macOS. It’s a crucial step to make sure the percentage you see on screen is what's actually left in the tank. If you skip this, you’re setting yourself up for annoying surprises, like your Mac suddenly dying even when it says there's 20% or 30% charge remaining.
The Essential Calibration Cycle
Getting your new battery calibrated is thankfully pretty straightforward. All you're doing is teaching your MacBook the battery's upper and lower limits with one full power cycle. Do this once, and you'll have an accurate battery meter for years to come.
Here's the simple, effective way to do it:
- Charge it to 100%: With your MacBook Pro on, plug it in and let it charge all the way to 100%. Don't unplug it just yet. Leave it on the charger for at least another two hours. This step makes sure the cells are completely topped up.
- Run it Down: Now, unplug it and use your MacBook like you normally would. Keep going until it shuts down on its own when the battery is totally empty. Don't worry, this is exactly what you want to happen.
- Let it Rest: Once it's off, leave it unplugged for at least five hours. This gives the battery time to settle at its true empty state.
- Full Recharge: Finally, plug the charger back in and let it charge uninterrupted all the way back to 100%.
That's it—your battery is now fully calibrated. The system knows its true capacity, which means reliable, predictable performance from here on out.
Long-Term Battery Care in Australia
With calibration out of the way, a few good habits will go a long way in maximising its lifespan, especially with the Aussie climate in mind. Lithium-ion batteries absolutely hate extreme temperatures, and heat is their number one enemy.
A critical tip for anyone in Australia: Never leave your MacBook in a hot car. On a sunny day, the inside of a car can quickly rocket past 50°C, which can permanently slash your battery's capacity. Even one bad afternoon in a hot car can cause irreversible damage.
You should also take full advantage of the Optimized Battery Charging feature that's built into modern versions of macOS. It’s a clever little function that learns your daily routine and holds off charging past 80% until it knows you'll need it. By minimising the time your battery sits at a full 100% charge, it dramatically slows down the chemical ageing process.
Responsible E-Waste Disposal
Your final job is to get rid of the old battery safely. Lithium-ion batteries are hazardous waste, so they must never, ever be tossed into your regular household rubbish bin.
Thankfully, finding a proper disposal point in Australia is easy. Organisations like Planet Ark's Recycling Near You have simple search tools to find local drop-off spots, which often include major retailers and local council waste facilities. By recycling your old battery, you’re not just preventing nasty chemicals from ending up in landfill—you’re also helping recover valuable materials for reuse.
Your MacBook Pro Battery Questions Answered
Even after a detailed walkthrough, it's totally normal to have a few more questions rattling around. Swapping out a MacBook Pro battery is a decent-sized job, and you want to be sure you're making the right call. Let's tackle the most common queries we hear from customers to help you get over the finish line with confidence.
Think of this as your final sanity check before deciding whether to roll up your sleeves for a DIY project or hand your beloved Mac over to a pro.
Can I Really Replace the MacBook Pro Battery Myself?
Absolutely. If you’ve got a bit of patience and a steady hand for detailed work, a DIY battery replacement is a super achievable and satisfying project. The real secret sauce is following a good guide, keeping your screws meticulously organised, and not skimping on quality parts and tools.
The bit that trips most people up is dealing with the ridiculously strong adhesive holding the old battery pack in place. That said, if you see any hint of the old battery swelling up, or you're just not feeling it after reading through the steps, getting a professional service like Screen Fixed Brisbane to handle it is always the smartest, safest bet.
How Much Does a MacBook Pro Battery Replacement Cost in Australia?
The final bill really comes down to which path you take.
- Apple's Official Service: If your Mac is out of warranty, you're looking at a bill from Apple that’s typically between $299 and $349.
- Independent Repair Shop: A professional independent service will often get the job done for $150 to $350, but usually with a much quicker turnaround.
- DIY Replacement: This is easily the most wallet-friendly route. A premium battery kit costs a fraction of a full repair service because you're only paying for the part, not the labour.
For most people, it's a balancing act between cost, convenience, and risk. A DIY job saves you the most cash, while a professional service gives you that warm, fuzzy feeling of a warranty and peace of mind.
Will a DIY Replacement Void My Apple Warranty?
This is a big one, so pay close attention. If your MacBook is still under its original one-year warranty or you’ve got an active AppleCare+ plan, cracking it open yourself will almost certainly void that coverage for anything you touch. On a new machine, it’s a risk that’s just not worth taking.
However, the vast majority of us are looking for a battery replacement long after any warranty has expired. For these Macs, going the DIY route or using an independent repair shop is a standard, cost-effective fix that doesn't interfere with any active policies.
Why Should I Avoid Cheap Unbranded Batteries?
The quality gap between a premium battery and a cheap, no-name one from a random online marketplace is massive. Premium, OEM-quality batteries are engineered to meet Apple's original specs for capacity, safety, and lifespan. They have all the crucial safety circuits built-in to prevent nasty surprises like overheating or overcharging.
Cheap batteries, on the other hand, are a gamble. They often have a much lower capacity than advertised, a depressingly short lifespan, and a significantly higher risk of failing, swelling, or even damaging your Mac. If, after all this, you decide a battery swap isn't for you, you might even think about selling your MacBook Pro and putting the cash towards a new machine. But if you do proceed, investing in a quality part is non-negotiable for protecting your valuable Mac and making sure it runs like a dream for years to come.
Disclaimer: Screen Fixed is an independent repair service and is not affiliated with Apple Inc. Any third-party trademarks, such as Apple, MacBook, MacBook Pro, and macOS, are the property of their respective owners.
Ready to bring your MacBook back to life and break free from the charger? Book your repair with Screen Fixed Brisbane today and let our expert techs get it sorted with speed and precision.