
Meta Title: Phone Screen Repair Guide | Screen Fixed Brisbane
Meta Description: A guide to phone screen repair. Learn to diagnose damage, choose tools and parts, and troubleshoot issues. Book your repair with Screen Fixed Brisbane.
That dreaded crunch when your phone meets the pavement is a feeling most of us in Australia know all too well. A cracked screen isn't just an eyesore; it can interfere with your phone's functionality and even pose a safety risk with sharp glass. But before you rush into a phone screen repair, it’s crucial to understand exactly what you’re dealing with.
This guide is here to walk you through the entire process, whether you're a first-timer tackling a DIY project or a repair technician looking to refine your skills. We’ll cover everything from diagnosing the damage correctly to choosing the right parts, ensuring your repair is a success.
Starting Your Phone Screen Repair Journey
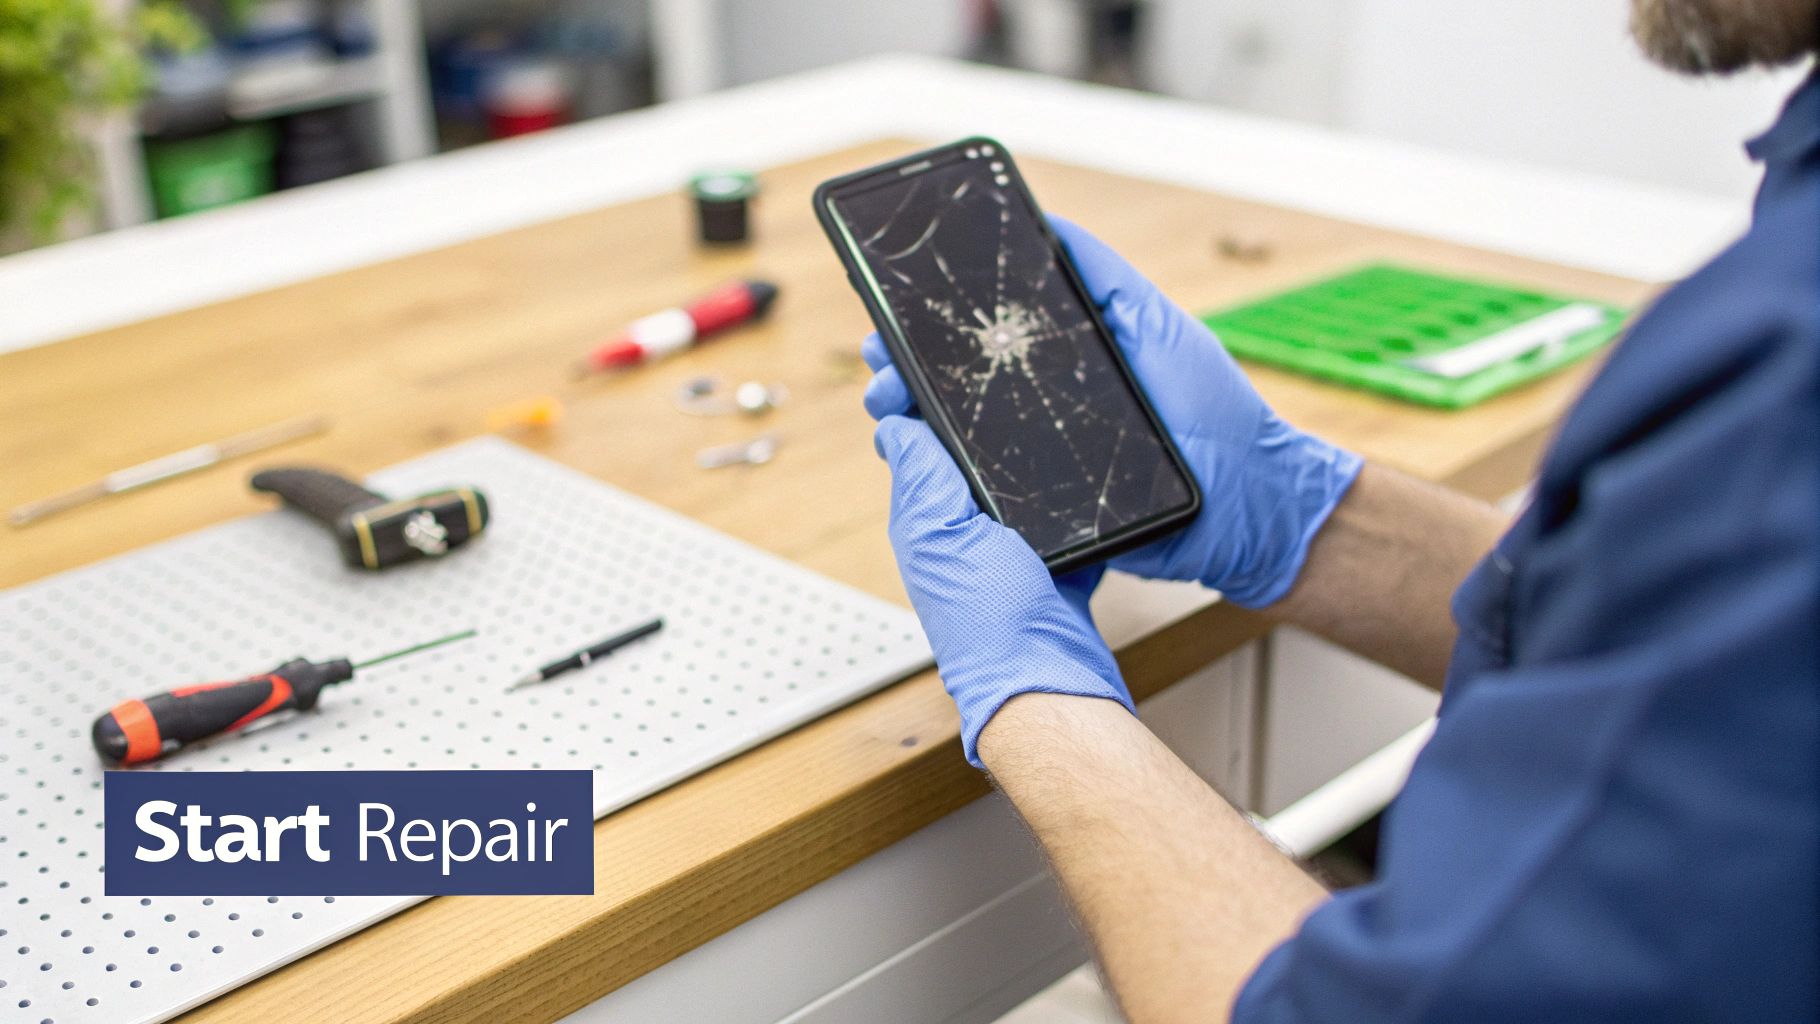
Alt: A technician holding a smartphone with a cracked screen, ready for a phone screen repair.
Caption: iPhone 14 Pro screen replacement in Brisbane.
The first step, always, is diagnosis. Is it just the top layer of glass that’s shattered, or has the impact damaged the sensitive display underneath? A proper assessment is what separates a smooth repair from a frustrating one, and it dictates the parts you’ll need to order.
Understanding the Extent of the Damage
Looking at the cracks is one thing, but you need to perform a quick functional check to see what’s really broken. This initial step will tell you whether you're in for a straightforward screen swap or something more complex.
Here’s a quick checklist of what to look for:
- Surface-level cracks: The glass might look like a spiderweb, but if the picture underneath is perfect and the touch response is flawless, you've only broken the top glass. Keep in mind, though, that on most modern phones, this glass is fused to the display, so you’ll still be replacing the entire screen assembly.
- Display issues: Are there black spots, strange coloured lines running across the screen, or areas that have gone completely dark? These are clear signs that the LCD or OLED panel itself has been damaged.
- Touch problems: If some parts of the screen don’t respond to your finger, or worse, you’re getting "ghost touches" where the phone acts on its own, the digitiser (the layer that senses touch) has failed.
Here in Australia, cracked screens are by far the most common mobile phone repair we see. They make up the bulk of service requests for everything from iPhones to the latest Samsung Galaxy. For any repair shop, this sheer volume means having a rock-solid parts supplier isn't just important—it's essential for business.
Preparing for a Successful Repair
Once you’ve figured out what’s wrong, it’s time to get ready. A successful phone screen repair is all about having the right gear and the right mindset before you even think about removing the first screw. Rushing in without a game plan is a surefire way to cause more damage.
A successful repair is 90% preparation and 10% execution. Taking the time to organise your workspace, gather the correct tools, and understand the steps will save you from costly mistakes down the line.
Think of it like a pre-flight checklist for your repair bench. Is your workspace clean and well-lit? Have you sourced a quality replacement screen? Are all your tools laid out and ready to go? Nailing this prep work is what makes the whole process smooth and satisfying. To get a better idea of your options, check out our guide on how to find affordable phone screen repair services near you. This initial planning is what separates a frustrating afternoon from a successful fix.
Building Your Essential Repair Toolkit
Alt: A collection of phone screen repair tools including precision screwdrivers, prying tools, and a magnetic mat.
Jumping into a phone screen repair without the proper gear is a recipe for disaster. It's like trying to cook a gourmet meal with just a butter knife – you'll make a mess, but you definitely won't get the result you want.
The difference between a clean, successful repair and a phone that’s worse off than when you started often boils down to the quality of your tools. A cheap, poorly-made screwdriver can strip a tiny screw head in a heartbeat, turning a straightforward job into a nightmare.
This is why investing in a proper toolkit pays for itself, whether you're a DIY enthusiast tackling your first repair or a seasoned technician in Screen Fixed Brisbane. It’s not about having the most tools; it’s about having the right ones. Each piece of equipment is specifically designed to handle the delicate internals of a modern smartphone without causing damage.
The Must-Have Tools for Any Repair
Your toolkit should be a collection of specialised instruments. Take the humble plastic spudger, for instance. It might seem basic, but it's your first line of defence against accidentally shorting the motherboard. Using a metal tool to pry up connectors is a massive risk that can cause irreversible damage, making non-conductive plastic tools essential.
Here are the absolute essentials you'll want on your bench:
- Precision Screwdriver Set: This is your workhorse. Make sure it includes Pentalobe bits for iPhones, various small Phillips heads, and ideally Torx bits for other models. Quality is key here—hardened steel tips are a must to prevent stripping screws.
- Spudgers and Prying Tools: A good mix of plastic spudgers and thin metal prying tools lets you safely disconnect ribbon cables and open casings without scratching or cracking anything.
- Suction Cup Pliers or Handle: This is crucial for lifting the screen assembly away from the phone's frame, especially on iPhones and other modern devices sealed with strong adhesive. It applies gentle, even pressure to break the seal safely.
- Tweezers: You’ll need a pair of fine-tipped, anti-static tweezers. Trying to handle minuscule screws and fragile flex cables with your fingers is a fast track to frustration and dropped parts.
Getting to know each tool's purpose is the first step. If you want to go a bit deeper, understanding the various screw drive types used in electronics will give you a real appreciation for why a specific driver works perfectly while another spells disaster.
Workspace and Safety Essentials
Your repair environment is just as critical as the tools you're using. A messy, disorganised space is a breeding ground for lost screws and expensive slip-ups. Thankfully, two simple items can immediately level up your setup from amateur to professional.
First is a magnetic project mat. These mats often have a grid that helps you map out where every single screw came from. This is incredibly important because putting the wrong length screw back in during reassembly can puncture the battery or permanently damage the logic board.
An anti-static wrist strap isn't just for show. A tiny, unseen spark of static electricity from your body can be enough to fry sensitive microchips on the logic board, rendering the phone useless. It's a small precaution that protects against invisible threats.
Second is an anti-static mat and wrist strap. Electrostatic discharge (ESD) is the silent killer of electronic components. Grounding yourself ensures that any static build-up is safely discharged away from the device you’re working on. For any serious iPhone repairs in Brisbane, this is standard operating procedure.
Choosing the Best Replacement Screen
The success of your phone screen repair comes down to one thing more than any other: the quality of the replacement screen you use. It's easy to get lost in jargon like OEM, Service Pack, and aftermarket. But understanding what these terms mean is the key to a repair that not only looks good but lasts.
The screen is how you interact with your phone for everything. Colour accuracy, touch response, brightness, and durability are all dictated by that single part. A cheap, low-quality screen will give you a frustrating experience every time you pick it up, from laggy typing to photos that look flat and lifeless.
Decoding Screen Types: OEM vs Service Pack vs Aftermarket
When you start sourcing parts, you'll run into three main types of screens. Each has its own place, and the best one for your job depends on the phone, your budget, and your expectations.
- OEM (Original Equipment Manufacturer): These are identical to the original parts, made by the same factories that supply Apple or Samsung. The catch? They are incredibly difficult for independent shops or the public to obtain.
- Service Pack: This is the gold standard for many repairs. These are genuine parts, often the same ones supplied to official service centres. If you're working on a flagship Samsung, a Service Pack screen guarantees you're getting the exact same display quality as the original.
- Aftermarket: Made by third-party companies, these screens can be a mixed bag. The quality ranges from cheap copies you should avoid to premium aftermarket screens that offer a fantastic balance of performance and price.
This isn't just splitting hairs. Putting a cheap screen on a high-end phone can compromise features you paid for, like high refresh rates or HDR video. If you want to dive deeper into the tech, understanding the differences between LCD, OLED, and AMOLED screens is a great place to start.
Making the Right Choice for Your Repair
So, which screen should you go for? It’s usually a trade-off between cost and perfection. For a nearly new flagship phone, a Service Pack screen is almost always the right call to protect its performance and resale value.
On the other hand, for an older device, like an iPhone 11, a premium aftermarket screen from a trusted supplier makes a ton of sense. You get reliable performance that’s miles better than a cheap copy, but at a price that makes the repair worthwhile.
Choosing a part isn't just about price. It's about matching the screen's quality to the device's value and your own expectations. A well-chosen premium aftermarket screen can extend the life of an older phone beautifully, while a Service Pack part restores a new device to its factory glory.
To make it even clearer, here’s a quick breakdown of how these screen types compare.
Screen Quality Comparison: OEM vs Service Pack vs Aftermarket
This table compares the different screen types based on performance, quality, and cost.
| Screen Type | Display Quality | Touch Response | Durability | Typical Cost | Best For |
|---|---|---|---|---|---|
| OEM/Service Pack | Identical to original; perfect colour accuracy, brightness, and contrast. | Flawless and immediate, matching factory specifications. | Built to the manufacturer's original standards for scratch and impact resistance. | High | Newer, high-end devices where maintaining original performance is critical. |
| Premium Aftermarket | Very good; colours and brightness are close to the original, but minor differences may be noticeable. | Excellent and reliable for everyday use, with minimal perceptible lag. | Generally strong, often using high-quality glass, but may differ from OEM. | Medium | Mid-range or slightly older flagship phones where value is a key consideration. |
| Basic Aftermarket | Variable; may have lower resolution, inaccurate colours, or uneven backlighting. | Can be inconsistent, sometimes leading to 'ghost touch' or lag. | Often uses lower-grade materials that are more prone to scratching or breaking. | Low | Older, budget devices where the primary goal is simply to restore basic functionality. |
Taking the time to make an informed choice here is the most important step. It's what ensures your phone screen repair results in a device that doesn't just work, but feels right again.
Navigating the Screen Replacement Process
Alright, you’ve got your tools laid out and the perfect replacement screen ready. Now comes the real work—the part where patience and a steady hand make all the difference. This is the heart of any phone screen repair, and taking your time is the golden rule.
To give you a real-world feel for the process, we'll walk through the main stages using two of Australia's most popular models: the iPhone 13 and the Samsung Galaxy S21. While the exact steps vary, the core principles of preparation, disassembly, and reassembly are always the same.
Preparation Before You Begin
Before you touch a screwdriver, there are a couple of things you absolutely must do. First and foremost, back up your data. A screen replacement shouldn't wipe your phone, but things can go wrong. It’s always better to spend ten minutes backing up than to risk losing years of photos.
Once your data is safe, get your workspace sorted. Lay out your magnetic mat, have your tools within easy reach, and completely power down the phone. Don't just lock the screen—hold down the power button and slide to power off. This simple step prevents any accidental short circuits.
Disassembly: The Art of Careful Opening
Getting into a modern smartphone is like performing surgery. These devices are sealed tight with powerful adhesives and packed with tiny, fragile components. The first move is almost always applying heat to soften the glue holding the screen or back panel.
- For the iPhone 13: You'll start by taking out the two pentalobe screws at the bottom. After gently warming the edges of the screen, use a suction cup to create a tiny opening. This gives you just enough room to slide a thin pry tool in. The iPhone 13 opens like a book from left to right, so you have to be incredibly careful not to tear the delicate display cables running along the left side.
- For the Samsung Galaxy S21: This model opens from the back. The rear glass is glued down seriously tight and needs a good amount of even heat. Once it’s warm, you can work a thin plastic card around the edges to slice through the adhesive. Be careful not to push the card in too deep, or you risk damaging the wireless charging coil.
Pro Tip: Let the adhesive tell you what to do. If you feel too much resistance when prying, stop. Apply more heat. Trying to force it is the quickest way to crack a back panel or rip a hidden cable.
Once you’re inside, it’s a careful sequence of disconnecting parts. The battery always comes first—no exceptions. After that, you'll disconnect the flex cables for the display, sensors, and cameras. This is where your magnetic mat proves its worth. Screws in a phone are often different lengths, and putting a long screw where a short one should go can permanently damage the logic board.
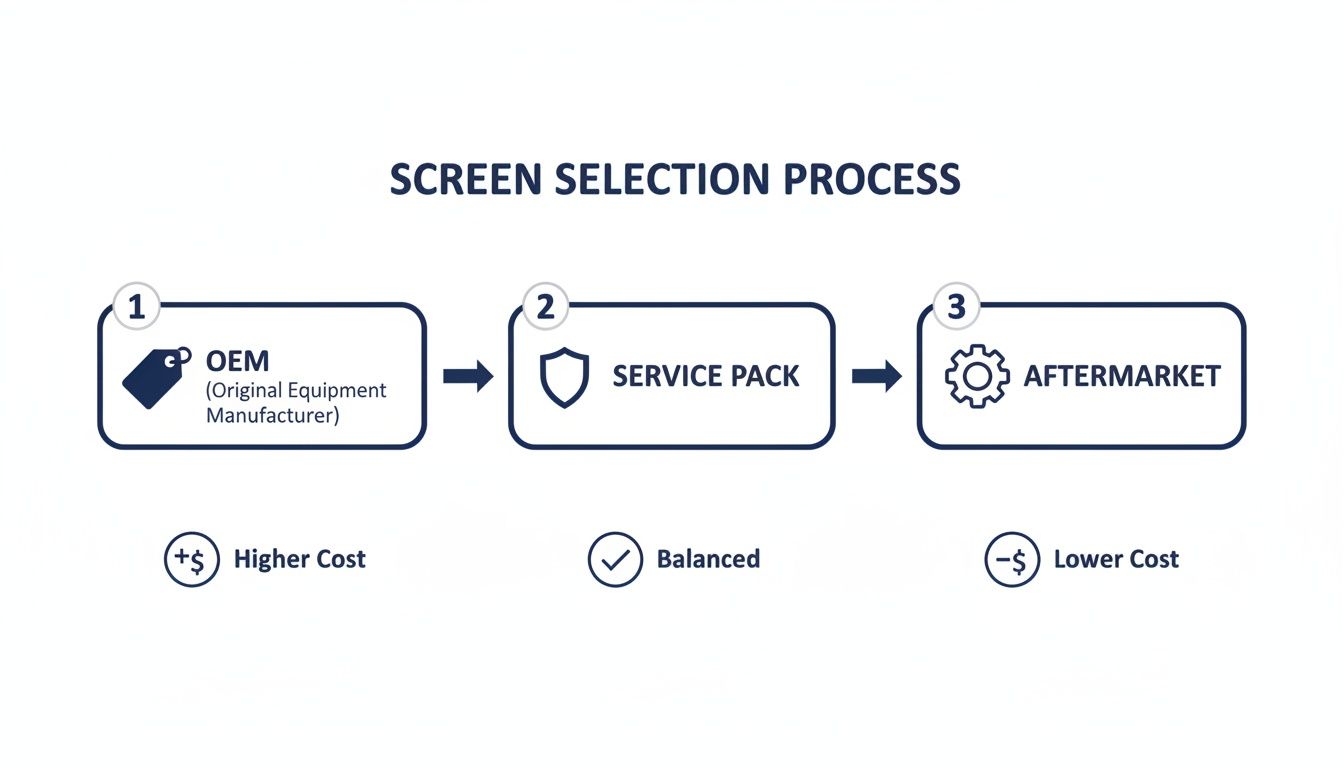
Alt: A flowchart showing the decision process for choosing a phone screen repair part: OEM, Service Pack, or Aftermarket.
This flowchart breaks down the decision between OEM, Service Pack, and Aftermarket parts, pointing you to the best fit based on your budget and device value.
Transferring Critical Components
This is often the most nerve-wracking part of a phone screen repair. On many phones, especially iPhones, key parts like the earpiece speaker and the front sensor assembly are attached to the old screen. The sensor assembly is particularly important as it houses the Face ID hardware.
You have to painstakingly transfer these components to the new display. The Face ID sensor array is not only incredibly delicate but also cryptographically paired to your phone's logic board. If you damage it, even slightly, Face ID is gone for good. It's a massive failure point for DIY repairs, which is why professional iPhone Repairs Brisbane services are often the smarter choice for newer models.
Use gentle heat to soften the glue holding these parts down, and work slowly with fine-tipped tweezers and a spudger. Never use force. The aim is to move every single piece over to the new screen exactly as it was.
Reassembly and Final Testing
With the components successfully transferred, you're on the home stretch. But before you seal everything up, it's absolutely vital to do a "test fit." Connect the new screen, reconnect the battery, and power the phone on.
This quick pre-closure check saves you the headache of having to reopen the phone if something isn’t right.
Essential Functionality Checklist:
- Display: Look closely for any dead pixels, weird colours, or lines.
- Touch Input: Open a notes app and scribble all over the screen. Make sure every single spot responds to your touch.
- Biometrics: Check that Face ID or the fingerprint sensor is working perfectly.
- Brightness: Slide the brightness control all the way up and down.
- Cameras: Test both the front and rear cameras to make sure they're clear and functional.
Once you've confirmed everything works, power it down, disconnect the battery again, and get ready to close it up. The final touch is applying a new adhesive frame seal. This is crucial for keeping out dust and moisture. Just remember, a repaired phone will never have the same water resistance rating it had from the factory.
After carefully pressing the screen into place and putting the final screws back, power it on for one last check. A successful repair should look and feel brand new—a direct result of the care and precision you put in.
Troubleshooting Common Repair Issues
Even when you follow every step to the letter, a phone screen repair can sometimes throw a curveball your way. The phone powers on, but something just isn't right. Don't panic—most post-repair issues are caused by simple, fixable mistakes, not a faulty part.
This is where you enter the troubleshooting phase. A calm head and a methodical approach will save you a world of frustration. Most problems can be traced back to a handful of common culprits, like a cable that isn't seated quite right or a sensor that got nudged out of alignment.
Think of it as your final quality check. By knowing what to look for, you can diagnose and solve these issues like a pro.
Unresponsive Display or Dead Screen
You've put it all back together, you hit the power button, and… nothing. Or maybe you get a backlight, but no image. This is a classic issue, and it's rarely because the new screen is a dud.
Before you assume the worst, work your way through this checklist:
- Check the Battery Connection: Is the battery properly connected? A loose battery terminal means no power is getting to the logic board or the display.
- Reseat the Display Cables: This is the most common cause. Power the phone down, disconnect the battery, and then carefully unclip and reconnect the screen's flex cables. You're listening for a satisfying little click that tells you it's secure.
- Inspect for Damage: Take a close look at the flex cables and connectors on both the new screen and the logic board. Any tiny tear in a cable or a bent pin on a connector is enough to interrupt the signal.
Ghost Touch or Erratic Behaviour
Is your phone acting like it's possessed, opening apps and typing messages all by itself? This phenomenon, known as "ghost touch," is incredibly annoying but usually has a straightforward fix.
This issue almost always comes down to a problem with the digitiser connection. The digitiser is the layer that registers your touch, and any interference can cause it to send faulty signals.
Often, ghost touch is caused by a pinched or improperly seated digitiser flex cable. When you're reassembling the phone, make sure the cable isn't folded at a sharp angle or crushed between the frame and the screen. That pressure is all it takes to create false inputs.
Start by reopening the device and carefully reseating the relevant cables. Also, double-check that no loose screws or bits of debris are pressing against the back of the screen assembly.
Discolouration and Brightness Issues
If your new screen is showing strange lines, off-colours, or just isn't as bright as it should be, don't immediately blame the part. The cause is often related to the connection or a temporary software glitch.
A single vertical line or a discoloured patch often points to a pin not making proper contact in one of the display connectors. Gently cleaning the connectors with isopropyl alcohol and a soft brush before reseating them can sometimes work wonders.
This is a significant issue across Australia's booming mobile repair industry. According to some reports on Australia's mobile phone repair market insights, the demand for cost-effective fixes over expensive replacements has never been higher, making screen repairs the top service. For repair shops from regional towns to major hubs like Brisbane, thriving in this market means having access to reliable parts and troubleshooting knowledge.
Face ID or Fingerprint Sensor Failure
This might be the most dreaded post-repair problem. You finish the job, and the biometrics just won't work. The root cause is almost always tied to the transfer of the original sensor array from the old screen to the new one. These components are uniquely paired—or "married"—to your phone's logic board at the factory.
- For Face ID: The entire front sensor assembly, including the dot projector and infrared camera, has to be moved over perfectly. Even the slightest damage to these components or their fragile flex cables will permanently kill Face ID.
- For Fingerprint Sensors: Under-display sensors can be just as finicky. You have to ensure the sensor is correctly aligned and that its cable is fully connected. Some models may even require a software recalibration after a screen replacement.
If you run into this issue, your only real option is to reopen the phone and meticulously re-check your work, ensuring every component was transferred without any damage.
Let Screen Fixed Handle It
A successful phone screen repair is incredibly rewarding, but it requires patience, precision, and the right parts. While a DIY approach can save money, the delicate components and potential for things to go wrong mean it’s not for everyone. If you’re feeling unsure, or if you’ve run into a problem you can’t solve, our expert technicians are here to help.
At Screen Fixed, we use premium parts and have the experience to handle any repair, from a simple screen swap to complex component transfers. We ensure every feature, including Face ID and water resistance seals, is restored as close to factory-perfect as possible. Don’t risk further damage or losing critical features.
Book your repair with Screen Fixed Brisbane today and let the professionals get your device looking and working like new.
Disclaimer: Screen Fixed is an independent repair service and is not affiliated with the manufacturers mentioned. All brand names and trademarks are the property of their respective owners.