

When you plug in your MacBook and the charging icon doesn’t appear, it’s easy to feel a surge of panic. You rely on your device for work, study, and staying connected, so a dead battery is more than just an inconvenience. But before you jump to conclusions about a costly hardware failure, take a breath. The most common reasons for a MacBook not charging are often the simplest to fix. These problems usually trace back to your power source, cable, or the charging port itself, and you can diagnose them in just a few minutes.
Your First Steps When a MacBook Refuses to Charge
That sinking feeling when your MacBook ignores its charger is a familiar story for many of us. The good news is, you don’t need to be a tech wizard to run through the initial checks. More often than not, the problem is something external, not a deep-seated issue within the machine. Let's walk through a logical troubleshooting process to quickly rule out the most frequent culprits and get you back up and running.
This methodical approach saves a lot of time and stress, making sure you don't overlook an easy solution before diving into more complex diagnostics.
Start with the Power Source
It might sound ridiculously obvious, but the first place to check is always the wall outlet. Power points can fail, and surge protectors can trip without you realising. Before blaming your expensive laptop, grab another device—like a lamp or your phone charger—and plug it into the same socket to confirm it’s actually delivering power.
If that outlet works fine, the issue could be the power board or extension lead you're using. Try plugging your MacBook's charger directly into a confirmed working wall socket to eliminate any middleman. This one step solves a surprising number of charging problems.
Inspect Your Charging Cable and Adapter
Your charging cable leads a tough life. It gets coiled, stretched, yanked, and stuffed into bags day after day. All that wear and tear can cause internal damage that isn't always visible at a glance.
Take a moment to carefully inspect the entire length of your USB-C or MagSafe cable for any signs of trouble:
- Fraying or breaks: Pay close attention to the ends of the cable where it meets the adapter and the MacBook connector. This is the weakest point and where damage most often occurs.
- Discolouration or burn marks: Any dark spots on the adapter pins or the cable's metal connectors are a massive red flag. This often indicates a potential short circuit.
- Bent pins: Look closely at the connector that plugs into your MacBook. A single bent or damaged pin is enough to prevent a proper connection and stop charging in its tracks.
This quick decision tree can help you visualise these first few troubleshooting steps for a MacBook that's decided to go on a power strike.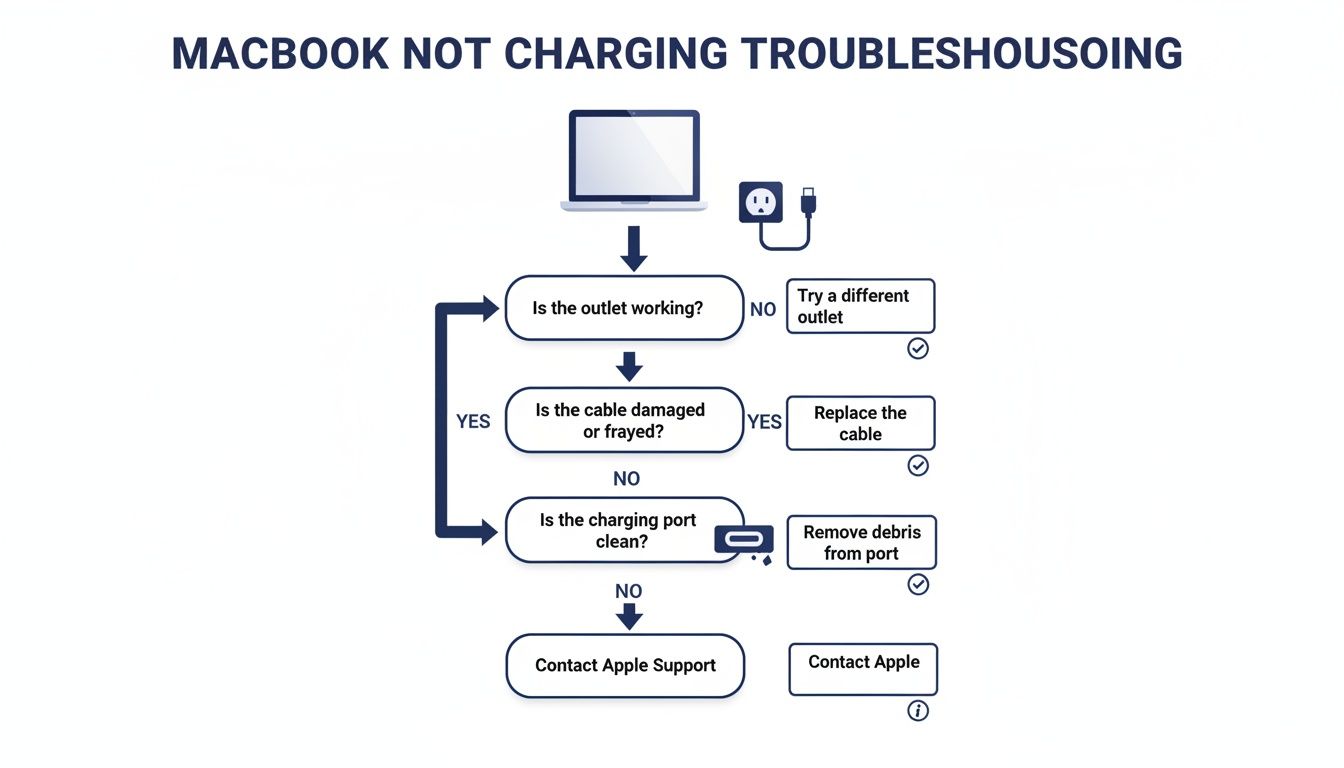
Alt text: Troubleshooting flowchart for a MacBook that is not charging, covering outlet, cable, and port checks.
Caption: This flowchart helps diagnose common MacBook charging issues quickly.
By following this flow, you can systematically knock out the most common external issues before needing to look at software or internal hardware.
Check the Charging Port for Debris
Your MacBook's charging port is an absolute magnet for dust, pocket lint, and other small bits of gunk from your bag. Over time, this buildup can get compacted down inside, preventing the charging cable from making a solid, clean connection.
A blocked charging port is one of the most common—and most overlooked—causes of charging failure. A careful clean can often get things working again instantly, no repairs needed.
Grab a torch and have a gentle look inside the port. If you can see any visible debris, you'll need to clean it out carefully. A non-metallic tool like a wooden toothpick or a can of compressed air is your safest bet to avoid causing any damage.
For broader technical assistance or AI-powered troubleshooting that goes beyond these basic steps, you might consider exploring general support tools like the supportGPT application. If these initial physical checks don't get you back up and running, the next step is to investigate your MacBook's software and system settings.
How to Read Your MacBook's Charging Signals
Your MacBook usually gives you clues about what's happening with its power, but you have to know what you're looking for. Learning to interpret these signals is the first step in any quick diagnosis. It helps you figure out whether you're up against a simple software quirk or a more serious hardware fault.
Knowing what to look for can save you a lot of stress when your MacBook is not charging the way it should. So, before you assume the worst, let's decode what your machine is trying to tell you.

Alt text: A silver MacBook laptop is charging from a white wall outlet, highlighting the power source.
Caption: Ensuring your power source is active is the first step in troubleshooting.
Decoding the MagSafe Indicator Light
If you’ve got an older MacBook or one of the newer models that brought back the much-loved MagSafe connector, that little LED on the cable is your best friend. It’s designed to give you an instant status update.
Here’s what the colours mean:
- Steady Orange/Amber Light: This is what you want to see. It means your MacBook’s battery is actively charging.
- Steady Green Light: This tells you the battery is fully charged and the MacBook is now running on power directly from the adapter.
- No Light at All: Here’s where the trouble starts. No light means no power is flowing from the adapter to your MacBook. The culprit could be anything from a faulty charger or a dead wall socket to an issue with the MagSafe port itself.
If you don't see a light, the very first thing to do is check your power source and all cable connections. Sometimes, all it takes is a quick wiggle of the connector to get things working again.
Checking Power Delivery on USB-C Models
For MacBooks that charge via USB-C, you don't get that handy indicator light on the cable. Instead, you need to dig into macOS to see what's really going on. The most reliable place to look is the System Information app.
To get there, hold down the Option key, click the Apple menu () in the top-left corner of your screen, and select System Information. Once it opens, head to the "Power" section under the "Hardware" list.
This screen is a goldmine of information. Find the "AC Charger Information" section. If your MacBook sees the charger, it will list details like its wattage. If it says "No" next to "Connected," then your Mac isn't detecting the charger at all.
This is a critical diagnostic step. If the system doesn't recognise the charger, the problem is almost certainly the cable, the adapter, or the USB-C port. On the other hand, if it sees the charger but still won't charge, you might be looking at a software glitch.
Is It a Fault or a Feature?
Sometimes, a MacBook that's not charging isn't broken—it's just being smart. macOS has a feature called Optimised Battery Charging that's designed to prolong your battery's lifespan. It does this by pausing the charge at around 80%. The system learns your daily routine and tries to finish charging to 100% just before you normally unplug.
This feature can be pretty confusing if you don't know it exists. We see this a lot with Australian MacBook users. In fact, Apple Support data shows that a surprising number of 'not charging' service queries are actually related to these optimised features. It's particularly common in hot climates like Queensland, where temperatures over 35°C can cause the system to pause charging to protect the battery.
If you see your charge is stuck at 80%, this is probably why. Before you book a repair with Screen Fixed Brisbane, make sure your MacBook isn't just looking after its own battery. You can usually force it to continue by clicking the battery icon in your menu bar and selecting "Charge to Full Now." For a deeper dive, you can also check out these insights into MacBook charging behaviour from Anker.
Trying a Software Reset to Fix Charging Glitches
If you've checked all your cables, ports, and power sources and still have no luck, don't jump straight to assuming you've got a hardware failure. The problem often lies in the low-level firmware that manages your MacBook’s power functions. These powerful software resets are your next logical step, and the best part is they won't touch any of your personal data.
These procedures essentially force a reboot of the tiny, specialised controllers inside your Mac that handle things like battery management and power delivery. Think of it as waking up a sleepy component that's stopped doing its job correctly—a surprisingly common reason why a MacBook is not charging.
Alt text: A white power bank with green indicator light charging a device on a wooden desk, with a laptop displaying 'Charging Signals'.
Caption: Sometimes, a simple software reset can restore normal charging behaviour.
What Is the SMC and Why Reset It?
The System Management Controller (SMC) is a little chip on the logic board of Intel-based MacBooks that handles a whole range of core functions. It’s the behind-the-scenes manager for all the tasks you rarely think about.
The SMC is responsible for:
- Responding when you press the power button.
- Managing the battery and its charging status.
- Controlling status indicator lights (including the charging light).
- Managing thermal performance and fan speeds.
When this controller's settings get scrambled, it can lead to all sorts of strange behaviour, including a complete refusal to charge. Resetting it forces the SMC back to its factory default settings, which can instantly sort out many power-related glitches.
How to Reset the SMC on Intel MacBooks
The process for resetting the SMC depends on whether your Intel MacBook has a removable battery or a non-removable one, which covers most models from the last decade or so.
For MacBooks with a non-removable battery (most models since 2009):
- Shut down your MacBook completely.
- Plug in your power adapter.
- On the built-in keyboard, press and hold Shift (left side) + Control (left side) + Option (left side) and the Power button all at the same time.
- Keep holding all four keys for 10 seconds, then let go of them all at once.
- Press the power button again to turn your MacBook on.
For MacBooks with a removable battery (older models):
- Shut down the MacBook and unplug the power adapter.
- Carefully take out the battery.
- Press and hold the power button for 5 seconds.
- Put the battery back in, reconnect the power adapter, and turn the MacBook on.
Once it's reset, plug your charger in and check if the issue is gone. This simple trick often brings a seemingly dead MacBook back to life.
The Equivalent for Apple Silicon MacBooks
Got a newer MacBook with an Apple Silicon chip (M1, M2, M3, etc.)? You won't find any instructions for an SMC reset. That’s because these models use a totally different architecture that handles those functions in another way.
On Apple Silicon Macs, the traditional SMC reset is obsolete. The equivalent action to clear similar low-level settings is to simply perform a full shutdown and restart.
For these newer machines, the process couldn't be simpler:
- Shut down your MacBook completely by going to the Apple menu () > Shut Down.
- Wait for at least 30 seconds. This ensures all the hardware processes have fully powered down.
- Press the power button to turn it back on.
This basic restart cycle serves a similar purpose to the old SMC reset, clearing out temporary firmware glitches that could be getting in the way of charging.
Advanced Hardware Diagnostics For The DIY Enthusiast
When software resets fail to revive your MacBook, it’s time to peek under the hood. This is for DIYers at ease with screwdrivers and circuit boards. Finding the exact faulty piece ensures you only buy what you truly need.
Using System Information To Check Battery Health
macOS already carries a detailed diagnostics tool. Hold down the Option key, click the Apple () menu and choose System Information. Navigate to Hardware → Power, then look for:
- Cycle Count: How many full charge/discharge cycles your battery has endured. Most MacBook batteries reach end-of-life around 1,000 cycles.
- Condition: A quick status update—“Normal,” “Service Recommended” or “Replace Soon.” Anything beyond “Normal” means trouble.
- Full Charge Capacity (mAh): Compares current capacity to factory specs. A sharp drop here spells battery wear.
This built-in report gives you the core data you need before cracking open the case.
System Information will flag a failing battery long before you swap any parts.
Common Hardware Failure Points Beyond The Battery
A healthy battery yet still no charging? The issue often shifts to the charging circuit. Key suspects include:
- Power Adapter: Swap in a known-good charger. If charging returns, the adapter was at fault.
- DC-In Board or USB-C Ports: Older MacBooks use a dedicated DC-in board; newer ones rely on USB-C sockets. Physical damage, corrosion or loose solder joints can interrupt power flow.
Use a multimeter to confirm voltage output. If you need a refresher, check our guide on how to use a multimeter for beginners.
Confirming each component before replacement cuts down on waste and expense.
Battery recalls aren’t unheard of. Take the Retina 15-inch Mid 2015 MacBook Pro recall in Australia—over 4,000 units were registered for free battery replacements by mid-2016 due to overheating concerns. That episode highlights why it’s crucial to inspect both battery health and charging parts thoroughly. For the full details, read about Apple's laptop battery challenges on Geeks2U.
When to Suspect a Logic Board Problem
So, you've swapped out the battery, given the charging port a thorough check, and your MacBook is still playing dead. When you've exhausted the usual suspects, it's time to consider that the problem might run a lot deeper. A faulty logic board is often the final frontier in diagnosing why your MacBook is not charging, and it's a completely different beast than a simple part swap.
We're not just talking about one broken component here; this is the central nervous system of your machine failing. Spotting the signs early can save you from wasting a lot of time and money chasing the wrong fix.
The symptoms of a logic board failure are usually pretty dramatic and absolute. Your MacBook will likely be completely lifeless—no fan spin, no startup chime, and zero response when you hit the power button. This holds true no matter which charger you connect. Another massive red flag is any history of liquid damage. Even a tiny spill from months ago can kick off a slow corrosion process that eventually shorts out a critical component on the board.
Alt text: A person uses a screwdriver to open a silver MacBook, ready for battery replacement.
Caption: A MacBook Pro battery replacement in Brisbane requires precision and care.
Understanding Component-Level Failure
A logic board is a complex ecosystem of thousands of microscopic components, and the charging circuit is one of its most intricate pathways. A failure in this area is rarely as simple as one part burning out. More often than not, it's a chain reaction that takes out multiple components along the way.
Think of the key players involved in getting power to your battery:
- The USB‑C or MagSafe Controller Chip: This is the gatekeeper. It’s responsible for identifying the charger, negotiating the correct voltage, and authorising the flow of power. If this chip is dead, your MacBook won't even know a charger is plugged in.
- Power Management ICs (PMICs): These are the traffic controllers. They take the incoming power and distribute it to all the different subsystems, including the one that actually charges the battery. A fault here can stop power in its tracks.
- MOSFETs and Capacitors: These are the workhorses that manage and stabilise the current. A shorted capacitor or a blown MOSFET on the main power rail is one of the most common reasons for a completely dead MacBook.
When one of these tiny, crucial parts fails, you can't just swap it out like a battery. It requires serious micro-soldering skills and a deep understanding of electronic schematics.
How Professionals Diagnose Logic Board Faults
Pinpointing a logic board issue is a specialist's game. It goes way beyond a visual inspection and involves some pretty advanced tools and techniques to find the exact point of failure on a board crowded with microscopic parts. This is less guesswork and more electronic forensics.
For example, a technician's first step is often to use a multimeter to check for short circuits on the main power rails. By injecting a very low voltage (around 1V) into the board and watching the current draw, they can instantly tell if there's a direct path to ground where one shouldn't be. That confirms a short, but the real trick is finding it.
To hunt down the exact culprit, professionals often turn to thermal imaging. By viewing the board through an infrared camera while injecting voltage, the shorted component heats up and glows like a beacon on the screen, revealing its precise location.
This level of diagnostics shows the massive difference between swapping parts and performing a genuine component-level repair. Here in Australia, logic board failures are a big deal, driving around 35% of all MacBook 'not charging' repairs in professional service centres. Digging into the data, short circuits on the main power rail are the specific cause in a whopping 62% of dead M2 and M3 MacBook Pro models we've seen. You can discover more about how these complex data recovery and repair cases are handled.
When you're facing these kinds of symptoms, it's pretty clear the problem is beyond a standard DIY fix. Trying to repair a logic board without the right skills can easily turn a recoverable device into an expensive paperweight. For these intricate issues, seeking out professional MacBook repairs in Brisbane is your safest bet to get your machine back up and running.
If you've run through all the checks and you're still stuck with a dead battery, don't risk causing more damage by poking around. The team at Screen Fixed are experts in diagnosing and repairing all sorts of MacBook issues, from simple battery swaps to complex logic board faults. Book your repair with Screen Fixed Brisbane today and let our technicians get your MacBook powered up and running again.
Disclaimer: Screen Fixed is an independent repair service and is not affiliated with Apple Inc. All brand names and trademarks are the property of their respective owners.