
Meta Title: MacBook Keyboard Not Working? A Complete Aussie Fix Guide
Meta Description: Keyboard not working on your MacBook? Follow our guide to fix sticky keys, software glitches, and hardware issues. Trusted repairs in Brisbane.
When your MacBook keyboard stops working, it’s a massive pain that can bring your productivity to a halt. The good news is that the problem is often simpler than you think. It could be a minor software glitch, a bit of dust trapped under a key, or an accessibility setting that’s been switched on by mistake. In many cases, a quick restart, checking settings like 'Slow Keys', or a careful clean with compressed air will get you typing again without needing a trip to the repair shop.
Your First Steps When Your MacBook Keyboard Stops Responding
That feeling of dread when your MacBook keyboard decides to stop working can bring your whole day to a screeching halt. Whether you're fighting with sticky keys, letters that just won't type, or a keyboard that’s completely dead, it’s a massively frustrating—but surprisingly common—problem. Before you even think about booking a repair, know that a lot of these issues can be sorted out with a few simple checks at home.
This guide will walk you through the process, starting with the easy software fixes and basic cleaning that solve an incredible number of keyboard dramas. It’s your practical roadmap to getting things working again, saving you both time and money.
Start with the Simplest Solution
It might sound like a cliché, but the first thing you should always try is restarting your Mac. A simple reboot can clear out temporary files and sort out minor software squabbles that are notorious for making a keyboard unresponsive.
If a quick restart doesn’t do the trick, try a full shutdown. Turn your MacBook off completely, give it 30 seconds, and then power it back on. This forces the entire operating system to re-initialise all its hardware, including the keyboard, which can often kick it back into action.
Check for an External Keyboard Conflict
Sometimes, the culprit isn't your MacBook's keyboard at all. If you've recently used a Bluetooth or USB keyboard, your Mac might still be trying to talk to it, effectively ghosting your built-in one.
- Unplug everything: Disconnect any external keyboards, mice, or USB hubs.
- Switch off Bluetooth: Head to the Control Centre in your menu bar and toggle Bluetooth off.
- Try typing again: Check if your built-in keyboard is responding now.
This is a quick way to rule out interference from other devices. It happens more than you'd think, especially if you have a Bluetooth keyboard that’s accidentally switched on inside your laptop bag.
Pro Tip: A great way to figure out if you're dealing with a hardware or software issue is to boot into Safe Mode. Just hold down the Shift key as your Mac starts up. If the keyboard works perfectly in Safe Mode, the problem is almost certainly caused by a third-party app or a login item you have installed.
Identifying Your Keyboard Type
Knowing what kind of keyboard your MacBook has is a big deal, as it tells you what its weak points are. Between 2015 and 2019, Apple used its infamous "Butterfly" mechanism in an effort to make its laptops as thin as possible. Unfortunately, this design is notoriously fragile and can be defeated by a single speck of dust or a tiny crumb. If you've got a model from this era with keys that are sticky, repeating, or just dead, there's a good chance this is your problem.
MacBooks made before or after this period use the much more reliable scissor-switch mechanism, which is tougher and far less prone to getting jammed by debris. Figuring out which one you're dealing with helps set realistic expectations for whether a good clean will be enough. If you’re looking for a hand with your MacBook, a professional service like Screen Fixed Brisbane can quickly diagnose these model-specific issues. Recognising your hardware is the first step towards a real fix. You can find out more about keyboard tech from resources like PCMag's keyboard guide.
Simple Software Fixes to Try First
When your MacBook keyboard starts acting up, it’s easy to assume the worst—a dreaded hardware failure and a costly repair bill. But hold on a second. In our experience, a surprising number of keyboard problems are actually software-related.
Before you start pricing out a replacement, it's worth running through these simple software checks. They’re quick, free, and more often than not, they get the job done without you ever needing to pick up a tool. Think of it as the digital version of checking that a plug is switched on at the wall.
Alt text: MacBook user typing on a functioning keyboard, highlighting software solutions for a non-working keyboard.
Dive Into Your System Settings
Sometimes the fix is hiding in plain sight. macOS has a few Accessibility features that, if accidentally enabled, can make your keyboard behave in very strange ways, making you think it’s broken.
The two main culprits here are Slow Keys and Mouse Keys. Slow Keys creates a delay between pressing a key and the character appearing on screen, which feels a lot like an unresponsive keyboard. Mouse Keys is designed to let you control the cursor with the number pad, but it disables normal typing on those keys in the process.
It’s easy to check:
- Open up System Settings (or System Preferences on older macOS versions).
- Head over to the Accessibility section.
- Look for Keyboard under the Motor category.
- Just make sure Slow Keys and Mouse Keys are both switched off.
This is a five-second check that has saved countless customers from unnecessary panic. It’s a common issue, especially on shared or family Macs where settings can get changed without you knowing.
Reset Your Mac's Core Controllers
If your settings are all good, the next step is to reset the SMC and the NVRAM/PRAM. These sound a bit technical, but they’re really just straightforward procedures that can fix deeper firmware-level glitches affecting your Mac’s hardware, including the keyboard.
The System Management Controller (SMC) handles low-level functions like power, battery charging, and fans. When it gets confused, it can directly mess with how your keyboard communicates with the rest of the Mac.
The NVRAM (Non-Volatile Random-Access Memory), or PRAM on older machines, is a small bit of memory that stores settings your Mac needs to access quickly, like speaker volume and screen resolution. If the data in there gets corrupted, it can cause all sorts of weird hardware behaviour.
Resetting these is like giving your Mac’s brain a hard reboot, forcing it to re-establish clean connections with all its components.
How to Actually Do the Resets
The steps are a little different depending on whether you have a newer Apple Silicon Mac or an older Intel-based one.
For Apple Silicon Macs (M1, M2, M3):
- SMC Reset: This is ridiculously simple. Shut down your MacBook completely, wait a good 30 seconds, then just power it back on. The system automatically resets the SMC equivalent during this process.
- NVRAM Reset: Again, it’s all automatic. The Mac checks and clears the NVRAM on its own every time it starts up, so a simple restart is all you need.
For Intel-based Macs:
- SMC Reset: Shut down your Mac. Now, press and hold Control + Option + Shift (the one on the left side) and then press and hold the power button as well. Keep all four held down for about 7 seconds, then release them and turn your Mac back on.
- NVRAM Reset: Shut down your Mac. Turn it on and immediately press and hold these four keys: Option + Command + P + R. You’ll need to hold them for about 20 seconds. On older models with a startup chime, you can let go after you hear the second chime.
Is Your macOS Up to Date?
Lastly, don't dismiss the power of a simple software update. We know they can feel like a chore, but macOS updates frequently contain critical bug fixes and driver improvements that target known hardware issues. If there’s a widespread macbook keyboard not working problem, you can bet Apple is working on a patch for the next software release.
Running an older version of macOS might mean you’re stuck with a bug that was fixed months ago. To check, just go to System Settings > General > Software Update. It’s a basic bit of maintenance that keeps your Mac running smoothly and could be the very thing that gets your keyboard typing again.
Practical Cleaning Techniques For Sticky Or Unresponsive Keys
When you're dealing with a macbook keyboard not working problem, it's rarely a sign of catastrophic hardware failure. More often than not, the culprit is something much simpler: dust, crumbs, or other tiny bits of debris that have found their way under the keycaps. Before you jump to the worst-case scenario, a bit of careful cleaning can often get things working perfectly again.
These physical fixes are surprisingly effective, especially if you're experiencing sticky keys, characters that repeat, or keys that just feel "mushy." By tackling the grime head-on, you can often restore your keyboard’s function without needing any replacement parts.

Alt text: Technician carefully cleaning a MacBook keyboard with a brush to fix unresponsive keys.
Safely Using Compressed Air
Compressed air is your best friend for blasting out loose particles trapped beneath the keys. But you have to use it correctly to avoid causing damage, particularly to the delicate butterfly mechanisms found in 2015-2019 models. Apple actually has a specific technique they recommend for this exact reason.
Here’s how to do it properly:
- Hold your MacBook at a 75-degree angle—not quite vertical.
- Spray the compressed air across the keyboard (or just the problem keys) in a left-to-right pattern.
- Next, rotate your MacBook to its right side and do it again.
- Finally, rotate it to its left side and give it one last spray.
This multi-angle approach is great for dislodging stubborn debris. Always keep the can’s nozzle about a centimetre away from the keys and use short, controlled bursts. This prevents moisture from the propellant from getting inside your machine.
Dealing With Minor Liquid Spills
A small spill doesn’t have to spell the end for your keyboard, but you need to act fast. The second liquid hits your MacBook, the number one priority is stopping it from reaching the sensitive logic board.
Immediate Action Required: Shut down your MacBook immediately. Don't even bother with the proper shutdown sequence—just press and hold the power button. Unplug everything and turn it upside down in a tent position to let gravity do its work.
Whatever you do, resist the temptation to turn it back on to "see if it's okay." Give it at least 24-48 hours to dry out in a well-ventilated spot. If you’re left with sticky residue from a sugary drink, you can gently clean the surface with a lint-free cloth lightly dampened with isopropyl alcohol, but only after you're certain it’s completely dry.
Reseating Wobbly Or Detached Keycaps
If a keycap feels loose or has popped off completely, you can often snap it back into place. How you do this depends on the mechanism underneath—the older, tougher scissor-switch or the notoriously fragile butterfly clip. You need to be extremely gentle, as the tiny plastic clips that hold the keycap on are very easy to break.
With butterfly mechanisms, you have to align the clips perfectly before applying even pressure. If you hear a snap but the key still feels off, you’ve probably broken a clip. At this point, trying to force it can make things worse. For a broader look at keyboard issues, you can check out this helpful guide on troubleshooting a non-working keyboard.
Diagnosing Deeper Hardware Problems
If you've already worked through the software fixes and given your keyboard a good clean with no luck, it's time to face the possibility of a hardware issue. When a macbook keyboard not working problem just won't go away, it often points to something physically wrong inside the machine. This means we need to shift gears from simple fixes to investigating the components themselves.
Figuring out the potential hardware culprit is the next critical step. This will help you decide if it's something you can tackle yourself or if you need to hand it over to a pro. The first clue often lies in identifying which keyboard your MacBook has, as some are notoriously more problematic than others.
Before diving deeper, it can be helpful to match your keyboard's behaviour to the most likely cause.
Common MacBook Keyboard Symptoms and Potential Causes
This table should help you quickly pinpoint whether you're likely dealing with a software glitch or a hardware fault based on what you're seeing.
| Symptom | Potential Software Cause | Potential Hardware Cause |
|---|---|---|
| Single key not working | A specific key mapping app or setting is interfering. | Debris under the keycap; a failed key switch (especially on Butterfly models). |
| Multiple keys not working | A corrupt keyboard layout file; accessibility settings like "Slow Keys" enabled. | Liquid damage; a damaged keyboard flex cable; logic board controller issue. |
| Keys repeating | Keyboard repeat rate settings are too high in System Settings. | Debris causing the key to stick; a faulty key switch; liquid damage shorting a contact. |
| Entire keyboard unresponsive | A major software crash or kernel panic; a failed macOS update. | Disconnected or damaged keyboard flex cable; liquid damage to the logic board. |
| Laggy or delayed typing | High CPU usage from a background app; Bluetooth interference (for external keyboards). | A failing keyboard controller on the logic board; intermittent connection on the flex cable. |
Seeing your symptom in the "Hardware Cause" column is a strong sign that one of the issues below is the root of your problem.
The Notorious Butterfly Keyboard Problem
If you own a MacBook released between 2015 and 2019, the phrase "Butterfly keyboard" probably makes you wince. Apple's attempt to create an ultra-thin keyboard mechanism backfired spectacularly. Its design was incredibly fragile and prone to failure. The key travel was so shallow that a single crumb or speck of dust could jam the entire mechanism, resulting in keys that were stuck, repeated endlessly, or just completely died.
This wasn't just a minor annoyance; it became a massive headache for users all over the world, including right here in Australia.
In Australia, the Butterfly keyboard debacle hit repair shops hard starting in 2016, with failure rates doubling compared to prior models. Data showed the 2016 MacBook Pro keyboard failing at 11.8% in its first year, compared to just 5.6% for 2014 models. Aussie technicians noted a 30-40% increase in keyboard repairs, prompting Australian Consumer Affairs Victoria to log over 2,500 complaints by 2018. You can read up on the high failure rates of these models to understand the full scope of the issue.
If your MacBook is from this era, there’s a very real chance your keyboard problems are a direct result of this flawed design, and a simple clean just won’t be a permanent fix.
Identifying Flex Cable And Connector Issues
Looking past the keys themselves, the next usual suspect is the keyboard's flex cable. This is a very thin, ribbon-like cable responsible for connecting the entire keyboard assembly to the logic board. Because it's so delicate, it can get damaged from a drop, a previous repair attempt gone wrong, or just wear and tear.
The signs of a failing flex cable can be tricky and often misleading. You might see things like:
- Intermittent functionality: Your keyboard works perfectly one minute, then cuts out the next.
- Groups of keys failing: A whole section, row, or column of keys stops responding all at once.
- Complete unresponsiveness: The keyboard is dead, but the trackpad and power button still work fine.
The only real way to know for sure is a visual inspection. This involves opening up the MacBook to check if the cable has been crimped, torn, or simply come loose from its connector. The connector on the logic board can also be the point of failure, especially if any liquid has ever found its way inside. A burnt or corroded connector is a dead giveaway that you've found the source of the problem.
Checking For Logic Board Damage
In a worst-case scenario, the issue isn't with the keyboard or its cable but with the logic board itself—your MacBook's brain. All the signals from your keyboard are processed by a specific controller chip on the logic board. If that chip fails or the tiny electrical pathways leading to it get damaged, your keyboard will stop working entirely.
Liquid damage is the number one cause of this kind of failure. Even a tiny bit of moisture can create a short circuit and fry the sensitive components that handle keyboard input. Diagnosing a logic board problem is a complex job that requires specialised tools and expertise.
For the more technically savvy, you can use a multimeter to check for continuity on the keyboard connector pins. This tells you if the electrical connections are solid. If you want to go down that rabbit hole, you can learn more about how to test continuity with a multimeter, but for most people, this is a clear sign to call in a professional. A logic board repair is serious business and not something to be taken lightly.
So, You're Thinking About A MacBook Keyboard Replacement?
Alright, so you’ve tried all the software tricks and given the keys a good clean, but the problem persists. It’s looking like a hardware issue, which on a MacBook, often means a full keyboard replacement is on the cards. If you’re a confident DIYer, this can be a really satisfying project. But before you start taking things apart, it's vital to know what you’re getting yourself into. This isn’t like swapping out a keyboard on an old PC laptop; it's a deep-dive, intricate procedure that demands patience, a steady hand, and the right gear.
The reason it's so involved is that on most modern MacBooks, the keyboard isn’t a separate part you can just unclip. Instead, it’s built directly into the top case—the single piece of aluminium that forms the chassis, surrounds the trackpad, and often holds the battery. This integrated design means replacing a faulty keyboard requires stripping down and rebuilding pretty much the entire laptop.
This flowchart maps out the usual suspects when it comes to hardware failures. You start with the keys, then check the cable that connects everything, and finally, the logic board itself.
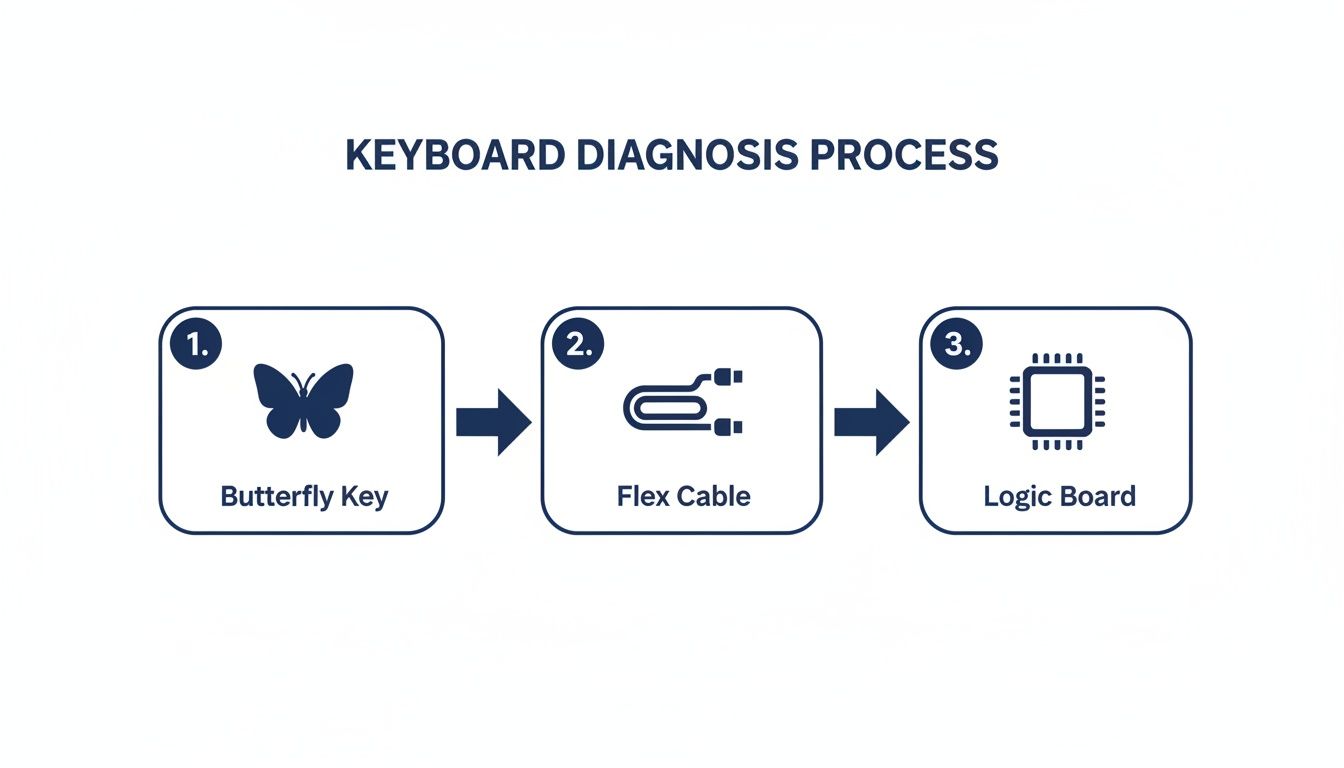
Alt text: Diagnostic flowchart for MacBook keyboard not working: checks for Butterfly Key, Flex Cable, and Logic Board issues.
Working through this process helps you figure out if a full top case swap is truly necessary, or if you might get lucky with a simpler fix.
The Major Stages Of The Repair
When we talk about a top case replacement, we mean meticulously moving every single internal component from the old, faulty top case to the brand-new one. It's a long process that requires serious organisation to avoid losing tiny screws or damaging fragile components. It really is a test of your repair skills.
First things first, and this is non-negotiable: safely disconnect the battery. Seriously. Attempting any internal work on a MacBook with the battery connected is asking for trouble. It’s the fastest way to cause a short circuit that can fry the logic board, turning a keyboard problem into a very expensive paperweight.
With the battery safely isolated, the next big job is removing the logic board—the brains of your MacBook. This involves carefully unlatching a whole host of delicate flex cables, each with its own tiny, fragile connector. You'll also be removing fans, speakers, I/O boards, and the Wi-Fi antenna assembly. It all has to come out.
A huge pitfall for first-timers is screw management. MacBooks use a bewildering array of screw sizes and types. Mixing them up is disastrous. A screw that’s too long can puncture the battery from underneath or crack the logic board when you tighten it.
Using a magnetic project mat or a simple screw tray isn't just a suggestion; it's essential for keeping everything organised. Every single screw has to go back exactly where it came from.
Specific Tools You Will Need
Trying this repair without the proper tools is a one-way ticket to frustration and a potentially broken MacBook. Your standard screwdriver set won't do you any good here, as Apple loves to use proprietary screws to keep people out. You'll need a specialised toolkit.
Here are the absolute essentials:
- Pentalobe Screwdrivers: You can't even get the back cover off most MacBooks without one of these.
- Torx Screwdrivers: You'll find various sizes (like T3, T5, and T8) holding down almost everything inside, from the logic board to the fans.
- Plastic Spudgers and Pry Tools: These are crucial for safely popping open those delicate flex cable connectors without tearing them. Metal tools are a big no-no here.
- Tweezers: Absolutely necessary for handling impossibly small screws and guiding tiny components into place.
That’s the bare minimum. Professional techs, like our team at the Screen Fixed Brisbane workshop, use these tools every day. They have the muscle memory and experience to fly through a component transfer like this safely and efficiently.
The Realities Of The Butterfly Keyboard Era
Let’s be honest, the infamous Butterfly keyboard is why this repair is so common, especially for models released between 2016 and 2019. The shockingly high failure rate of these keyboards created a massive headache for MacBook owners across Australia.
The Butterfly keyboard crisis really hit its peak in Australia around 2018, just as Apple’s own service program was acknowledging widespread defects. Repair data from back then showed a staggering 11.8% first-year failure rate for 2016 MacBook Pros, which was double the average for previous models. Repair shops in Sydney and Melbourne were logging over 1,200 top-case swaps in 2018 alone, often hitting customers with bills of $600 or more if they were out of warranty. You can dig into the history of Apple's keyboard service program response in Australia to see just how big the fallout was.
This history really highlights why a full top case replacement, despite its complexity, is often the only real, permanent fix for a failing Butterfly keyboard. Knowing the scale of the job helps you make the right call: tackle it yourself, or hand it over to a pro who’s done it a hundred times before.
Deciding Between A DIY Fix And Professional Repair
So, you've worked through all the possibilities for fixing your MacBook keyboard, from the straightforward software tweaks to the far more involved job of a full top case replacement. The big decision now comes down to your own technical confidence, the specific model you’re working with, and whether you have the right tools for the job.
If you’re just dealing with software glitches or needing to clean out some pesky debris, a DIY approach is absolutely the way to go. It’s rewarding, cost-effective, and these tasks carry almost no risk. In many cases, it's all you need to do to solve the most common keyboard problems without spending a cent.
When To Call The Professionals
The game changes entirely, however, if you’ve diagnosed the problem as something needing a full top case replacement. This isn't just a simple component swap. It's a high-stakes operation with a very real risk of causing much more expensive damage.
Honestly, one misplaced screw or a torn flex cable can quickly turn a keyboard issue into a logic board catastrophe. The repair itself demands some specialised gear, like the correct Pentalobe and Torx screwdrivers, just to get inside the machine without causing damage. You can learn more about why using the right tools matters in our detailed guide on Pentalobe screwdrivers for MacBook repairs. Trying to make do without them is a sure-fire way to strip screws and make the whole situation worse.
For these more complex jobs, getting in touch with a professional technician is often the smartest and most reliable path. They have the experience, the right tools, and the steady hand to get the repair done correctly, which can save you from a very costly mistake in the long run.
Ultimately, you need to be honest with yourself about your skill level. Pulling off a DIY repair feels fantastic, but a failed attempt can be a very expensive lesson to learn. If you have even the slightest doubt, trusting an expert is the best investment you can make for your MacBook’s future.
Got Questions About Your MacBook Keyboard? We've Got Answers
We see a lot of MacBooks with keyboard troubles, from sticky keys to complete meltdowns. If your macbook keyboard not working is doing your head in, you're not alone. Here are some quick answers to the questions we hear most often.
Can I Just Replace One Broken Key?
It really depends on which MacBook you're using. On the older models with the classic scissor-switch keys, you can sometimes get away with just swapping out a single keycap or the little plastic mechanism underneath it. It's a fiddly job, but doable.
But for any MacBook with a butterfly keyboard (that's most models from 2015–2019) and the newer machines, it's a different story. The entire keyboard is riveted directly into the top case. This design means that one faulty key often requires replacing the whole top case assembly—a much bigger and more involved repair.
Is It Even Worth Fixing an Old MacBook Keyboard?
In most cases, absolutely. If the rest of your MacBook is still chugging along nicely, a proper keyboard repair is way cheaper than splashing out on a new laptop. For a couple of hundred dollars, you can breathe new life into a machine you might have spent thousands on.
Think about the alternative: a new MacBook could easily set you back over $1,500. A quality repair from a trusted workshop like Screen Fixed Brisbane can give your device several more years of solid use. It’s a win for your wallet and the planet.
Why Did So Many MacBook Keyboards Fail in the First Place?
Ah, the butterfly keyboard era. That period between 2016 and 2019 was a tough one for Australian MacBook owners, all thanks to that deeply flawed design. The keyboards were so prone to failure from tiny specks of dust that official service claims shot past 10,000 in major states by mid-2019.
It gets worse. Unofficial research from tech forums suggested that by 2020, a staggering 63% of people with these models were just putting up with busted keys. This tells us the problem was way bigger than the official numbers ever let on. You can read up on the high failure rates of these models to get the full picture.
Disclaimer: Apple and MacBook are trademarks of Apple Inc., registered in the U.S. and other countries. Screen Fixed is an independent repair service and is not affiliated with Apple Inc.
Whether you just need a keycap clicked back into place or a full top case replacement, the team at Screen Fixed has the right tools and expertise to get your MacBook typing like new again. Book your repair today!