
Is your MacBook Air just not holding a charge like it used to? A MacBook Air battery replacement is often the fix, but before you jump to that conclusion, it's smart to make sure the battery is actually the problem. The best way to do that is by checking your Mac's battery health and its cycle count—this gives you the hard data on just how worn out it really is.
How To Know If Your MacBook Air Needs A New Battery
Before you start ordering parts or scheduling a repair, let's confirm the battery is genuinely on its last legs. While a battery that dies in a couple of hours is the most glaring sign, there are a few other, more subtle clues that it might be time for a change. Ignoring them can lead to random shutdowns or performance slowdowns that make your once-zippy MacBook feel frustratingly sluggish.
Catching these signs early saves you the headache of a device that can't get through a meeting without being plugged in. It also stops you from chasing phantom software issues when the real problem is just a tired old battery.
Beyond Just Short Battery Life
A battery that drains in a flash is obvious, but a failing one can cause some less apparent problems. Ever notice your MacBook Air running incredibly slow, even when it's plugged in and charging? That's not your imagination. macOS will sometimes throttle the processor speed to prevent a weak battery from causing an unexpected shutdown.
Another classic symptom is your MacBook dying suddenly when the battery menu still shows 20% or 30% charge. This is a dead giveaway that the battery can no longer supply a stable voltage when you're actually using the machine. And if your MacBook won't turn on at all, it could be a completely dead battery, though it’s worth checking other potential causes first. For more on that, take a look at our guide on what to do if your MacBook Air is not turning on.
To help you pinpoint the issue, here's a quick rundown of the common symptoms you might be experiencing.
Signs Your MacBook Air Battery Needs Replacing
This table breaks down the typical signs of a failing battery, what they mean, and what you should do next.
| Symptom | What It Means for Your Battery | Recommended Action |
|---|---|---|
| "Service Recommended" Warning | macOS has detected significant degradation in the battery's ability to hold a charge. | Plan for a replacement. The battery is still functional but performance is compromised. |
| Rapid Battery Drain | The battery's maximum capacity has diminished, and it can no longer hold a full charge. | Check the cycle count. If it's high (near 1000), a replacement is needed. |
| Sudden Shutdowns | The battery can't provide stable power under load, causing the Mac to shut off unexpectedly. | This is a critical sign of failure. Replace the battery as soon as possible to avoid data loss. |
| Slow Performance | macOS may be throttling the CPU to prevent the weak battery from causing a shutdown. | A new battery will restore your MacBook's original performance. |
| Physical Swelling | The battery is failing chemically and expanding. This is a safety hazard. | Stop using the device immediately. Do not charge it. Seek professional service for removal and replacement. |
Seeing one or more of these signs is a strong indicator that it's time to look into a replacement.
That "Service Recommended" Warning
Your MacBook Air has a built-in health monitor that keeps an eye on your battery. When it notices a serious drop in the battery's ability to hold a charge, you'll see a "Service Recommended" warning right there in the battery status menu.
Think of this message as your Mac's way of saying, "Hey, this battery is still working, but it's not what it used to be." You can keep using it for a while, but you'll have to live with the shorter runtime and other potential issues we've covered. It's the clearest sign you can get that a replacement is on the horizon.
Understanding Your Battery's Cycle Count
Every time you drain your MacBook Air's battery and charge it back up to full, that counts as one charge cycle. Like all lithium-ion batteries, yours has a limited number of these cycles before its performance starts to noticeably decline.
For most MacBook Air models, the magic number is 1000 cycles. Apple considers the battery "consumed" after this point, as it's designed to retain up to 80% of its original capacity after 1000 full cycles. Once you fly past that number, you'll really start to feel the shorter battery life.
Key Takeaway: The cycle count is your most reliable metric for battery health. A high cycle count paired with a "Service Recommended" warning is the ultimate confirmation that it's time for a replacement.
You can check this yourself in about ten seconds. Just hold down the Option key, click the Apple menu in the top-left corner, and select "System Information." In the new window, find the "Power" section under "Hardware." You'll see your current cycle count listed right there. This gives you the hard data you need to decide if a new battery is the right move.
Choosing Your Path: DIY vs. Professional Repair
So, you've confirmed the battery is on its way out. Now you're at a fork in the road: do you roll up your sleeves and tackle the MacBook Air battery replacement yourself, or hand it over to a professional?
Honestly, this decision really boils down to your comfort level with fiddly electronics, your budget, and how long you can live without your laptop. Both options have their pros and cons, so let's break them down to help you figure out what’s right for you.
Going the DIY route can be a really satisfying project, and it's definitely easier on the wallet. There's a genuine sense of accomplishment that comes from breathing new life into your own machine. But it's not a walk in the park—it requires patience, a steady hand, and the right set of tools. You won't get far without specific Pentalobe and Torx screwdrivers.
On the flip side, a professional service is your ticket to a stress-free fix. It’s the peace-of-mind option. You know the job will be done right by a seasoned technician, and you’ll usually get a warranty covering the new battery and the labour.
The Appeal of DIY Repair
For most people, the biggest win with a DIY repair is saving money. When you buy a battery kit and handle the labour yourself, you can often slash the total cost compared to what a repair shop would charge. It’s a great option if you're a student on a tight budget or just someone who enjoys a good hands-on challenge.
The good news is that the process has become pretty straightforward for many models. A DIY battery replacement for a MacBook Air is a practical repair that usually takes anywhere from 30 minutes to a couple of hours, depending on your model and how confident you are.
MacBook Airs released before 2018 had batteries that were just screwed in, making the swap dead simple. From 2018 onwards, Apple started using adhesive pull tabs, which adds an extra step but is still totally manageable for most people. If you want to see exactly what you’re in for, iFixit's detailed guide to MacBook battery replacement is an excellent resource.
A decent DIY kit will come with everything you need, so you don't have to hunt down all the individual tools and parts yourself.
Understanding the Risks of Going It Alone
While it can be rewarding, the DIY path is definitely not risk-free. The inside of a MacBook Air is a delicate ecosystem, and one small slip-up can turn a simple battery swap into a much more expensive problem.
Here are a few real-world risks to think about:
- Stripped Screws: Those tiny Pentalobe screws are notoriously easy to strip if you use the wrong size screwdriver or just a bit too much force.
- Damaged Connectors: The logic board is covered in tiny, fragile connectors for the battery, keyboard, trackpad, and speakers. If you pry one up the wrong way, you can easily break the socket.
- Stubborn Adhesive: Newer models use some seriously strong adhesive to hold the battery in place. Getting it out requires patience. If you rush it, you could bend or, worst-case scenario, puncture the old battery—which is a legitimate fire hazard.
- No Warranty: If something goes wrong during your repair attempt, you're on your own. There’s no warranty to cover any components you might accidentally break in the process.
Our Takeaway: DIY is a fantastic choice if you’re methodical, patient, and have a clean, organised workspace. But if the thought of messing with delicate ribbon cables makes your palms sweat, a professional service is the smarter, safer bet.
When to Call in the Professionals
Choosing a professional MacBook Air battery replacement at a trusted shop like Screen Fixed Brisbane is all about getting it done quickly, correctly, and with zero stress. This is the way to go for anyone who relies on their laptop for work and can't afford any downtime, or for those who just want the job done right.
Our technicians have done hundreds of these repairs. We have the specialised tools, access to high-quality replacement parts, and the hands-on experience to deal with even the most stubborn models—especially those with tricky adhesive. We can typically get the replacement done fast, getting your MacBook Air back to you in top shape, often on the same day.
Even better, our work is backed by a solid warranty. This guarantee covers both the new battery and our service, giving you complete confidence that your investment is protected. If your MacBook Air’s battery issues have you thinking the whole device is outdated, you could look into strategies for managing outdated computers. For most people, though, a fresh battery is all it takes to add years to their MacBook’s life.
To make things even clearer, here’s a quick comparison to help you weigh your options.
Comparing DIY vs Professional Battery Replacement
This side-by-side comparison should help you decide which replacement method best suits your needs, skills, and budget.
| Factor | DIY Replacement | Professional Repair Service |
|---|---|---|
| Cost | Lower. You only pay for the battery kit and tools. | Higher. You're paying for parts, labour, and expertise. |
| Time Commitment | Varies. 30 minutes to a few hours, plus research time. | Fast. Often completed the same day, minimal downtime for you. |
| Risk | Higher. Risk of damaging components, no warranty on your work. | Minimal. The technician assumes the risk. The repair is warrantied. |
| Tools & Parts | You source them. A good kit helps, but quality can vary. | Provided. Professional-grade tools and high-quality parts are used. |
| Experience | None required, but helps. Best for those with some technical confidence. | Expert-level. Handled by trained technicians with extensive experience. |
| Satisfaction | High. A real sense of accomplishment from fixing your own gear. | Peace of Mind. The job is done correctly without any hassle on your part. |
Ultimately, the choice is yours. A DIY replacement is a great way to save money and learn something new, but a professional service offers unbeatable convenience and security.
Your Guide To Replacing The MacBook Air Battery
Right, so you've decided to tackle the MacBook Air battery replacement yourself. Good on you. This is where we get hands-on and walk through the entire process, stage by stage. We're not just going to give you a numbered list; we'll break this down properly so you feel confident from start to finish.
We’ll cover everything from getting your workspace sorted to those final checks after you’ve sealed it all back up. You'll learn the difference between dealing with the older screw-in batteries and the newer ones that are glued in place, with a few pro tips to handle both safely.
Before we get our tools out, it's worth picturing the choice you've just made—opting for a DIY fix over a professional service.
This flowchart neatly sums up the path you're on, leading straight into the practical steps we're about to dive into.
Workspace Prep and Essential Safety
Before you even think about touching a screw, setting up your space is the most important part. A good repair starts in a clean, organised, and well-lit area. Clear off a desk or table so you have plenty of room to move without things getting cluttered. A magnetic mat is a lifesaver for keeping track of tiny screws, but even a few small bowls will do the trick.
The biggest invisible threat in any electronics repair is electrostatic discharge (ESD). That little zap you sometimes get from a doorknob can be absolutely fatal to the sensitive components inside your MacBook.
To avoid this, always work on a non-conductive surface like a wooden table. The best practice is to use an anti-static wrist strap clipped to a metal part of the laptop's frame (after you've opened it). If you don't have one, just get into the habit of touching a large, unpainted metal object every few minutes to ground yourself and get rid of any static buildup.
Pro Tip: For your own safety, make sure you discharge the old battery to below 25% before you start. A fully charged lithium-ion battery is far more volatile and presents a much greater risk if it gets accidentally punctured during removal.
Opening The Case With Care
With your workspace sorted, it's time to open up your MacBook Air. The bottom case is held on by a series of small Pentalobe screws. These aren't your typical Phillips head screws; they have a unique five-point star shape that Apple uses to discourage people from opening their devices. Using the wrong tool here is the fastest way to strip them, turning a simple job into a massive headache.
You'll need the correct Pentalobe screwdriver, which for most MacBook Air models is a P1.2. If you want to learn more about these specialised drivers, have a look at our guide on Pentalobe screwdrivers for iPhone and MacBook repairs.
One crucial detail: the screws aren't all the same length. The two near the hinge are almost always longer than the rest. As you take them out, place them on your magnetic mat in the same pattern they came out of the case. This simple habit makes reassembly completely foolproof.
Once the screws are out, the bottom case won’t just pop off. It’s secured by little clips. Grab a plastic opening tool or even a sturdy guitar pick and gently pry it open, starting from the hinge side. Stay away from metal tools, as they’ll scratch the soft aluminium casing.
Removing The Old Battery
With the case off, the battery will be staring right at you—it's the biggest thing in there. The very first and most critical step is to disconnect the battery from the logic board. This kills the power to the system and prevents any accidental short circuits. The connector is a small, wide plug; use a plastic spudger or even your fingernail to carefully lift it straight up and out of its socket.
Now, getting the battery out depends on which MacBook Air model you have.
- Older Models (Pre-2018): These are the easy ones. The battery is simply held in place with several Torx T5 screws. Unscrew them, keeping track of where they go, and the battery will lift right out of the chassis. Simple.
- Newer Models (2018 and Later): Apple started using strong adhesive strips instead of screws on these models. It makes for a slimmer design, but a trickier removal. You’ll see several black pull-tabs along the battery cells. The technique is to pull these tabs slowly and at a very low angle, stretching the adhesive out from under the battery like a Command strip.
If a tab breaks, don't panic. And whatever you do, don't try to pry the battery out with a metal tool. A punctured battery is a serious fire risk. Instead, you can apply a few drops of isopropyl alcohol around the edge of the stuck cell to dissolve the glue. Let it work its magic for a minute, then gently slide a plastic card underneath to work it free. Patience is key here.
Installing The New Battery
Once the old battery is gone, the hardest part is officially over. Before you drop the new one in, take a second to clean out any dust or fluff from inside the case with a soft brush or a can of compressed air. If you dealt with adhesive, make sure the surface is clean for the new strips.
Carefully position the new battery in the chassis. It should sit completely flat, and the screw holes (if you have them) should line up perfectly. Never force it into place.
First things first, reconnect the battery connector to the logic board. You should feel a satisfying little click as it seats properly with gentle, even pressure. This is a vital step—if the connection isn't solid, you'll run into charging issues or your Mac might not even turn on.
Next, secure the battery. For older models, just put the Torx screws back in. For newer ones, press the battery down firmly onto the new adhesive to create a strong bond.
Closing Up and Final Checks
Before you screw the bottom case back on, it’s smart to do a quick power-on test. With the new battery connected, press the power button. Your MacBook should chime and start to boot. Seeing that Apple logo is the green light that you've connected everything correctly.
Once you’ve confirmed it works, shut it down completely. Now, replace the bottom case, making sure it snaps cleanly into place all the way around the edges. Re-install the Pentalobe screws, remembering to start with the two longer ones by the hinge. Tighten them until they’re snug, but don't go overboard and overtighten them.
And that’s it—the physical replacement is done! The very last thing to do is calibrate the new battery so that macOS can get an accurate reading of its charge levels, which is crucial for getting the best performance. We’ll cover that next.
Right, with the last screw back in place, the physical part of your MacBook Air battery replacement is done and dusted. But hold on, you're not quite finished yet. To make sure you get the absolute best performance and a long life out of that new battery, there are a couple of crucial final steps.
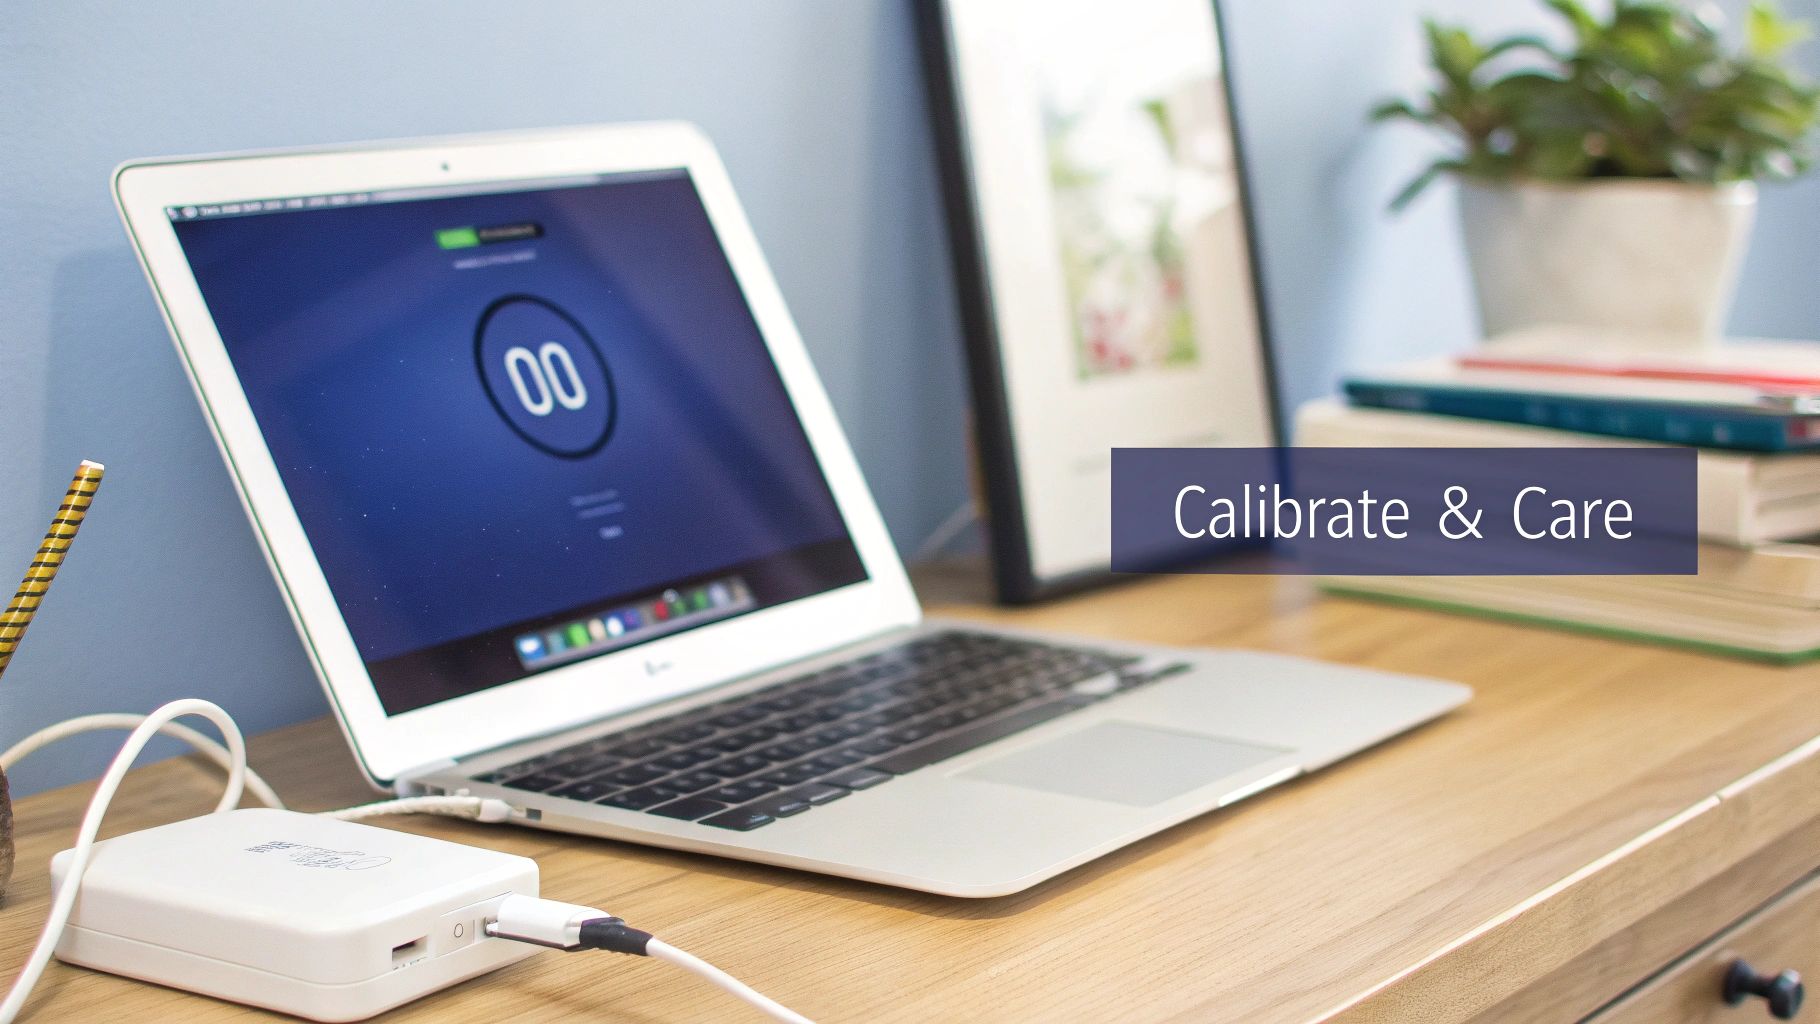
First up, and this is non-negotiable, is calibration. This process is how you teach macOS the real capacity of its new power source, so it can give you an accurate battery percentage and a reliable estimate of how much time you have left. If you skip this, you’re asking for trouble—like your MacBook suddenly dying even when it says you've got 20% charge left.
The Battery Calibration Cycle
Calibrating the new battery is simple enough, it just requires a bit of patience. Think of it as a full charge-and-drain cycle that gets the battery's own microcontroller on the same page as macOS.
Here’s the process I always follow:
- Full Charge Up: Plug in your MagSafe charger and let it go all the way to 100%. Don't unplug it just yet—leave it connected for at least another two hours after it hits the top to make sure it's completely full.
- Drain It Down: Now, unplug the charger and just use your MacBook Air as you normally would. The goal is to let it run completely out of juice until it shuts itself down. Let it happen naturally.
- Let It Sit: Once it's off, leave it unplugged for at least five hours. This gives any last bit of residual charge a chance to disappear, giving the system a true 'zero' baseline.
- Charge It Back Up: Finally, plug it back in and let it charge all the way to 100% without any interruptions.
That’s it. Your new battery is now calibrated. This one cycle is all it takes to teach the power management system the battery's true upper and lower limits, setting you up for reliable performance right from the start.
Long-Term Care For Lasting Performance
With calibration out of the way, a few good habits will help you squeeze every last drop of life out of your new battery for years to come. Modern lithium-ion batteries are pretty tough, but they still appreciate a bit of smart handling.
The biggest enemy? Extreme temperatures. Never leave your MacBook baking in a hot car during an Aussie summer—it can permanently cook the battery's capacity. Extreme cold isn't great either, as it can temporarily tank its performance.
To get the most from your investment, think of battery health as an ongoing practice, not a one-time fix. Simple adjustments in your daily routine can add months, or even years, to your new battery’s effective lifespan.
Managing your charging habits also makes a big difference. You can't really 'overcharge' a modern battery, but leaving it plugged in at 100% constantly isn't ideal for its long-term health. If your MacBook mostly lives on your desk, make a point to let it discharge down to around 40-50% every once in a while before plugging it back in.
Optimising Your macOS Settings
Your MacBook Air has some brilliant built-in tools for saving power, and taking a minute to check them can seriously boost your daily runtime. For a really thorough look, check out our guide on getting the best performance from a new battery for your MacBook Air.
In the meantime, here are a few quick settings to tweak:
- Turn on "Optimised Battery Charging": You’ll find this in System Settings > Battery. This clever feature learns your habits and holds the charge at 80% until it thinks you’ll need the full hundred, which is much better for the battery's lifespan.
- Make use of Low Power Mode: This is your best friend when you need to stretch out that last bit of charge. It dims the screen and dials back performance on background tasks to save precious power.
- Keep an eye on energy-hungry apps: Click the battery icon in your menu bar. It'll show you exactly which apps are chewing through your power. Closing down anything you’re not using is one of the easiest wins for longer battery life.
Breaking Down MacBook Air Battery Replacement Costs in Australia
Let's talk numbers. When you realise your MacBook Air battery isn't holding a charge like it used to, the first question is always, "How much is this going to set me back?" The answer isn't a single figure; it really depends on the path you choose to take.
The cost can swing pretty wildly depending on whether you go directly to Apple, find a trusted independent repair expert like us at Screen Fixed Brisbane, or decide to get your hands dirty with a DIY kit. Getting your head around these differences is the key to making a call that works for your budget and your Mac.
No matter which way you go, investing in a new battery is a smart move. It’s a cost-effective way to breathe new life into your laptop, which is a win for your wallet and a great step for the environment, keeping a perfectly good device out of e-waste.
Official Apple Service Pricing
Going straight to the source is often seen as the safest bet, but it's usually the priciest one, too. Apple offers a straightforward out-of-warranty battery service with fixed pricing. You know exactly what you'll pay, but there's no room for negotiation.
As of early 2025, Apple's flat rate for most MacBook Air models is $159 AUD. While that gets you a genuine part and service directly from the manufacturer, third-party repair providers in Australia often offer a much more competitive deal, with prices ranging anywhere from $109 to $299 AUD depending on your specific model. You can learn more about MacBook Air battery replacement costs from this detailed breakdown. That price difference really highlights the savings you can find by looking beyond the official channels.
The main trade-off here is cost versus the peace of mind that comes with an Apple-certified repair. For many people with out-of-warranty devices, the value offered by independent repair shops is just too good to ignore.
The Value of Independent Repair Shops
This is where you can find that perfect balance of affordability, quality, and confidence. Independent repair shops specialise in these exact kinds of jobs, giving you professional service without the premium price tag you'd get from Apple.
We use high-quality, third-party batteries that meet or even exceed the original specs, making sure your MacBook Air performs like it just came out of the box. The real benefit, though, is the combination of expert service from technicians who do this all day, competitive pricing, and a solid warranty on both the new battery and the labour.
Choosing a professional independent repairer means you get the expertise of a seasoned technician who handles these jobs daily, minimising risk and downtime. You're not just paying for a battery; you're paying for a fast, safe, and guaranteed installation.
The Cost-Effective DIY Route
For those who are comfortable opening up their tech, the DIY path offers the biggest savings. By cutting out the labour costs entirely, you're only paying for the parts themselves.
A good replacement battery kit from a reputable supplier will usually come with all the specialised tools you'll need for the job. For example, a DIY kit for a MacBook Air from a source like iFixit averages around $100 AUD, with newer models like the 2020 M1 costing about $130 AUD. This makes it an incredibly budget-friendly option.
Of course, those savings come with a catch: you're taking on all the risk. There’s no warranty on your own handiwork, and one simple slip could turn a cheap fix into a much more expensive problem. It’s a fantastic choice for the patient and technically inclined, but it’s definitely not for everyone.
Your Top Questions About MacBook Air Battery Replacement
Even with a detailed guide in hand, it’s totally normal to have a few last-minute questions about swapping out your MacBook Air’s battery. We get it. This is a pretty important repair, and you want to be 100% confident before diving in.
To help clear up any lingering doubts, we’ve put together a list of the most common questions we hear from our customers right here in Brisbane. Think of it as a final pre-flight check to make sure you’re ready for takeoff.
Will a Third-Party Battery Void My Apple Warranty?
This is a big one, and thankfully, the answer is pretty straightforward. If your MacBook Air is still covered by Apple's one-year limited warranty or an AppleCare+ plan, then yes, opening it up and doing a third-party repair could cause issues with future warranty claims, especially for the power system.
But let's be realistic—most MacBooks that are old enough to need a new battery are well past their warranty period anyway. If your machine is a few years old, this probably isn't a concern for you, which makes a high-quality third-party battery a safe and much more affordable choice.
How Do I Safely Dispose of My Old MacBook Battery in Australia?
Getting rid of the old battery correctly is non-negotiable, both for safety and for the planet. Whatever you do, never toss an old lithium-ion battery in your regular household rubbish. They’re a serious fire hazard if punctured and are full of materials that are nasty for the environment.
The good news is that Australia has a solid e-waste recycling system in place. You can drop off your old battery at a designated collection point.
- Your Local Council: Most councils have special e-waste drop-off days or permanent collection bins at their waste management facilities.
- Big Retailers: Places like Officeworks and Battery World have free battery recycling programs that make it super easy.
It only takes a few extra minutes to dispose of your old battery the right way, but it makes a huge difference. You're ensuring hazardous materials are handled properly and valuable resources get recovered.
Is It Actually Safe to Replace the Battery Myself?
Doing the replacement yourself is generally very safe, but it really comes down to your approach. If you’re patient, careful, and follow the instructions precisely, you can pull this off without a hitch. The main risks are dealing with the tiny, fragile connectors on the logic board and, of course, the battery itself.
The golden rule is never to puncture or bend the lithium-ion battery. If you come across some stubborn adhesive, don't try to pry it off with a metal tool. A much safer way is to use a few drops of isopropyl alcohol to gently dissolve the glue. If you feel even the slightest bit unsure at any point, hitting pause and calling a professional is always the smartest move.
What Should I Look for in a Replacement Battery Kit?
Not all DIY kits are created equal, and picking a good one is key to a successful repair. A solid kit should be more than just a battery in a box—it should be a complete solution designed to make the job as painless as possible.
Make sure the kit you choose includes all the specific tools for your MacBook Air model. This means having the right Pentalobe (P1.2) and Torx (T5) screwdrivers, along with plastic spudgers or opening tools. Most importantly, find a supplier that offers a decent warranty on the battery and has a history of positive customer reviews. That’s your best guarantee that you’re installing a battery that meets high standards for both safety and performance.
If you've decided a professional repair is the right path for you, the team at Screen Fixed Brisbane is here to help. We provide fast, reliable MacBook Air battery replacements with a full warranty, giving you complete peace of mind.