
Meta Title: iPhone Screen Repair Brisbane | Fast, Professional Fixes
Meta Description: Cracked your iPhone screen? This guide covers your repair options in Brisbane, from DIY kits to professional services. Get your phone fixed fast.
That sickening crunch of an iPhone hitting the pavement is a sound Brisbane locals know all too well. It’s a moment of dread. You pick up your phone, and there it is: a spiderweb of cracked glass across the screen. Your mind immediately jumps to the hassle and the cost. The good news is that getting an iPhone screen repair in Brisbane doesn't have to be a nightmare. You have options, from a quick professional fix to a more hands-on DIY approach.
This guide will walk you through everything you need to know to solve your cracked screen problem.
Your iPhone Screen Is Cracked What Now?

Caption: A common sight needing a fast iPhone screen repair in Brisbane.
The moment your iPhone screen shatters, it feels like a digital disaster. Simple daily tasks like firing off a text, checking emails, or navigating with maps become a frustrating mess of sharp glass and unresponsive touch points.
But before you start mentally preparing for the cost of a brand-new phone, it’s worth exploring your repair options right here in Brisbane. The path you choose can have a real impact on your wallet, your time, and how well your device works down the track.
Making a quick decision isn't just about appearances. A cracked screen is a major weak point in your iPhone's defence against the elements. Dust, pocket lint, and even a bit of moisture can sneak inside, potentially causing chaos with the sensitive internal parts. What starts as a simple screen issue can quickly spiral into a more complex—and expensive—problem if you leave it too long.
H3: The Two Main Paths for an iPhone Screen Repair
When it comes to fixing that screen, you’re basically looking at two main choices. Each has its pros and cons, and the best fit for you really depends on your budget, how confident you are with fiddly tech, and how fast you need your phone back up and running.
- Go to a Professional Repair Service: This is the most common route. You drop your device off at a specialist shop, like Screen Fixed Brisbane, and let experienced technicians handle everything. It’s convenient, gives you peace of mind, and usually comes with a warranty.
- Use a DIY Repair Kit: For anyone who’s a bit more technically inclined (or just loves a good project), a DIY kit gives you all the parts and tools needed to do the job yourself. A Fixo kit can be a cost-effective alternative if you’re willing to put in the time.
Thinking about the real-world side of things is key here. A professional service is fast and reliable, but you'll pay a bit more for that expertise. On the other hand, a DIY repair can save you a decent chunk of cash, but it demands patience and a steady hand—with the risk of causing more damage if things go sideways.
H3: DIY Repair vs Professional Service A Quick Comparison
Deciding between a DIY kit and a professional service often comes down to a trade-off between cost, convenience, and risk. Here’s a quick breakdown to help you weigh up the options available for an iPhone screen repair Brisbane service.
| Factor | DIY Repair (Using a Fixo Kit) | Professional Repair (e.g., Screen Fixed) |
|---|---|---|
| Cost | Significantly cheaper. You only pay for the parts and tools. | More expensive as it includes labour and overheads. |
| Time | Can take a few hours, depending on your skill level. | Very fast, often done in under an hour. |
| Convenience | You do it on your own schedule, but you have to do all the work. | Drop-off-and-pick-up service. Minimal effort required. |
| Risk | You're responsible for any mistakes. Potential for further damage. | Low risk. Professionals are experienced and offer a warranty. |
| Skill Level | Requires patience, a steady hand, and technical confidence. | No technical skill needed from you. |
Ultimately, both are valid choices. A DIY kit empowers you to take control and save money, while a professional service like Screen Fixed offers speed and a guarantee that the job will be done right.
H3: Breaking Down the Costs in Brisbane
Cost is, of course, a huge factor for most people. The price for an iPhone screen repair in Brisbane can vary, typically ranging from around AUD $95 to over $400. This depends heavily on your specific iPhone model and which repair shop you go to. Specialist repairers often offer competitive pricing and can get your phone back to you in about an hour. For a better idea of the local pricing landscape, you can check resources like Aussie Mobile Phone Repairs.
Key Takeaway: A cracked screen is more than just a cosmetic flaw. It compromises your iPhone's structural integrity, leaving it vulnerable to dust and moisture that can cause much bigger problems later. Acting fast is always your best bet.
So, whether you opt for the speed and security of a professional or the cost savings of the DIY path, the goal is the same: to get your iPhone back to its former glory. This guide will walk you through the entire DIY process, giving you the knowledge to tackle the job yourself and get your digital life back on track.
Disclaimer: iPhone® and Apple® are registered trademarks of Apple Inc. Screen Fixed is an independent repair service and has not been authorized, sponsored, or otherwise approved by Apple Inc. Fixo is a third-party repair parts supplier.
Setting Up Your DIY Repair Workspace
Caption: A well-organised workspace is essential for a successful iPhone 13 Pro screen repair.
A successful iPhone screen repair starts long before you even touch the first screw. It all begins with setting up a proper, organised workspace. Think of it like a surgeon prepping their operating theatre—every tool has its place, the lighting is spot-on, and the environment is controlled. Getting this right is the key to a smooth, stress-free repair.
Trying to tackle a delicate job like this on the corner of a cluttered kitchen table is just asking for trouble. You need a dedicated space that's clean, flat, and most importantly, well-lit. And when we say well-lit, we mean it. Good lighting isn't a suggestion; it's essential for seeing the tiny screws and fragile connectors you'll be handling.
Another thing to watch out for is static electricity—the invisible enemy of all things electronic. Just walking across a carpeted room can build up enough static to fry your iPhone's main board without you ever knowing it. It's always best to work on a hard surface like wood or tile and maybe leave that woolly jumper in the wardrobe for this job.
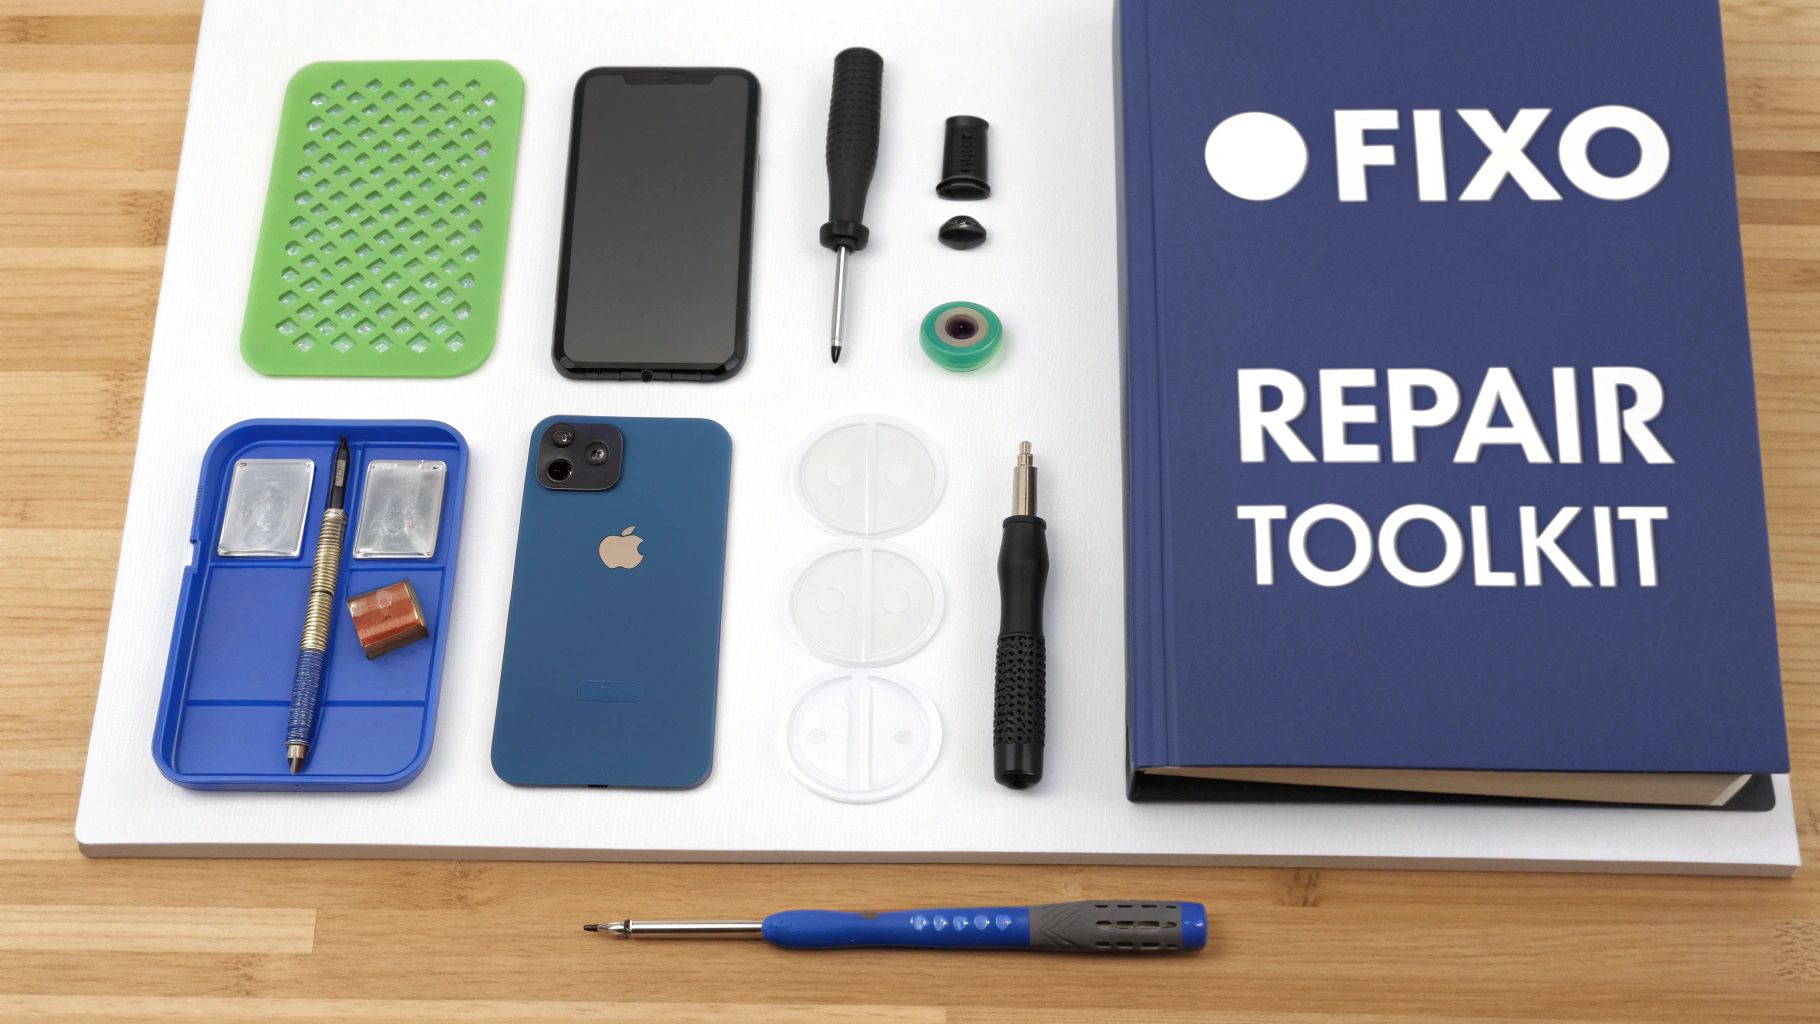
H3: The Essential Tools in Your Fixo Kit
Your DIY repair kit is your best friend here. It’s been put together to give you everything you need, so you’re not tempted to reach for that flathead screwdriver from the junk drawer. Trust us, using the wrong tool is one of the most common DIY mistakes and it can turn a simple fix into a complete nightmare.
Here’s a look at some of the specialised tools you'll find and why they’re so important:
- Pentalobe Screwdriver: This is for Apple's unique five-point screws at the bottom of your iPhone. Nothing else will work without stripping them. You can dive deeper into these unique tools in this guide to pentalobe screwdrivers for iPhone and MacBook repairs.
- Spudger: This anti-static plastic pry tool is perfect for gently disconnecting tiny ribbon cables without causing a short circuit or damaging the connectors.
- Suction Cup: You'll use this to carefully lift the screen assembly away from the iPhone's frame once the bottom screws are out.
- Tweezers: Precision tweezers are absolutely crucial for handling the minuscule screws and components inside the device.
Trying to substitute these with random household items is a massive risk. Using a knife blade instead of a spudger can easily slice through a critical cable, and forcing a regular screwdriver can strip a screw head, making it nearly impossible to remove.
H3: Organising Your Screws Is Non-Negotiable
Inside your iPhone, you'll find dozens of tiny screws, and many of them are different lengths. Mixing them up is a catastrophic, and surprisingly common, error. If you put a long screw into a hole meant for a short one, you can literally pierce right through the main board, permanently killing your phone.
Pro Tip: A magnetic mat is an absolute game-changer for any iPhone screen repair Brisbane DIYer. It gives you a grid where you can place each screw exactly as it came out of the phone, making sure every single one goes back where it belongs.
If you don't have a magnetic mat, a piece of paper with a quick sketch of the phone will do the trick. Just tape each screw to its corresponding spot on your diagram. It might feel a bit tedious, but this one simple act of organisation can save your device from irreversible damage. When it comes to DIY repair, preparation is truly half the battle won.
A Practical Walkthrough of an iPhone Screen Replacement
Alright, you’ve got your workspace sorted and your tools laid out. Now comes the main event of your DIY iPhone screen repair in Brisbane. Think of this less like a strict instruction manual and more like a guided process. Every step logically follows the one before it, so being patient and precise is going to be your best strategy here.
First thing’s first, and it’s a big one: power down your iPhone completely. We can't stress this enough. Trying to do any kind of repair on a live device is just asking for a short-circuited main board. Once the screen is black, you’re good to go.
H3: Getting Inside the Device
Your entry point is right at the bottom of the iPhone. Grab the pentalobe screwdriver from your kit and carefully take out the two tiny screws sitting on either side of the charging port. Those are the only external fasteners holding the screen on, but don't be fooled—a strong waterproof adhesive still runs around the entire edge of the frame.
This is where your suction cup and a prying tool become your best friends. Stick the suction cup onto the lower half of the screen, staying away from the curved glass. Pull up with gentle, steady pressure to create a very small gap between the screen and the frame. You’re not trying to rip it open, just create enough space to get a tool in.
With a tiny opening made, you can slide in a plastic pick or spudger and begin to slice through that adhesive. Slowly work your way around the phone’s perimeter. Be very aware of how the screen is meant to open—on most recent iPhones, it opens like a book from left to right. Trying to force it open the wrong way will almost certainly tear the fragile display cables.
H3: Disconnecting the Essentials: Power and Display
Once the screen is slightly ajar, the next move is crucial for safety: disconnecting the battery. Peeking inside, you’ll spot a small metal plate covering the battery connector. Remove the screws holding it down (and please, keep them organised!), then use your plastic spudger to gently pop the battery connector off its socket on the main board.
This one simple action cuts all power to the device, drastically cutting the risk of frying any sensitive components. No matter how quick you think the repair will be, never, ever skip this step.
With the battery safely disconnected, you can turn your attention to the display and sensor cables. They’re also tucked under a small protective bracket. Once that’s off, use your spudger to carefully lift each flex cable connector. They pop off with a gentle prying motion, a bit like a LEGO piece. Always take your time and never use metal tools for this part of the job. For a more detailed look at these initial stages, check out this guide on how to fix a cracked iPhone screen at home.
H3: The All-Important Sensor Assembly Swap
This is, without a doubt, the most delicate part of the whole operation. The top sensor assembly—which houses the Face ID components or the home button for Touch ID—is cryptographically paired to your iPhone’s main board from the factory. If this assembly gets damaged or isn't transferred perfectly to your new screen, Face ID or Touch ID will stop working permanently.
You'll find this assembly attached to the back of the old screen with a few tiny screws and some light adhesive. Carefully remove the screws. You might need to gently warm the area with a hairdryer on a low setting to soften the glue just enough to release it.
Using your tweezers and spudger, meticulously lift the assembly off the old screen. Be extra careful with the ribbon cables; they are incredibly fragile and can tear with the slightest mishandling. Once it’s free, place it in the exact same spot on your new screen and secure it with the original screws. Rushing this is the single most common reason a DIY iPhone screen repair in Brisbane ends in frustration.
H3: Putting It All Back Together and Final Checks
From here, you’re basically doing everything in reverse. Start by reconnecting the display and sensor flex cables to the main board. You should feel a faint but satisfying "click" as each one snaps into place. If a connection feels spongy or just won't click, don't force it. Take it off, realign it, and try again.
Now for a pro tip: before you seal the phone up, do a quick function test. Rest the screen in place without clicking it in, and then reconnect the battery. Power the phone on and check these key things:
- Touch Response: Swipe around, open apps, and type something to test the whole screen.
- Display Quality: Look for any weird lines, dead pixels, or colour issues.
- Face ID/Touch ID: Make sure your biometrics are still working.
- Front Camera & Earpiece Speaker: Take a quick selfie or make a test call.
If it all checks out, power the phone down, disconnect the battery one last time, and get ready to seal it. Your DIY kit should come with a new waterproof adhesive gasket. This thin, sticky seal is what helps restore some of the phone’s original water resistance.
Carefully align the new adhesive around the frame's edge. Once it's on, reconnect the battery for the final time, screw the connector plate back on, and gently close the screen. Make sure the top edge clicks in first, then snap the sides and bottom into place. Pop those two pentalobe screws back in at the bottom, and you’re done.
So You’ve Done the Repair… But Something’s Not Quite Right?
You’ve carefully followed all the steps, sealed up your iPhone, and hit the power button… only to find the screen is acting up. Don't panic. This happens sometimes, even to seasoned pros, and it’s usually not a sign of a failed repair. More often than not, it's a simple fix.
This part of the guide is your go-to for troubleshooting those little glitches that can pop up after your iPhone screen repair in Brisbane. You've done the heavy lifting; now let's get it over the finish line. Most of the time, these problems come down to a tiny connector that just isn't clicked in all the way. A bit of patience is all you need.
The infographic below shows the very first steps of the repair, which are crucial for preventing the exact problems we’re about to solve.

Caption: Infographic showing the initial steps for an iPhone screen repair in Brisbane.
Remembering to power down and disconnect the battery isn't just about safety—it's foundational. Skipping these can lead directly to the issues we're about to tackle.
H3: My Touchscreen Is Glitchy or Unresponsive
This is probably the most common post-repair headache. You might see strange lines on the display, experience "ghost touching" (where the phone acts on its own), or find the screen completely unresponsive. It’s frustrating, for sure, but the solution is almost always the same.
The culprit is nearly always a poorly seated display connector. Think of those little ribbon cables—they need to snap perfectly into place on the main board. If they’re even a fraction of a millimetre off, the connection is broken, and that’s when the screen starts misbehaving.
Here’s the game plan:
- Power Down and Disconnect: First things first, turn the iPhone off completely. Re-open it and—this is critical—disconnect the battery again. You don't want any power running through the main board while you're working.
- Check and Reseat the Cables: Gently unclip the display and digitiser cables. Take a moment to inspect the ends of the cables and the sockets on the board. Is there any dust or debris?
- Listen for the "Click": Carefully line up the connectors again and press down firmly with your spudger. You're listening and feeling for a satisfying "click". If it feels soft or mushy, it’s not in correctly. Try again.
Once you’re confident they’re secure, reconnect the battery and do another quick test before you seal everything up. Nine times out of 10, this simple reseating trick solves touchscreen problems.
H3: Help! My Face ID or Front Camera Isn't Working
Okay, so the screen looks perfect, but now your selfie camera is just a black screen, or Face ID is giving you an error message. This issue almost always points back to one very specific, delicate step: transferring the front sensor assembly.
This little bundle of tech—which houses the Face ID sensors and the front camera—is incredibly fragile. If it wasn't moved over to the new screen with the utmost care, or if its tiny ribbon cable got creased or torn in the process, it will stop working.
The front sensor assembly is cryptographically paired to your iPhone's main board. If you damage this original part during the transfer, you can permanently kill Face ID. This is, without a doubt, the highest-risk part of the entire repair.
To fix this, you'll need to get back inside the phone and take a very close look at that assembly. Make sure it's sitting perfectly flush on the new screen and that its flex cable is securely connected to the main board. Scrutinise the ribbon for any tiny tears or sharp folds. If you see any physical damage, the component itself may be toast.
If you get stuck or suspect the part is damaged, don't hesitate to reach out. Our team at Screen Fixed is always here to help with professional iPhone Repairs Brisbane when a DIY job goes sideways.
When to See a Professional in Brisbane Instead
DIY repair is incredibly empowering, but it isn't always the right call. The smartest move any DIYer can make is knowing their limits. Let’s be honest about when it’s time to put the tools away and seek professional iPhone Repairs Brisbane, because sometimes, letting an expert take over is the safer, and even cheaper, choice.
Pushing through a complex repair you're not ready for can quickly turn a manageable problem into an expensive catastrophe. It's crucial to recognise the red flags before you even get started.
H3: Identifying Major Red Flags
Not all damage is created equal. While a simple crack is often manageable for a first-timer, some issues signal deeper trouble that a new screen just won't fix. Trying to push a DIY repair in these scenarios will almost certainly make things worse.
Keep a sharp eye out for these serious warning signs:
- A Bent or Dented Frame: If the iPhone's metal chassis is bent, a new screen will never sit flush. This creates gaps for dust and moisture to get in, and it puts constant, uneven pressure on the new glass, making it far more likely to crack again.
- Visible Signs of Water Damage: Can you see moisture trapped under the old screen or any corrosion on the internal components? Water damage is completely unpredictable. Powering on the device without a professional clean can easily cause a short circuit.
- The Phone Won't Power On: If the device is completely dead, the issue is much bigger than just the screen. You'll need a professional diagnosis to find the root cause, which could be anything from a dead battery to a serious main board fault.
Recognising when a problem is beyond a simple screen swap is key. Forcing a repair on a device with underlying issues almost always leads to more significant, and costly, damage.
H3: The Value of Professional Expertise and Warranty
Confidence is a huge factor here. If you're not comfortable handling those tiny, fragile components, or the thought of permanently disabling Face ID is giving you anxiety, that's a perfectly valid reason to find a pro. Technicians at a service like Screen Fixed Brisbane handle these delicate parts every single day.
Plus, professional repairs come with a warranty. That peace of mind is invaluable. If something goes wrong with the new part or the repair itself, you're covered. When you're doing it yourself, any mistakes—like tearing a ribbon cable or losing a crucial screw—are entirely on you. The cost of fixing a self-inflicted error can quickly add up to more than you would have paid for a professional service in the first place. For a better understanding of what goes into professional pricing, this article on iPhone screen repair costs offers a helpful breakdown.
If you decide that DIY isn't for you and want to find a professional in Brisbane, you'll notice many local repair shops use a solid ultimate guide to local SEO for small businesses to make sure they're easy to find online. Choosing a reputable, highly-visible local expert ensures you get reliable service backed by a solid warranty.
Got Questions About Your iPhone Repair?
Even after walking through the steps, it's totally normal to have a few questions buzzing around. Deciding on an iPhone screen repair in Brisbane comes with a few options, and getting straight answers helps you make the best call for your phone and your wallet.
Let's dive into some of the most common queries we get from fellow Brisbanites, whether they're rolling up their sleeves for a DIY job or looking for a pro to handle it.
H3: How Long Will an iPhone Screen Repair Actually Take?
This is usually the first thing people ask, and the answer really boils down to which path you take.
If you bring your device to a professional outfit like Screen Fixed, it's surprisingly quick. Most of our screen replacements are done and dusted in under an hour. You can literally drop it off on your lunch break and have it back, good as new, before you head back to work.
Tackling it yourself? You’ll want to carve out a bit more time. For your first go, we’d set aside a solid two to three hours. This gives you a relaxed window to work methodically, keep track of all those tiny screws, and re-check your connections without the pressure of a ticking clock. Trust us on this one – patience is your most valuable tool here.
H3: Is My Data Going to Be Wiped During the Repair?
This is a big one, and you can breathe a sigh of relief. A standard screen replacement should not touch your data. The whole process is focused on the display hardware, so your iPhone’s main board and storage are left completely alone. All your photos, messages, and apps will be right where you left them.
That said, it’s always a brilliant idea to back up your iPhone before any kind of repair. Think of it as cheap insurance. An unexpected hiccup is rare, but having a fresh backup on iCloud or your computer provides total peace of mind.
A Quick Heads-Up: If your iPhone's problems go deeper than a cracked screen—say, serious water damage or a main board fault—then data loss becomes a real possibility. In those more complex situations, you'd be looking at professional data recovery, which is a whole different ball game.
H3: Is It Even Worth Fixing an Older iPhone Model?
Deciding whether to fix up an older iPhone usually comes down to a simple cost-versus-benefit chat with yourself. A good rule of thumb is if the repair costs less than half of what the phone is currently worth, it's a solid investment. Slapping a new screen on a trusty iPhone X or 11 can easily give it a couple more years of life.
Just think about what you use it for. If your older model still handles all your essential apps without lagging and you're happy with its performance, a screen replacement is a much smarter move than forking out for a new device. It's not only easier on your bank account but also better for the planet, keeping a perfectly good phone from becoming e-waste.
We've covered some common ground here, but every repair situation is a little different. Here's a quick-glance table to clear up a few more points.
H3: Your Questions Answered
| Question | Answer |
|---|---|
| Do you use genuine parts for repairs? | At Screen Fixed, we use the highest quality parts available to ensure your phone performs like new. |
| What if my DIY repair goes wrong? | Don't panic! Our technicians can often fix issues from failed DIY attempts. Bring it in, and we'll assess the damage and give you a clear quote. |
| Is there a warranty on professional repairs? | Absolutely. All our professional repairs at Screen Fixed come with a comprehensive warranty covering both the parts and the labour for your peace of mind. |
| Can you fix other issues besides the screen? | Yes, we handle everything from battery replacements and charging port issues to camera and logic board repairs for most iPhone models. |
Hopefully, that clears things up! Choosing between DIY and professional repair is a personal choice based on your comfort level, time, and the specific issue you're facing.
Still on the fence, or decided a professional touch is the way to go? The expert technicians at Screen Fixed Brisbane are always ready to help. We provide fast, reliable, and warrantied iPhone screen repairs right here in Brisbane.
Book your repair with Screen Fixed Brisbane today and let's get that screen looking perfect again.