
An iPhone 14 Pro back glass replacement isn't a simple job, and that's largely down to Apple's design. That shattered spiderweb of cracks on the back of your phone is more than just an eyesore; it's a breach in your device's defences. Still, professional third-party repair services can be a fantastic, cost-effective alternative to going through official channels. The final price tag really boils down to whether you head to an Apple Store, find a trusted independent shop like Screen Fixed Brisbane, or brave the repair yourself.
Understanding the Real Cost of a Cracked iPhone 14 Pro
Once that back glass is compromised, it can no longer shield the delicate internal parts from dust, moisture, and everyday knocks. Leaving it broken can lead to much more expensive problems down the track, putting everything from the battery to the wireless charging coil at risk.
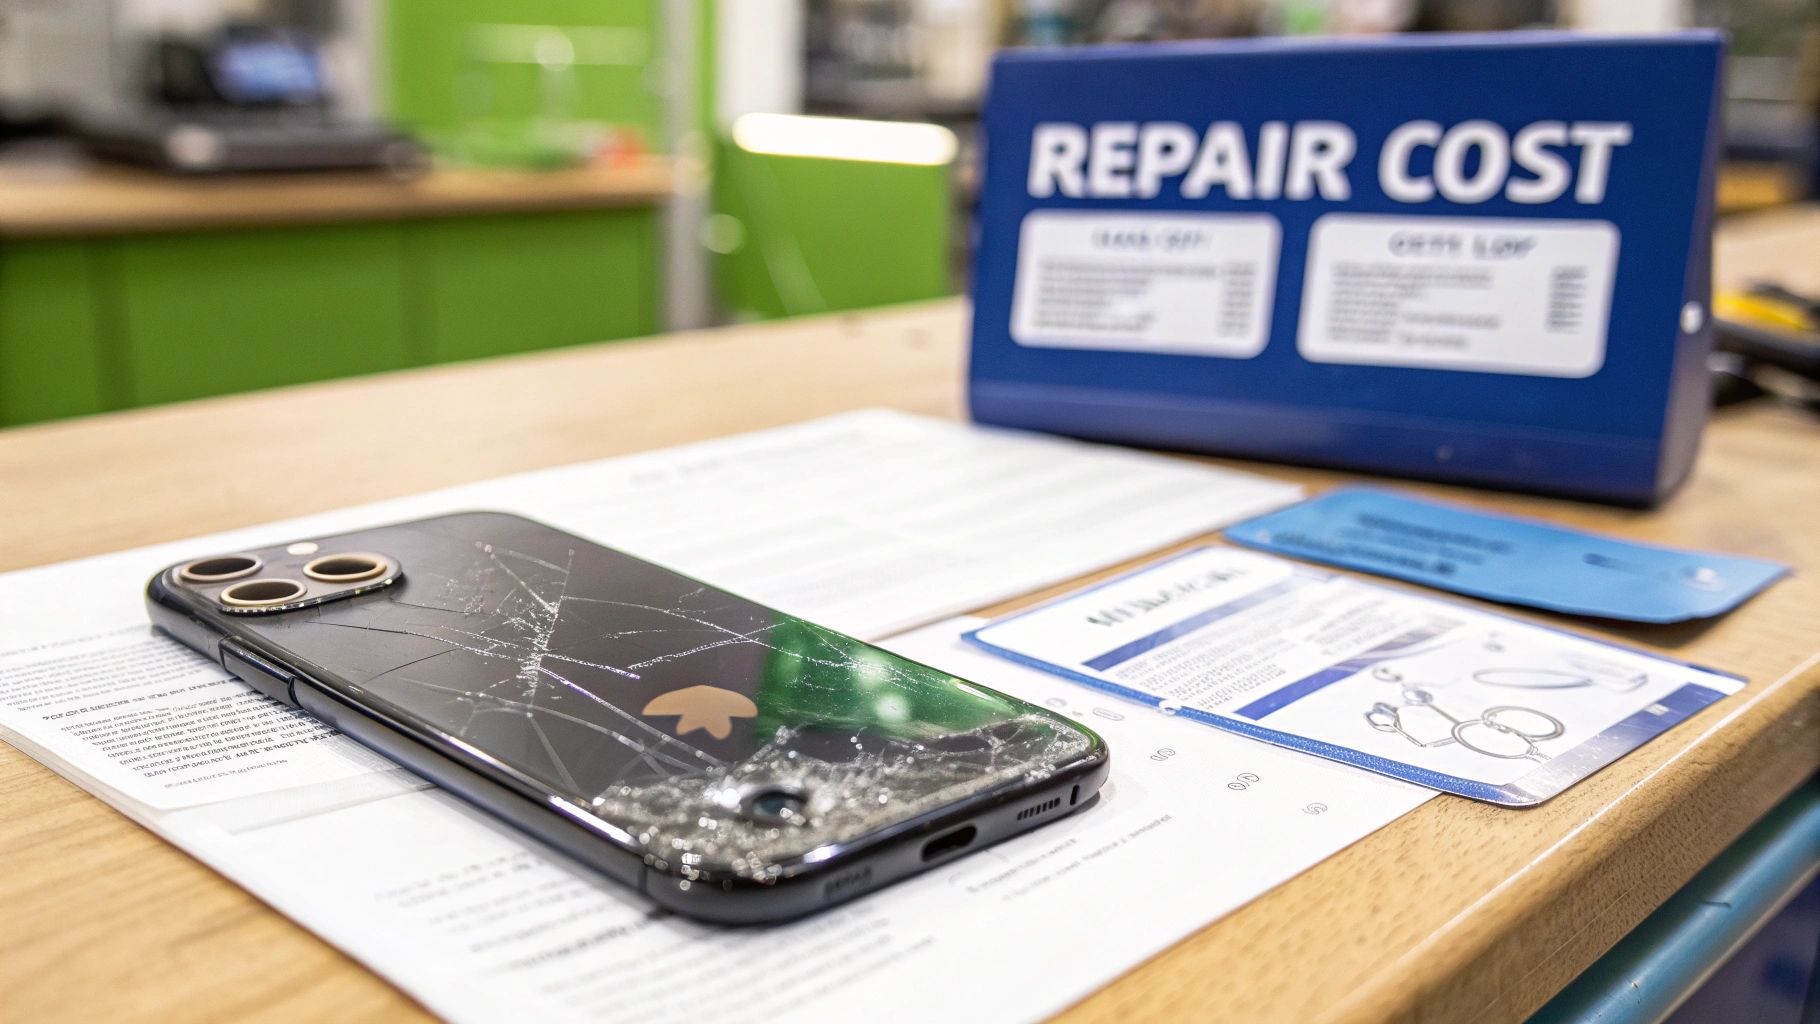 alt: Cracked back of an iPhone 14 Pro next to a repair cost sign, highlighting the need for replacement.
caption: iPhone 14 Pro back glass replacement in Brisbane.
alt: Cracked back of an iPhone 14 Pro next to a repair cost sign, highlighting the need for replacement.
caption: iPhone 14 Pro back glass replacement in Brisbane.
Many iPhone owners get a shock when they see the quotes from official Apple services. The high price is because the iPhone 14 Pro's back glass is fused directly to the chassis and tangled up with the MagSafe and charging components. This design choice makes the iPhone 14 Pro back glass replacement a tricky, labour-intensive job that demands specialised tools—it's far from a simple glass swap.
Comparing Your Repair Options
When you're faced with a broken back, you've got three main paths to choose from, and the cost varies wildly between them.
- Official Apple Service: This is almost always the most expensive option, especially if you're out of warranty or don't have AppleCare+. You’re guaranteed original parts, but the bill can be a huge chunk of what the phone is actually worth.
- Independent Repair Shops: This is where you can find the sweet spot. Professional third-party repairers like Screen Fixed Brisbane have the skills and equipment to handle this complex procedure without the eye-watering price tag. They offer a much more affordable and practical solution for most people.
- DIY Repair Kits: If you're technically savvy and feeling brave, a DIY approach is the cheapest upfront. Be warned, though: it also carries the highest risk. One slip could cause even more damage, turning a cheap fix into a very expensive mistake.
The price gap is no joke. Here in Australia, an iPhone 14 Pro back glass replacement at a reputable independent service usually lands somewhere between $149 and $199 AUD. Compare that to Apple's official repair, which can easily shoot past $500 AUD without AppleCare+.
Beyond the immediate hit to your wallet, think about the bigger picture. Repairing your device instead of replacing it is a far more sustainable choice, helping to reduce the environmental impact of electronic waste.
iPhone 14 Pro Back Glass Repair Cost Comparison in Australia
Here’s a quick breakdown to help you weigh up the costs and benefits of each repair path for your iPhone 14 Pro back glass.
| Repair Option | Estimated Cost (AUD) | Typical Turnaround Time | Key Consideration |
|---|---|---|---|
| Apple Official Repair | $500+ (without AppleCare+) | 3-7 Business Days | Highest cost but guarantees genuine parts and maintains warranty. |
| Independent Repair Shop | $149 - $199 | Same-day to 24 hours | The best balance of cost, speed, and quality for most users. |
| DIY Repair Kit | $50 - $100 | Several hours | Lowest cost, but carries a high risk of damaging the phone further. |
Ultimately, choosing the right repair comes down to balancing cost, convenience, and how much risk you're willing to take. Understanding the process and the skills involved, as detailed in guides on how to replace iPhone back glass, can help you make an informed decision, whether you tackle it yourself or hand it over to a pro.
Gathering Your Essential Repair Toolkit
Attempting an iPhone 14 pro back glass replacement without the right gear is, to put it mildly, a recipe for disaster. Think of it like performing surgery on your phone—you wouldn't go in with a butter knife, you need precision instruments. Having the correct tools laid out and ready to go will make the entire process smoother, safer, and dramatically boost your odds of a successful repair.
Essential Tools for the Job
First up, and arguably the most critical item on your list, is a heat gun or an iOpener. Apple uses an incredibly strong adhesive to bond that back glass to the frame, and you simply can't muscle it off cold. You need a controlled source of heat to gently soften that glue, which is the only way you'll get the glass loose without applying the kind of brute force that cracks frames or fries internal components.
Next, you'll need a good selection of prying and scraping tools. And no, we're not talking about anything from your garage toolbox. You need thin plastic picks, spudgers, and fine-tipped tweezers designed for electronics. These are what allow you to get under the glass and carefully separate it from the frame, navigating the minefield of delicate flex cables for the camera, flash, and wireless charging coil. You'll also need a range of screwdrivers to deal with the tiny screws inside; for more on that, check out our guide on Pentalobe screwdrivers for iPhone repairs.
Safety and Sourcing Your Kit
Beyond the tools for taking things apart, safety gear is completely non-negotiable. You're going to be working with sharp, shattered glass, so a pair of safety glasses is an absolute must to protect your eyes from tiny, flying shards. A good pair of gloves will not only protect your hands from cuts but also prevent the natural oils on your skin from contaminating the phone’s internals.
An anti-static wrist strap or mat is also a very, very good idea. Even a tiny, invisible discharge of static electricity from your body is more than enough to permanently fry the sensitive electronics inside your iPhone. It can turn a straightforward repair into a very costly nightmare in a split second.
When it comes to getting all this stuff, you've got a couple of paths you can take. You could buy each tool individually, or you can grab a comprehensive DIY repair kit. Many Aussie suppliers offer bundled kits that include all the necessary tools plus a high-quality replacement back glass panel. For a one-off repair, this is often the most convenient and cost-effective route, taking all the guesswork out of it.
If you see yourself doing more repairs down the line, investing in a more robust, professional-grade toolkit might be the smarter long-term choice.
Removing the Shattered Back Glass with Precision
Alright, with your tools laid out, it's time to get into the most delicate part of the entire iPhone 14 Pro back glass replacement: getting that shattered mess off the phone. This isn't a race. Patience and a steady hand are your best friends here, turning what looks like a disaster into a manageable process. The key is to be methodical and always remember the sensitive electronics sitting just beneath that broken glass.
First things first, and this is non-negotiable: power the phone down completely. It’s a simple step but absolutely critical for preventing any electrical shorts that could brick your device for good. Once it's off, you can get ready for the main event—applying heat.
Applying Controlled Heat to Loosen the Adhesive
Apple uses an incredibly strong adhesive to hold the back glass in place, and the only way to beat it is with controlled heat. Grab your heat gun and, on a low to medium setting, start moving it gently around the edges of the iPhone's back. The trick is to keep it moving. Never let it sit in one spot for too long, or you risk cooking the battery or the wireless charging coil.
Your aim is to get the adhesive warm and pliable, not to melt the phone's insides. The glass should be warm enough that you can touch it, but not so hot that you can’t keep your finger on it for a second or two. Nailing this balance is everything for a safe disassembly.
The infographic below gives you a solid visual of the essential tools for this stage.
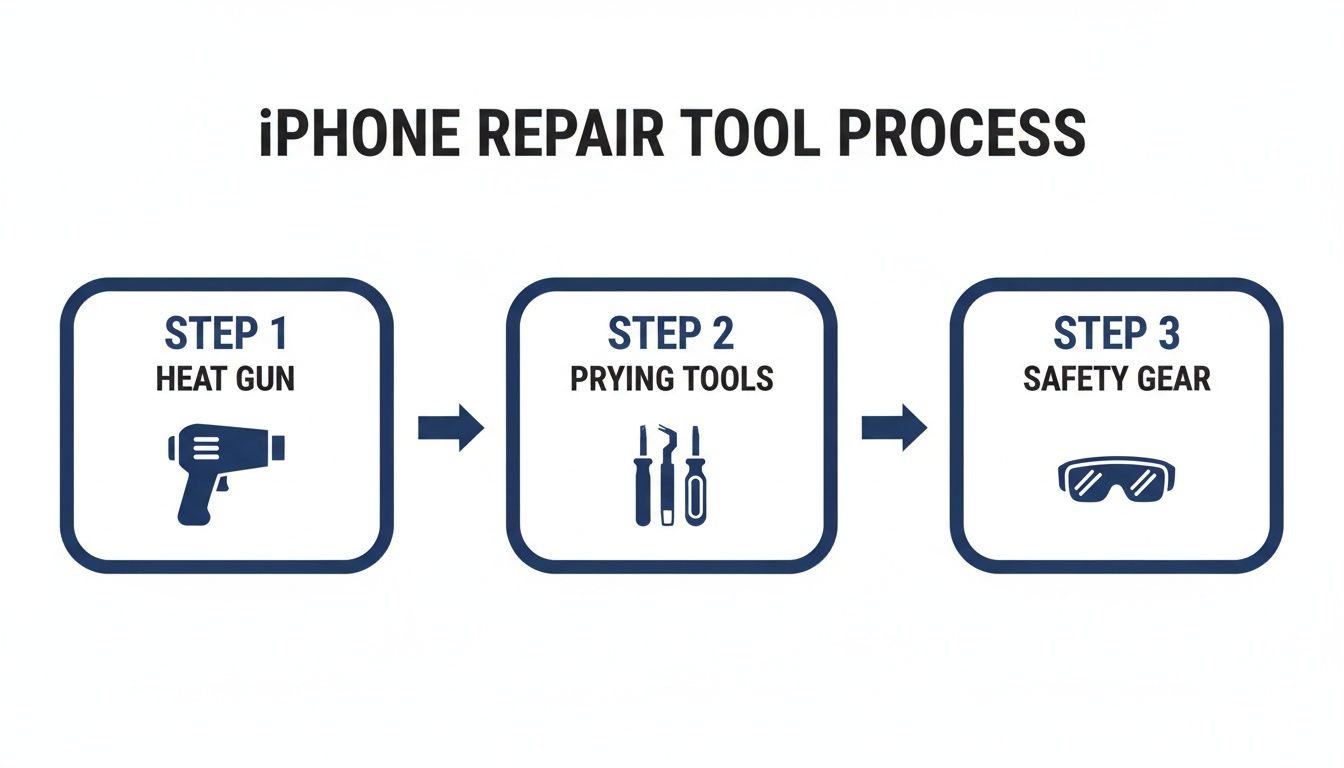 alt: Infographic showing the three stages of repair tools: heat gun, prying tools, and safety glasses and gloves.
caption: Essential tools for an iPhone 14 Pro back glass repair.
alt: Infographic showing the three stages of repair tools: heat gun, prying tools, and safety glasses and gloves.
caption: Essential tools for an iPhone 14 Pro back glass repair.
It breaks down the gear into three key phases, showing you exactly what each tool is for and when you'll need it.
Prying Away the Broken Glass Fragments
Once the adhesive has softened up, you can start the painstaking job of prying the glass away. I find it’s always best to start at a corner or a major crack line, as it gives you an easy entry point. Gently work a thin prying tool or a sturdy plastic pick into the gap between the glass and the metal frame.
Pro Tip: Whatever you do, don't force it. If you hit a wall of resistance, the adhesive has cooled down. Just pull the tool out, apply a bit more heat to that spot, and try again. This will stop you from bending the frame or snapping your tool in frustration.
Slowly work your way around the phone's perimeter, lifting out small pieces of glass as you go. You need to be extra careful around the camera module. This is easily the trickiest spot because of how close everything is to the sensitive camera components. Use your tweezers for the tiny shards here, and be incredibly gentle to avoid scratching the lenses.
This manual, piece-by-piece removal is what makes the DIY route so tough. Professional shops that handle iPhone Repairs Brisbane often use high-tech laser machines to do this with pinpoint accuracy. The typical iPhone 14 Pro back glass replacement at an Australian repair shop takes about 2-3 hours, mainly because techniques like laser removal can safely vaporise the adhesive without risking damage to the phone itself. You can learn more about how the pros do it by checking out the process for back glass replacement online.
Keep repeating the cycle: heat, pry, remove. Don't stop until every last fragment of glass is gone. The frame needs to be perfectly clean of any old glass and adhesive before you even think about putting the new panel on.
Disclaimer: Screen Fixed is an independent repair service and is not affiliated with Apple Inc. iPhone, iPad, and MacBook are trademarks of Apple Inc.
Installing Your New Back Glass Like a Pro
Right, the broken bits are gone and the frame is prepped. Now for the most satisfying part of the whole iPhone 14 Pro back glass replacement: putting it all back together. This stage is all about precision and patience. If you rush it now, you can undo all your hard work, leaving you with a bad seal, ugly gaps, or a back panel that just pops off later.
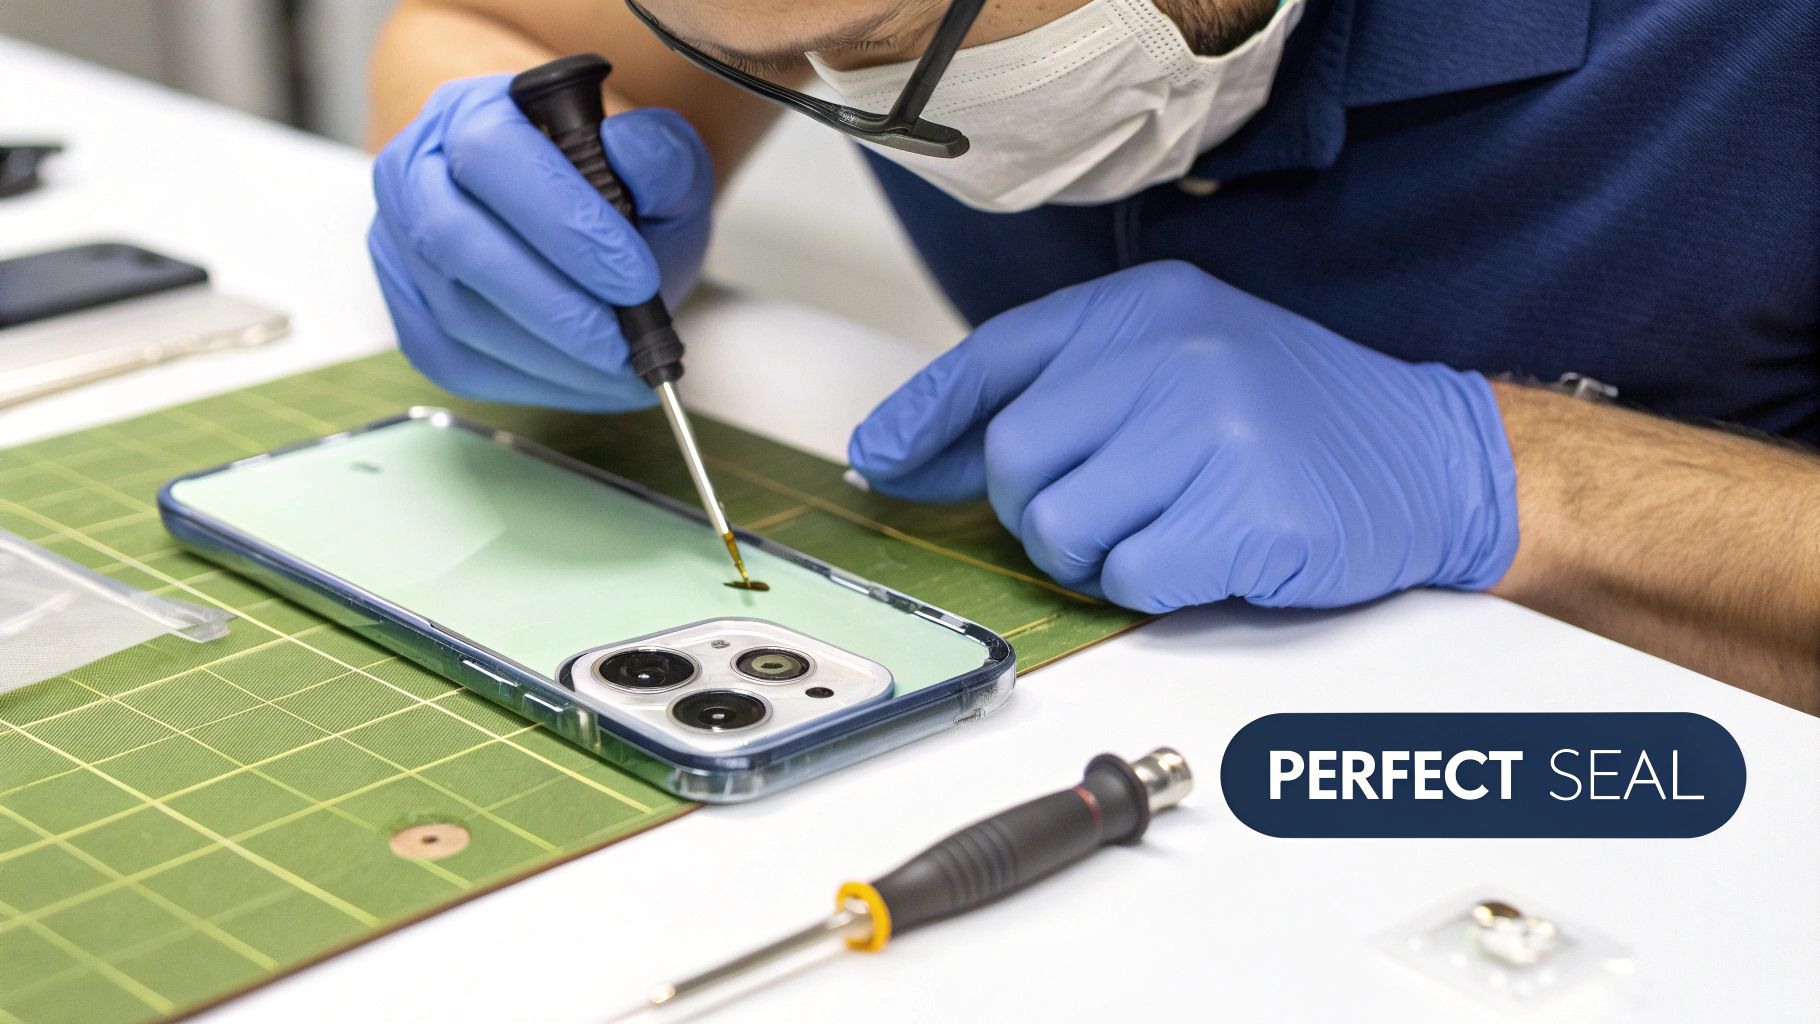 alt: Technician in a clean workshop carefully performing an iPhone 14 Pro back glass replacement.
caption: A professional technician completes an iPhone 14 Pro back glass repair.
alt: Technician in a clean workshop carefully performing an iPhone 14 Pro back glass replacement.
caption: A professional technician completes an iPhone 14 Pro back glass repair.
First things first, that phone frame needs to be flawlessly clean. I mean spotless. Even a tiny speck of old adhesive or a stray glass shard will stop the new panel from sitting perfectly flat. This isn't just about looks; a poor seal kills the phone's structural integrity and its defence against dust and moisture.
Take your time here. Grab a plastic scraper and some isopropyl alcohol, and meticulously get rid of every last trace of the old glue. The metal frame should be completely smooth to the touch before you even think about reaching for the new adhesive.
Applying Adhesive with Precision
With a pristine frame ready to go, it’s time for the new adhesive. Most good replacement kits will give you a pre-cut adhesive sticker that perfectly matches the frame's shape. This makes the job a lot easier than messing around with liquid glue, but you still need a steady hand.
Start by carefully peeling back one corner of the adhesive’s protective film. Line it up perfectly with the matching corner on the iPhone's frame, then slowly press it down as you work your way around the edges.
Use a plastic spudger or the flat edge of your tweezers to press the adhesive down firmly. You want to make sure there are absolutely no air bubbles. A bubble creates a weak spot in the bond, which is the last thing you want after all this effort.
If your kit came with liquid adhesive instead, apply a thin, even bead right around the entire perimeter of the frame. Be careful not to use too much—any excess can squeeze into the phone's internals and cause some serious damage. For more advanced bonding options, you can explore different types; our guide on using UV adhesive glue gives you a deeper look into professional techniques.
Aligning and Curing the New Glass
Adhesive is on. Time to place the new back glass. This is another one of those moments where you need to take a deep breath and work slowly.
- Start at the Camera Module: The camera cutout is your most important reference point. Gently lower the new glass panel, lining up the camera holes with the actual lenses on the phone first.
- Lower and Adjust: Once the cameras are perfectly aligned, slowly lower the rest of the panel onto the frame. You’ll have a few seconds to make tiny adjustments before the adhesive really starts to grab hold.
- Check the Edges: Run your finger all the way around the perimeter. The new glass should sit completely flush with the metal frame. There shouldn't be any raised edges or uneven gaps.
The final step is to secure the panel and give the adhesive time to cure properly. I recommend using soft clamps or even a stack of books to apply gentle, even pressure across the entire back surface. Whatever you do, don't overtighten the clamps, as too much pressure can crack your brand-new glass.
Let the phone sit undisturbed for at least a few hours—overnight is even better. This curing process is what creates that strong, durable bond and helps restore some of the phone's original water resistance. Rushing this last step is a classic mistake that completely undermines the entire repair.
Common DIY Mistakes and How to Avoid Them
Even with the best guide in hand, the DIY iPhone 14 Pro back glass replacement has a few common traps that can catch you out. Knowing what they are beforehand can save you a world of frustration and, let's be honest, potentially expensive damage. Let's walk through the most frequent slip-ups and how you can sidestep them like a seasoned pro.
Key DIY Pitfalls
One of the biggest culprits is getting impatient during the heating and prying stage. It’s so easy to apply too much heat in one spot, which can permanently damage the wireless charging coil or even the battery underneath. Beyond just wrecking a component, a critical mistake like puncturing the battery can lead to seriously dangerous scenarios like exploding phone batteries. The key is to always keep the heat gun moving and work slowly. Patience is your best tool here.
Another classic mistake is leaving microscopic bits of old adhesive on the frame. It might look clean to the naked eye, but even a tiny remnant can stop the new glass from sitting perfectly flush. This creates an ugly gap and, more importantly, completely ruins the phone's seal.
Troubleshooting Post-Repair Problems
Sometimes, you only discover something's wrong after you’ve put everything back together. Don't panic; most issues are fixable if you know what to look for.
- Wireless Charging Not Working: This often points straight back to heat damage. You'll need to check the wireless charging coil for any signs of scorching or discolouration. If it looks burnt or warped, the coil itself will likely need replacing.
- Camera Flash Malfunctions: The flash is connected by a very delicate flex cable that's incredibly easy to nick or dislodge during the repair. Carefully reopen the device and inspect the flash connector. Make sure it’s securely seated and the cable isn't damaged.
- New Glass Isn't Sitting Flush: This is almost always due to leftover adhesive or improper alignment when you first placed it. You'll have to gently remove the new glass (using minimal heat), thoroughly re-clean the frame, and try the installation again, paying very close attention to how it lines up around the camera bump.
Here's a crucial pro tip: test the key functions before you fully seal the device. Power it on when the new glass is just resting in place and check the camera, flash, and wireless charging. This simple check can save you from having to undo all your hard work.
Sometimes things still go wrong. It's just part of the DIY process. Here’s a quick reference table for identifying and solving some of the most common issues you might run into during an iPhone 14 Pro back glass replacement.
DIY Repair Troubleshooting Guide
| Problem | Possible Cause | Solution |
|---|---|---|
| Uneven Gaps Around Edges | Leftover adhesive or misalignment. | Re-heat, remove the new glass, meticulously clean the frame again, and re-apply. |
| Muffled Speaker Sound | Debris or adhesive blocking the speaker grille. | Use a soft brush and isopropyl alcohol to gently clean the speaker mesh. |
| Flex Cable Damage | Accidental tear or nick during prying. | Unfortunately, the only fix is to replace the damaged component. |
Facing these issues is part of the learning curve when you're doing your own repairs. If you run into a problem you can’t solve, remember that getting professional help from services offering iPhone repairs Brisbane is always an option. There's no shame in calling in the experts when you're in over your head.
Got Questions About Your iPhone 14 Pro Repair?
Still got a few questions floating around? That’s totally normal. Tackling an iPhone 14 Pro back glass replacement is a big job, and it pays to know exactly what you’re getting into before you start. We’ve pulled together some of the most common queries we get to give you clear, straight-up answers.
This should help you weigh up your options with confidence, whether you’re thinking about a DIY project or looking for professional iPhone repairs in Brisbane.
How Long Does the Repair Usually Take?
The time it takes can really vary. If you're doing this yourself for the first time, you’ll want to set aside a good four to six hours. This isn't a repair you can rush; the delicate dance of heating, prying off shattered glass, and meticulously cleaning the frame demands patience.
In a professional shop like Screen Fixed Brisbane, the whole process is a lot faster. Our technicians have specialised gear and have done this hundreds of times, so they can usually get the replacement done in about two to three hours.
Will the Repair Mess With My Phone's Water Resistance?
Yes, it most likely will. That factory-applied seal that gives your iPhone its water resistance is compromised the second the back glass shatters. While a professional job using high-quality adhesive can bring back a decent level of protection against dust and minor splashes, it’s safest to assume the phone is no longer as water-resistant as it was out of the box.
After any back glass replacement, whether it's DIY or done by a pro, you need to be extra careful around water. Don't submerge the phone or expose it to heavy rain.
Is It Cheaper If I Have AppleCare+?
Absolutely. Having AppleCare+ coverage makes a massive difference to the cost of an official repair. With this cover, the price for an iPhone 14 Pro back glass replacement through Apple drops dramatically. While prices can change, community discussions suggest it can be as low as $45 AUD for "accidental damage" service fee here in Australia. That's a huge saving compared to the $899+ AUD you’d be looking at without it for the iPhone 14 Pro. You can read community discussions about Apple repair costs to get a better idea.
But, if you don't have AppleCare+, the numbers tell a different story. Reputable third-party repair options suddenly become far more budget-friendly, often saving you hundreds of dollars for a top-quality fix.
When in doubt, it’s always best to chat with the experts. For a reliable, professional, and cost-effective iPhone 14 Pro back glass replacement, you can trust the team at Screen Fixed.