
Meta Title: iPad Is Disabled Connect to iTunes? Here's the Fix (2024 Guide)
Meta Description: Seeing "iPad is disabled connect to iTunes"? Our Aussie guide walks you through restoring your device using a Mac, PC, or iCloud. Get your iPad working again.
The message "iPad is disabled connect to iTunes" is the final security lockdown Apple puts in place after too many wrong passcode attempts. It means your iPad has locked itself down to protect your data, and the only official way forward is to completely erase the device using a computer. It's a problem we see often, but fixing it is usually straightforward.
This guide will explain why this happens and show you exactly how to get your device back up and running.
Why Your iPad Says It's Disabled
Seeing that stark, white text on a black screen can feel like a disaster, but it’s not a hardware fault or a sign your iPad is broken. It’s actually a powerful security feature doing exactly what it's supposed to do. Think of it as your iPad’s digital bodyguard, designed to shield your photos, messages, and personal info from anyone trying to guess your passcode.
When you, a child, or anyone else keeps punching in the wrong passcode, the iPad assumes it’s under attack. To stop this, it starts a series of time delays that get longer with each wrong guess. While it feels like a punishment, its only job is to keep your data safe.
How the Lockout Escalates
Your iPad doesn't just jump straight to being permanently disabled. Apple built in a tiered system that gives you plenty of chances before it takes that final step. It’s a predictable process that we see all the time from customers needing iPad repairs in Brisbane when a passcode is forgotten.
Here’s how quickly your iPad locks down after repeated incorrect passcode attempts:
| Incorrect Attempts | Lockout Duration |
|---|---|
| 1-5 | No penalty |
| 6 | 1 minute |
| 7 | 5 minutes |
| 8 | 15 minutes |
| 9 | 60 minutes |
| 10+ | Permanently disabled ("Connect to iTunes") |
Once you hit that 10th incorrect attempt, the device is locked for good. Even if you suddenly remember the correct passcode, it's too late to enter it on the device itself.
The critical takeaway is this: once your device hits that permanent "connect to iTunes" screen, there is no method to bypass it and save your data. The only path forward provided by Apple involves completely erasing the iPad.
This is exactly why having a recent backup isn't just a good idea—it’s the only way you'll get your personal files back after fixing a disabled iPad. Whether you use iCloud or a computer, regular backups are your only safety net.
If you don't have a backup, you will unfortunately lose the data stored on the device. The good news is you will still be able to use the iPad again once it’s been restored. The following sections will guide you through the exact steps to do just that.
For other common device issues, our article on why USB ports stop working might be helpful.
Solution 1: Restoring Your iPad Using a Mac or PC
When your iPad flashes that dreaded "connect to iTunes" message, grabbing a computer is your most reliable path back to a working device. This process hinges on putting your iPad into a special state called Recovery Mode. This allows your Mac or PC to wipe the slate clean and install a fresh version of iPadOS.
Before you dive in, make sure your computer's software is up to date—that means the latest macOS for Mac users or Windows with the newest version of iTunes for PC users. An outdated system is a common cause of connection errors. You'll also want to use a genuine Apple USB cable, as third-party cables can be unreliable for data transfer.
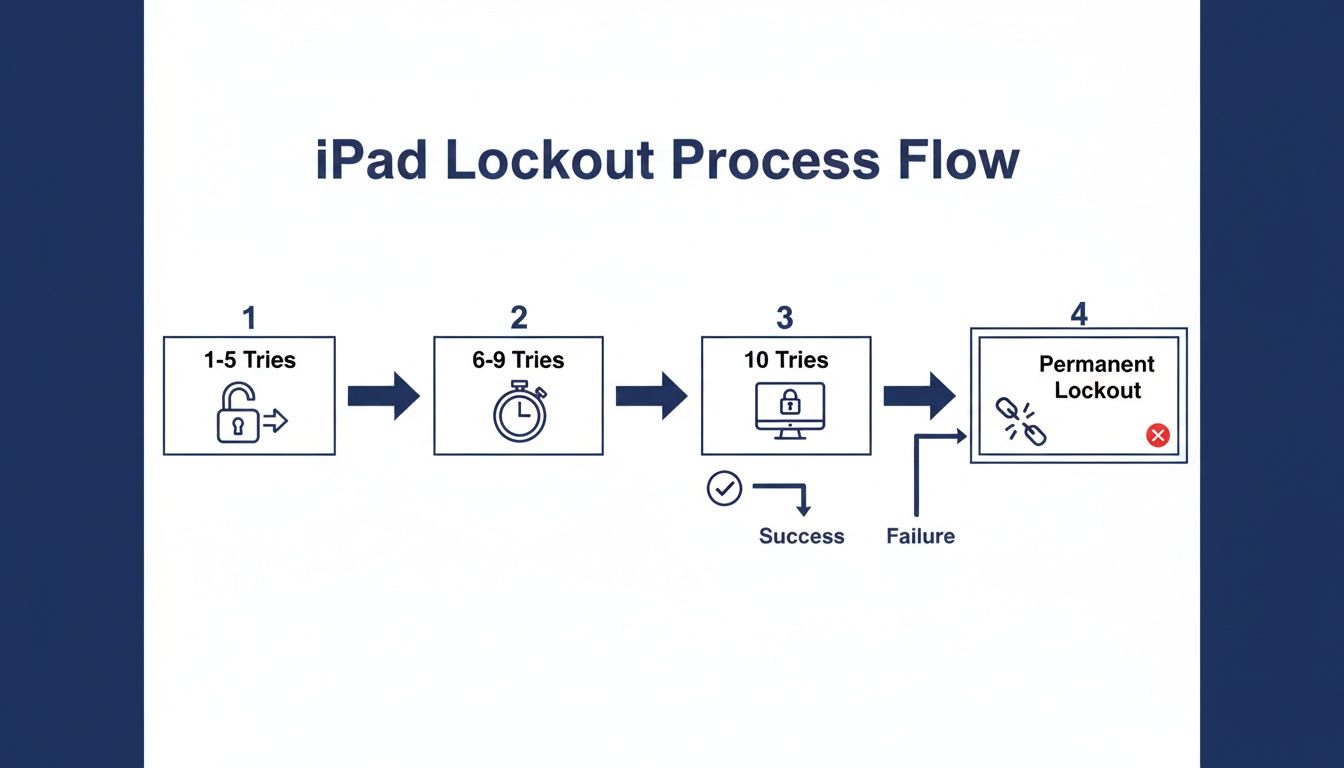
Alt text: A flowchart illustrating the iPad lockout process, showing how incorrect passcode attempts lead to permanent disability.
Entering Recovery Mode for iPads with a Home Button
For older iPads with a physical Home button (like original iPads, older iPad Airs, or early iPad minis), getting into Recovery Mode is simple.
- Power the iPad off completely.
- Press and hold the Home button while you plug the USB cable into your iPad.
- Keep holding the Home button until you see the Recovery Mode screen (a computer icon and a cable).
Entering Recovery Mode for iPads with Face ID
For newer iPads without a Home button (like the iPad Pro or modern iPad Air), use this button combination.
- Plug your iPad into the computer.
- Press and quickly release the Volume Up button.
- Immediately press and quickly release the Volume Down button.
- Press and hold the Top button. Keep holding it, even after the Apple logo appears. Only let go when the Recovery Mode screen pops up.
Key Tip: Timing is everything. If the iPad just reboots to the lock screen, you probably didn't hold the last button long enough. No stress—just power it down and try the sequence again.
The 'iPad is disabled' error is a security feature designed to stop passcode guessing. While Apple doesn't release official stats, it's one of the most common issues we see. You'll find countless similar stories from users on Apple's support forums.
Initiating the Restore on Your Computer
Once your iPad is in Recovery Mode, your computer should recognise it.
- On a Mac (macOS Catalina or newer): A Finder window will appear.
- On a PC or older Mac: The iTunes app will open.
Your computer will offer two choices: Update or Restore. You must select Restore. This will download the latest iPadOS and install it from scratch, wiping everything, including the forgotten passcode.
This download can take a while. If it takes more than 15 minutes, your iPad might exit Recovery Mode. If that happens, let the download finish, then repeat the button sequence to put your iPad back into Recovery Mode.
After the download, the restore process will begin. You'll see an Apple logo and a progress bar on your iPad. Do not disconnect the cable. If the computer still won't see your device, check our guide on what to do when your USB ports stop working.
Once complete, your iPad will restart to the "Hello" screen, ready for setup.
Solution 2: Using iCloud's Find My for a Remote Reset
If you don't have a computer handy, Apple's Find My service offers a clever, wireless lifeline. This method only works if Find My iPad was enabled before the device was locked out, and your iPad has an active Wi-Fi or cellular connection. If you meet those requirements, you can erase your iPad from anywhere.

Alt text: A person using iCloud's Find My on a laptop to remotely erase a disabled iPad.
Triggering the Remote Erase Command
- Go to iCloud.com on any web browser and log in with your Apple ID.
- Click the "Find My" app icon.
- From the "All Devices" dropdown menu, select your disabled iPad.
- Click Erase iPad and confirm your choice.
This action is final. It remotely wipes all content and settings, including the passcode. After the erase is complete, your iPad will restart as if it were new, ready for setup.
Think of the remote erase as a digital reset button. It's incredibly convenient, but it all hinges on having enabled 'Find My' ahead of time.
How iCloud Erase Compares to a Computer Restore
Both methods achieve the same goal: a wiped iPad that's no longer disabled.
- Convenience: iCloud wins. You can do it from any web browser without needing a specific computer or cable.
- Requirements: A computer restore has the upper hand. It works even if the iPad is offline and doesn't rely on you enabling Find My beforehand.
- The Process: iCloud is more straightforward. The computer method requires you to manually enter Recovery Mode, which can be a bit fiddly.
These two approaches are the only effective solutions for a disabled iPad. Most importantly, neither method will save your data if you don't have a recent backup. You can learn more about the iPad recovery process by watching a detailed walkthrough.
Your choice depends on your circumstances. If Find My is enabled and your iPad is online, the iCloud method is quicker. If not, the computer restore is your reliable go-to.
Solving Common Problems During the Restore
Even when you follow every step, the restore process can hit a snag. Most of these issues are common and can be fixed with a bit of troubleshooting.

Alt text: An image showing an iPad and MacBook with text that reads 'FIX Restore Errors', symbolizing common issues.
When Your Computer Doesn't Recognise the iPad
If your Mac or PC isn't detecting your iPad, work through this quick checklist.
- Try a Different USB Port: Plug the cable directly into a different port on the computer itself, avoiding USB hubs.
- Use a Genuine Apple Cable: Third-party cables can fail during data transfer. Stick with an official or MFi-certified cable.
- Restart Both Devices: A simple reboot can clear up temporary software glitches.
- Update Your Software: Make sure your Mac is running the latest macOS or that your PC has the most recent version of iTunes.
A faulty charging port on the iPad could also be the culprit. If you've noticed your device has been struggling to charge, that might be the root cause. We have a guide on what to do about an iPad that is not charging.
Dealing With a Stuck Restore Process
If the progress bar freezes, don't yank the cable. Your iPad will only stay in Recovery Mode for 15 minutes. If the software download takes longer, the iPad automatically restarts. This is normal.
If this happens, let the download finish. Once it's done, simply put your iPad back into Recovery Mode. The restore process will pick up where it left off.
If you see a specific error number (like 4013 or 9), it often points to a connection problem or interference from security software. Try temporarily disabling your antivirus or firewall during the restore.
What to Do After the Restore
Seeing the "Hello" screen after a restore is a huge relief. During setup, you'll reach the "Apps & Data" screen. Here, you can select 'Restore from iCloud Backup' or 'Restore from Mac/PC' to recover your photos, contacts, and settings.
Navigating Activation Lock
During setup, you will encounter Activation Lock, an anti-theft feature that requires the original Apple ID and password used on the device. There is no way to bypass this. If you can't remember your Apple ID password, go to Apple's official password recovery page to reset it.
Activation Lock is a non-negotiable security checkpoint. Without the correct Apple ID credentials, the iPad will remain unusable.
How to Prevent This Happening Again
Nobody wants to repeat this process. Preventing it is straightforward.
- Use a Memorable Passcode: Pick something that’s secure but memorable for you, avoiding obvious codes like "123456."
- Use Touch ID or Face ID: These biometric tools are secure and reduce the need to type your passcode, lowering the risk of accidental lockouts.
- Enable Automatic iCloud Backups: This is your ultimate safety net. Go to Settings > [Your Name] > iCloud > iCloud Backup and turn it on. Your iPad will back up automatically when locked, charging, and on Wi-Fi.
The security of your data is paramount. You can learn more by understanding the fundamentals of phone repair data security and privacy.
If you’ve tried everything and are still stuck, it might be time for professional help. The expert team at Screen Fixed Brisbane can run a full diagnostic to pinpoint the exact problem and get your iPad back in working order. Book your repair with Screen Fixed Brisbane today.
Disclaimer: Apple, iPad, iTunes, Finder, iCloud, and macOS are trademarks of Apple Inc., registered in the U.S. and other countries. Screen Fixed is an independent service provider and is not affiliated with Apple Inc.