
A cracked or malfunctioning MacBook Pro screen can feel like a disaster, stopping your work or study dead in its tracks. The good news is, getting it fixed is often simpler and more affordable than you might think. You can absolutely replace a MacBook Pro screen yourself with the right parts and a bit of guidance, saving hundreds of dollars compared to official repair channels. It's a project that demands patience and a steady hand, but the reward is a perfectly working Mac without that eye-watering price tag.
Is a DIY Screen Replacement Right for You?
Staring at a spiderweb of cracks or a screen that’s just given up is incredibly frustrating. Before you rush to the nearest repair shop, though, it’s worth asking: could you tackle this yourself? A DIY screen replacement is a fantastic way to save a serious amount of cash and learn some valuable tech skills, but let's be honest—it’s not for everyone. This first step is all about taking a realistic look at the challenge ahead.
 Alt: A MacBook Pro with a severely cracked screen sitting on a desk, symbolising the choice between DIY and professional repair.
For most people who decide to replace a MacBook Pro screen themselves, the number one motivator is cost. The savings can be huge, especially when you source a high-quality display assembly from a trusted Australian supplier like Screen Fixed. Let’s crunch some numbers to see just how big the difference is.
The Cost Savings Are Serious
Here’s a quick look at how the costs stack up in Australia. Going the DIY route can put a significant amount of money back in your pocket.
DIY vs Professional Repair Cost Comparison (AUD)
| MacBook Pro Model | Authorised Repair Est. | Independent Repair Est. | DIY with Screen Fixed Parts Est. |
|---|---|---|---|
| 13-inch (Pre-2017) | $700 - $900 | $450 - $650 | $250 - $400 |
| 13-inch (2017-2022) | $900 - $1,200 | $600 - $850 | $400 - $600 |
| 15/16-inch (All) | $1,200 - $1,800+ | $800 - $1,300 | $550 - $800+ |
As you can see, the price difference between an authorised Apple repair and a DIY approach is staggering. You’re often paying a massive premium for parts and labour through official channels. By tackling it yourself, you only pay for the part, cutting out the biggest expense.
Taking the DIY route means you could potentially save over 50% on your repair costs. That's money that stays with you, all for a few hours of focused work.
Gauging Your Skill and Patience
While the financial upside is clear, a successful repair hinges on more than just having the right part. You need to be honest about your technical comfort level. Have you ever opened up a laptop or phone before? Are you okay with handling dozens of tiny screws and delicate ribbon cables?
A MacBook Pro is a beautifully engineered but very compact machine. Everything inside is fragile. A successful screen replacement really comes down to:
- Patience: Rushing is the quickest way to tear a tiny connector or strip a screw head. You have to work slowly and methodically.
- Organisation: You'll be dealing with lots of tiny screws, often in different lengths. A magnetic mat or some labelled containers are non-negotiable for keeping everything straight.
- The Right Tools: Your standard screwdriver set won’t cut it. This job requires specific tools like Pentalobe and Torx screwdrivers, spudgers (plastic pry tools), and suction cups.
If you're a hands-on person who enjoys a good technical challenge, this project is well within your grasp. For a deeper dive into what’s needed for specific models, check out our full guide on MacBook Pro display replacement, which covers various scenarios. When you’re properly prepared, choosing the DIY path is an incredibly rewarding decision.
Sourcing the Right Parts and Tools for the Job
Any successful repair is built on two things: quality components and the right equipment. Once you've decided to replace a MacBook Pro screen yourself, the next crucial step is getting everything you need lined up. This isn't just about finding any old screen that fits; it's about choosing a part that will bring your Mac's display back to its original glory.
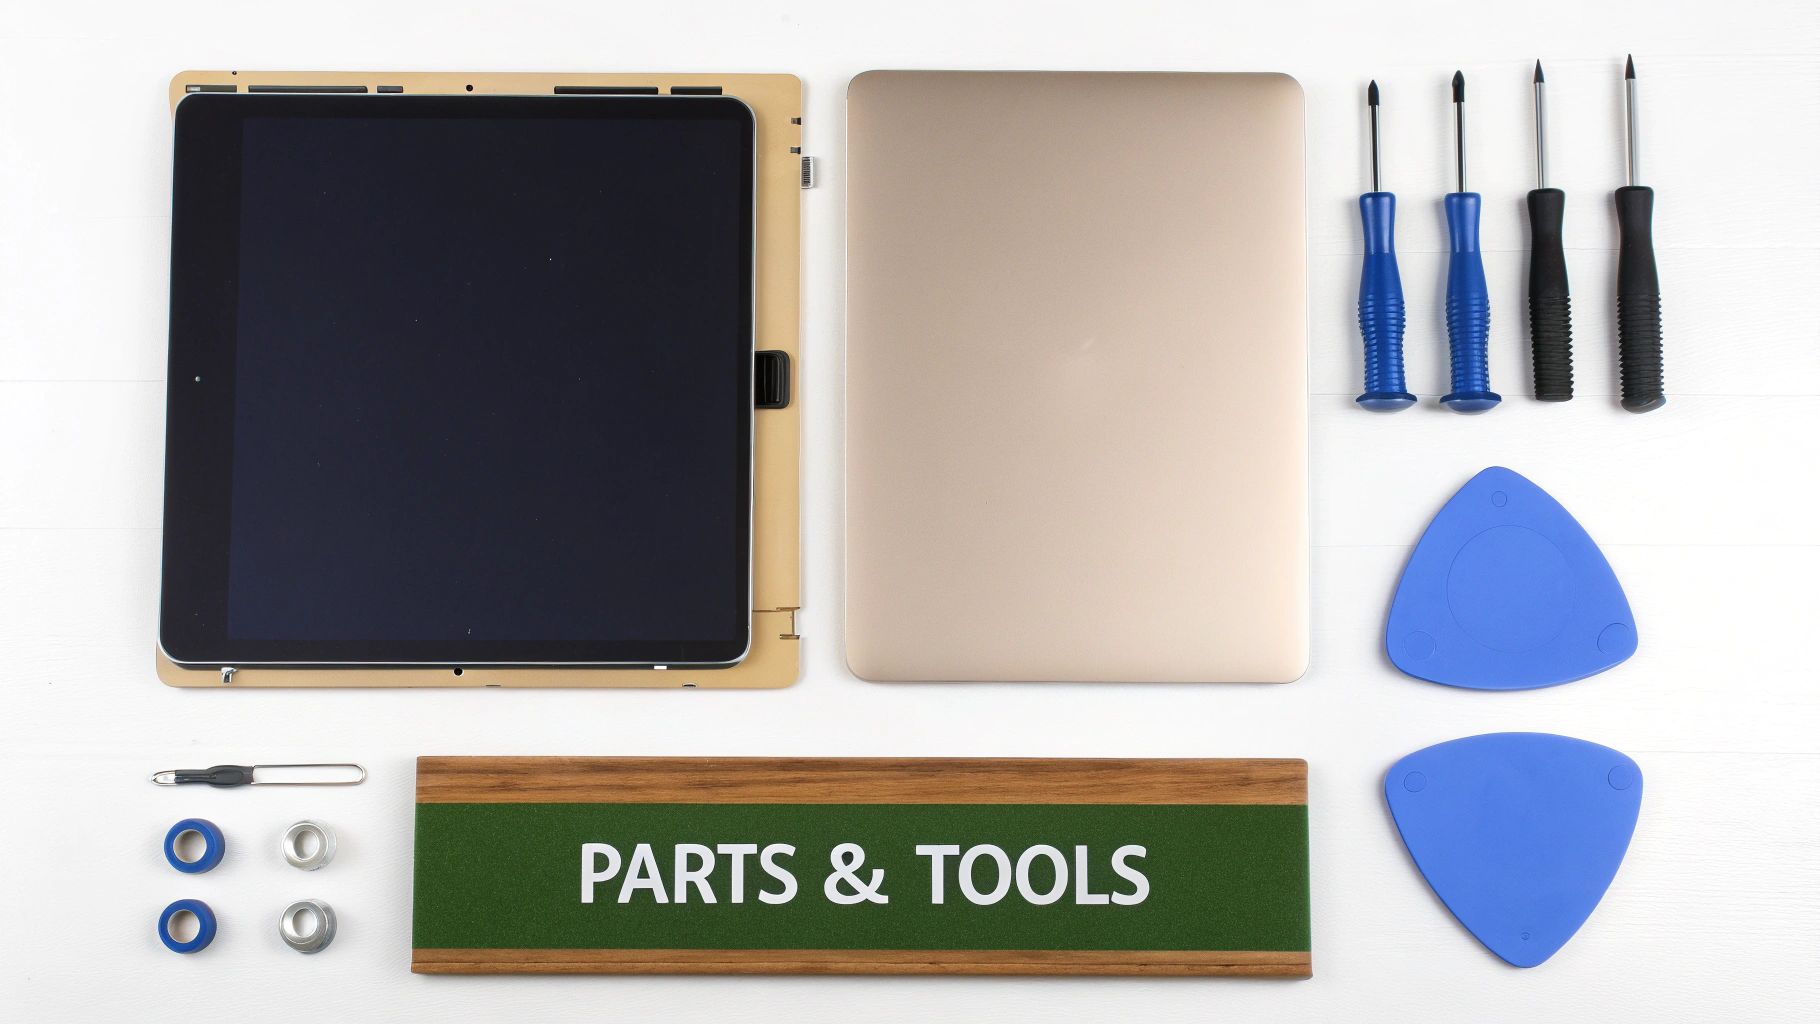 Alt: An organised layout of tools for electronics repair, including screwdrivers and laptop components for a MacBook Pro screen replacement.
Diving into the world of replacement parts can feel a bit daunting, but once you understand the options, the choice becomes much clearer. Here at Screen Fixed, we make sure to stock a range of displays to suit different needs and budgets, so you never have to settle for less than the best.
Choosing the Perfect Replacement Screen
Your MacBook Pro's display is its centrepiece, so picking the right replacement is absolutely vital. You'll typically find a few different grades of screens out there, and each has its own pros and cons.
- Service-Pack Screens: These are the top-tier parts, often identical to what Apple uses for its own official repairs. They're a sure bet for perfect compatibility, colour accuracy, and full functionality for features like True Tone.
- Premium Refurbished Displays: This is a fantastic option if you're looking for an eco-friendly and more budget-conscious choice. These are original Apple screens that have been professionally restored to an as-new condition, giving you OEM performance without the brand-new price tag.
- High-Quality Aftermarket Screens: These are newly manufactured screens built to meet or even exceed original specifications. For many common repairs, they strike a great balance between solid performance and value.
For professional repair shops in Sydney or Melbourne, keeping a mix of these on hand provides great flexibility when putting together quotes for customers. And with reliable, same-day dispatch from Screen Fixed, you can offer impressively quick turnaround times.
Identifying Your Exact MacBook Pro Model
There's nothing more frustrating than ordering a part only to find out it's the wrong one. Before you even think about adding a screen to your cart, you have to nail down your MacBook Pro's specific model number. I'm not talking about the model year; I mean the specific identifier printed right on the bottom case of the laptop.
Flip it over and look for a number starting with 'A', like A1707 for a 15-inch Touch Bar model or A2141 for a 16-inch version. This little number is your golden ticket to ensuring the screen assembly you buy has the correct dimensions, connectors, and camera module.
Always, always double-check the model number on the device itself. Relying on the "About This Mac" screen can sometimes lead you astray, especially if the machine has had previous repairs or software tweaks.
Once you've got that 'A' number, you can browse the Screen Fixed catalogue with confidence, knowing you're picking a part that's guaranteed to be compatible.
Your Essential Repair Toolkit
Trying to tackle this repair with the wrong tools is just asking for trouble. You'll end up stripping tiny screws, cracking the logic board with a makeshift pry tool, or tearing a delicate ribbon cable. Trust me, investing in a proper toolkit isn't just a recommendation; it's non-negotiable.
Here’s a rundown of the absolute must-haves for this job:
- Pentalobe P5 Screwdriver: You simply can't open the bottom case of most MacBook Pros without one.
- Torx T3, T5, and T8 Screwdrivers: You'll run into various Torx screws holding down internal components, brackets, and the all-important display hinges.
- Plastic Spudger or Pry Tool: Essential for safely disconnecting fragile ribbon cables without risking a short circuit. Metal tools are a big no-no here.
- Suction Cup: Gives you a secure grip to help lift the screen assembly away from the main body without putting stress on the wrong places.
- Tweezers: You'll be glad you have these when you're trying to handle microscopic screws or guide a tiny cable back into its socket.
A lot of these specialised drivers, particularly the Pentalobe, aren't something you'll find in a standard hardware kit. You can dive deeper into why these specific tools are so crucial in our guide on Pentalobe screwdrivers for Apple repairs.
To make things easy, a complete DIY kit from Screen Fixed is the way to go. It bundles the correct screen with all the necessary tools, so you’re ready to get started the moment your package lands on your doorstep.
Preparing Your Workspace for a Safe Repair
Before you even think about touching a single screw, let's get one thing straight: the success of a DIY MacBook Pro screen replacement is often decided before the repair even starts. Taking a few minutes to prepare your workspace isn't just a suggestion; it's the single most important thing you can do to prevent a simple job from turning into a costly nightmare. A clean, organised, and safe area drastically cuts down the risk of damaging a delicate part or losing a tiny, critical screw.
Set Up a Clean, Well-Lit Area
A messy desk is a recipe for disaster. You need a flat, well-lit, and clean surface with enough room to comfortably lay out your MacBook Pro, the new screen, and all your tools. Don't try to cram it all into a tiny space. Good lighting is completely non-negotiable. You’re going to be working with minuscule connectors and screws, and you absolutely must see what you’re doing. A simple desk lamp or even a headlamp can make a world of difference.
First Things First: Power Down Completely
This is the most critical safety step, and it's more than just putting your MacBook to sleep. To completely eliminate the chance of a short circuit that could fry your logic board, you have to perform a complete shutdown. Hold down the power button and select "Shut Down" from the menu. Do not just close the lid. Once it’s fully off, unplug the charging cable and anything else connected to it. The goal is to make sure zero electrical current is flowing into the machine before you open it up.
The Non-Negotiable Battery Disconnect
Once you get the bottom case off, the very first component you disconnect is the battery. Always. No exceptions. The battery connector is usually a wide, multi-pin plug connecting the battery to the logic board.
Disconnecting the battery immediately after opening the case is the professional standard. It de-energises the entire system, creating a safe environment to work in and protecting sensitive components from accidental static discharge or shorts.
Use a plastic spudger or the flat end of a pry tool to carefully lift the connector straight up from its socket. Whatever you do, never use a metal tool for this. It could easily bridge contacts and cause a catastrophic short circuit. Only after the battery is physically unplugged is it safe to move on.
Mastering Screw Management
One of the biggest pitfalls for first-timers is keeping track of screws. Apple uses a maddening variety of screw types and lengths, even within the same device. Mixing them up can cause serious damage, like putting a long screw into a short hole and piercing the logic board right through.
This is where a magnetic project mat becomes your best friend. These mats have a grid where you can place screws in the exact same pattern you removed them. It creates a visual map, making sure every single screw goes back exactly where it came from. If you don’t have one, small labelled containers or even a piece of paper with diagrams drawn on it will do the trick.
For more complex jobs involving multiple layers, it also helps to understand how pros keep everything secure. You can learn more about the role of double-sided tape in electronic repairs to see how it all fits together.
Finally, deal with static electricity. A stray static discharge can instantly kill sensitive electronics. The simplest precaution is to periodically touch a large, unpainted metal object to ground yourself. For extra peace of mind, use an anti-static wrist strap. It's standard equipment in any professional setting, including our workshops at Screen Fixed Brisbane, for a very good reason.
A Practical Guide to Replacing the Screen Assembly
Alright, this is the main event: the hands-on part of the screen replacement. This is where all that careful prep work really starts to matter.
While the exact steps might differ a tiny bit between models—say, a classic 2015 Unibody compared to a sleek 2020 M1 machine—the basic process of taking it apart and putting it back together is pretty much the same. We'll walk through the whole operation, pointing out the common traps people fall into.
The most important thing here is to be methodical. Rushing is your worst enemy; patience is your best friend. Every tiny connector is fragile, and every single screw has a specific home to return to. Take your time, and you'll be looking at a beautiful new screen before you know it.
This infographic breaks down the crucial prep steps you need to take before you even pick up a screwdriver. It’s all about starting the repair safely.
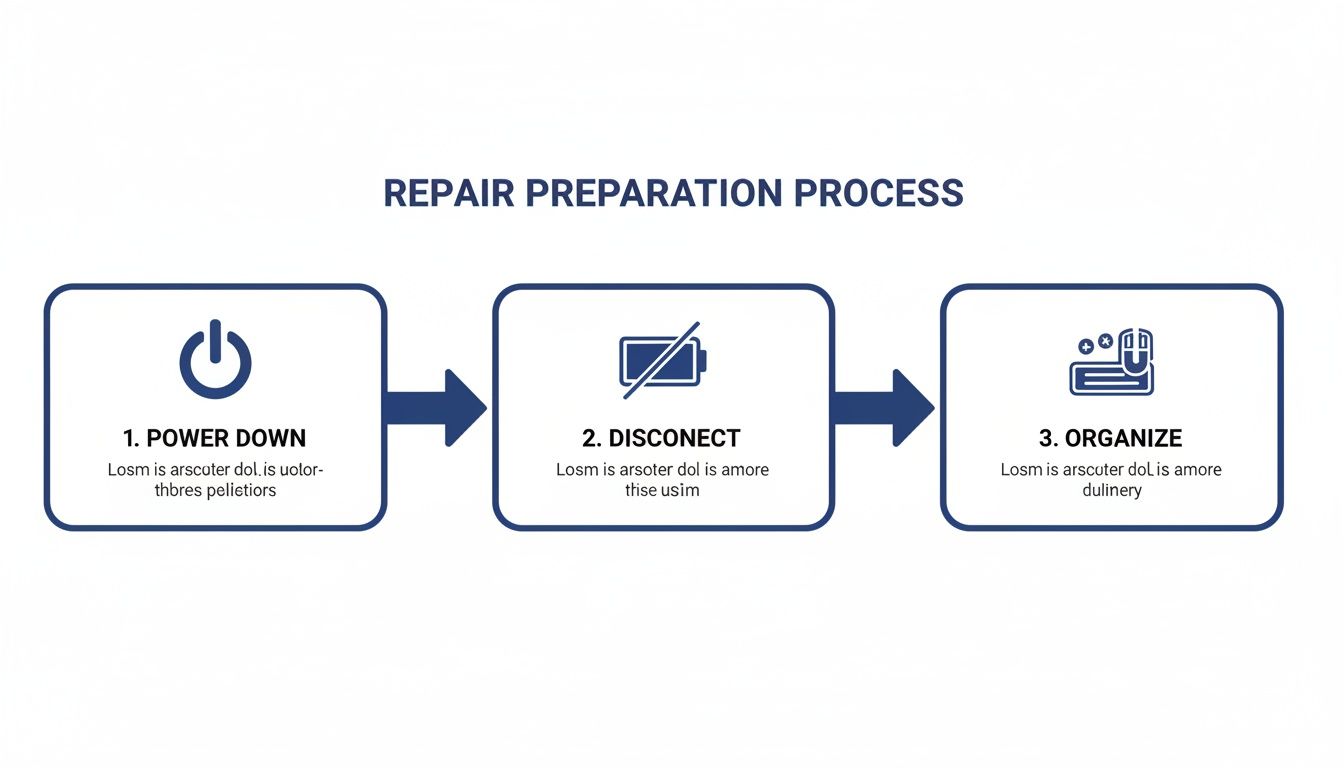 Alt: An infographic showing three key steps: power down MacBook, disconnect battery, and organise screws for a safe repair.
This little visual guide drives home the golden rule: power down, unplug the battery, and keep your screws organised. It's the best way to prevent electrical shorts or reassembly headaches.
Phase One: Removing the Bottom Case and Disconnecting Power
With your workspace ready and your MacBook completely shut down, it’s time to get inside. Flip the laptop over and place it on a soft cloth to avoid scratching the lid. Grab your Pentalobe P5 screwdriver and carefully remove all the screws holding the bottom case in place. Be warned: on most models, these screws aren't all the same length. This is where your magnetic mat or labelled trays become essential. As you remove each screw, place it in its matching spot on the mat. No guesswork later. Once the screws are out, use a suction cup or your fingernails to gently lift the bottom case away from the body, starting near the back vents. It's held on by a few clips, so you might need to give it a little wiggle. Lift it off and set it aside. The very first thing to do now is disconnect the battery, just like we covered. This step is non-negotiable.
Phase Two: Disconnecting the Display and Associated Cables
Now you can focus on the display connections. The screen assembly is wired to the logic board with several delicate ribbon cables, usually tucked under a small metal bracket near the hinges. You’ll need your Torx screwdrivers here to remove the screws holding that bracket down. With the bracket off, you'll see the connectors. Typically, these include:
- The main LVDS/eDP cable: This is the big one, the primary video cable that carries the picture to your screen.
- The iSight camera cable: A much smaller, more delicate cable for the webcam.
- Wi-Fi/Bluetooth antenna cables: These are tiny coaxial connectors that snap directly onto the wireless card.
Use a plastic spudger to gently pry each connector straight up off its socket. Never, ever pull on the cables themselves. The Wi-Fi antenna connectors are particularly tricky—you have to pop them straight up to avoid bending the pins inside.
That iSight camera cable is notoriously fragile. On some models, the way it’s routed makes it incredibly easy to tear if you aren't paying attention when lifting the display. Always know where it is and make sure there’s enough slack before you move on.
Phase Three: Releasing the Hinge Mechanism
The whole screen assembly is attached to the body by hinge clutches, which are secured by several Torx T8 screws on each side. These are usually the biggest screws you'll deal with in this repair. Before you touch them, you have to get the screen in the right position. Open the MacBook's lid to just past a 90-degree angle. This simple move takes the tension off the hinges, making them much easier and safer to remove. If you try to do this with the lid closed, the spring-loaded tension can make the display snap open violently as soon as the screws come loose. Carefully remove the Torx screws from both hinges—there are usually three on each side. As you loosen the last screw, use one hand to support the weight of the display so it doesn't flop backwards. With all the hinge screws out, you can now lift the entire screen assembly up and away from the top case. Congratulations, the old screen is off! This is a perfect opportunity to grab a can of compressed air and gently blow out any dust that’s built up in the fans and around the logic board.
Phase Four: Installing the New Display Assembly
Putting it all back together is basically the reverse of taking it apart, but you need to be even more precise. Start by positioning your new screen assembly from Screen Fixed, carefully aligning the hinges with the screw holes. Holding the display at that same 90-degree angle, loosely thread one screw on each hinge to hold it in place. Don't tighten them all the way just yet. Now, gently guide the delicate display cables back toward the logic board. This can be the trickiest part of the whole job. Reconnect the main video cable, the camera cable, and snap the Wi-Fi antennas back on. You should feel a satisfying little click as they seat properly. If you have to force it, something is wrong. Stop and realign. Once the cables are secure, pop the metal bracket back over them. Now you can go ahead and fully tighten the six Torx hinge screws. But before you button everything up, it’s a good idea to do a quick test run. Temporarily reconnect the battery, hit the power button, and check if the new screen lights up with the Apple logo. If it does, you’re in great shape. If not, power down immediately, disconnect the battery again, and carefully double-check all your cable connections. A common issue we see at repair shops like Screen Fixed Brisbane is a video cable that isn't fully seated, which results in a black screen. Once you’ve confirmed the screen is working, disconnect the battery one last time. Now you can put the bottom case back on and screw in all the Pentalobe screws. Power up your MacBook and enjoy your handiwork—a perfect new display, installed by you.
Post-Repair Checks and Troubleshooting Common Issues
Alright, the last screw is back in and your MacBook Pro is looking whole again. It's tempting to call it a day, but we're not quite there yet. The final, and arguably most important, phase of any screen replacement is the quality check. This is your chance to make sure everything is running perfectly and to catch any small hiccups before they turn into major headaches.
Think of it this way: skipping this part is like building a beautiful piece of furniture but not checking if the drawers open smoothly. You've done the hard work, now let's verify it. A systematic check ensures your MacBook isn't just working, but working correctly.
Your Essential Quality Assurance Checklist
Once you power on your MacBook Pro with its shiny new screen, take a deep breath and resist the urge to immediately jump back into your work. Instead, let's run through a quick but thorough diagnostic checklist. This is how you confirm all your careful work has paid off.
Here’s exactly what to look for:
- Pixel Perfection: Find a completely white, black, red, green, and blue background online. Carefully scan the entire screen for any "dead" pixels (which will look black) or "stuck" pixels (which stay lit as a single colour). A couple might be acceptable on cheaper aftermarket screens, but a premium Screen Fixed display should be flawless.
- Backlight Consistency: Using that same white background, look for any dim spots, shadows, or uneven brightness, especially around the edges. This is what's known as backlight bleed. A quality installation should have very little to none.
- Brightness Control: Grab that brightness slider and run it all the way up and down. You want to see a smooth transition from the dimmest setting to the brightest, with absolutely no flickering.
- Camera and Mic Function: The easiest way to test this is to open Photo Booth or FaceTime. Check that the iSight camera gives you a clear picture and that the built-in mics are picking up sound. It's surprisingly common to forget to reconnect this tiny cable.
- Sensor Functionality: Test the ambient light sensor by covering the top of the display near the camera with your hand—the screen should dim on its own. If your model has True Tone, pop into System Settings > Displays and confirm the option is there and working as expected.
Completing these checks gives you peace of mind that the repair was a genuine success. For anyone running a repair business, this is a non-negotiable step that ensures happy customers and prevents those frustrating follow-up calls.
Troubleshooting Common Post-Repair Glitches
Even the most experienced technicians run into issues sometimes. If you've put everything back together and something isn't right, don't panic. Most of the time, it's a simple connection error that's easy to sort out. If you hit a snag, the first step is always the same: shut it down completely and disconnect the battery before you do anything else. Remember, one of the biggest motivators for DIY is saving money. Australian repair specialists often point out the massive savings from independent repairs. For instance, an authorised repair for a 15-inch MacBook Pro can set you back up to $1,500 AUD, whereas independent shops might charge closer to $900 AUD. That's a huge difference, making a bit of troubleshooting well worth your time. You can learn more from this cost analysis of MacBook screen repairs.
Here's a quick guide to help you diagnose and fix the most common problems you might encounter after installing a new screen.
Common Post-Repair Issues and Solutions
| Symptom | Potential Cause | Recommended Solution |
|---|---|---|
| Blank or Black Screen | The main display cable (LVDS/eDP) isn't fully seated, or you forgot to reconnect the battery. | Disconnect the battery again. Carefully reseat the main display cable until you feel a distinct 'click'. Then, double-check the battery connection. |
| Flickering or Strange Colours | The display cable is only partially connected, or one of the delicate ribbon cables has been pinched. | Inspect the entire length of the display cables for any kinks or damage. Firmly reseat the connector on the logic board. |
| No Backlight (faint image) | The backlight connector (separate on older models) is loose, or a logic board fuse blew during the repair. | Check all display-related connections first. If everything looks secure, this could point to a more complex logic board issue needing a pro's eye. |
| Webcam Not Detected | The iSight camera cable is disconnected, damaged, or not seated correctly. | This cable is incredibly delicate. Power down and carefully check its connection on the logic board. It's tiny and very easy to misalign. |
Working through these steps methodically will resolve the vast majority of post-repair problems, leaving you with a perfectly restored MacBook Pro that you fixed yourself.
Disclaimer: Apple, MacBook, MacBook Pro, and iSight are trademarks of Apple Inc., registered in the U.S. and other countries. Screen Fixed is an independent company and is not affiliated with Apple Inc.
Your Top MacBook Screen Repair Questions, Answered
Deciding to tackle a MacBook Pro screen replacement yourself is a big step, so it's only natural to have a few questions before you dive in. Let's walk through some of the most common queries we hear from DIYers to clear things up and get you started with confidence.
Accidents happen, and cracked screens are incredibly common. Just look at the stats for Aussie smartphones—over five years, we managed to destroy or lose a staggering 2.5 million devices. That's about 1,370 every single day! A survey found that cracked screens were the #1 type of damage, contributing to a national repair bill of around $755 million. You can read the full breakdown of how often Australians are damaging their devices over at Techguide.com.au. The point is, you're definitely not alone in this.
Can I Just Replace the Glass on My MacBook Pro?
For any modern MacBook Pro with a Retina display, the short answer is no. The glass, the digitiser (which handles touch input), and the LCD panel itself are all fused together in a single, sealed assembly. Trying to separate these layers is a job for industrial machinery, not a home workshop. It's an incredibly delicate process that almost always leads to more damage. That's why the only practical and reliable solution is to replace the entire display assembly. It guarantees a perfect fit and a flawless result.
Will a DIY Screen Replacement Void My Apple Warranty?
Yes, it absolutely will. Performing any unauthorised repair, including swapping out the screen yourself, will immediately void any remaining Apple warranty. This guide is really for MacBooks that are already out of warranty, where the official repair costs just don't make financial sense. If your MacBook is still covered by its original warranty or an AppleCare+ plan, your first stop should always be Apple Support. See what your official repair options are before you pick up a screwdriver.
The bottom line: DIY repairs are the perfect way to save a ton of money and breathe new life into older machines where the warranty has already expired.
Will True Tone Still Work After the Replacement?
Functions like True Tone and automatic brightness rely on special sensors that need to communicate correctly with the display. As long as you use a high-quality, service-pack screen from a trusted supplier like Screen Fixed, these features are designed to work just like they did out of the box. On rare occasions, the system might need a little nudge to recognise the new hardware. A quick System Management Controller (SMC) reset is usually all it takes. This simple step recalibrates the sensors and restores full functionality.
What Is the Hardest Part of This Repair?
From our experience helping people with this exact repair, two things tend to trip them up the most. First, keeping track of all the tiny screws. Apple uses a frustrating number of different sizes, and putting one in the wrong spot can cause serious damage to the logic board. The second, and more critical, challenge is handling the paper-thin ribbon cables for the display and camera. These connectors are incredibly fragile and can be torn or damaged with the slightest bit of force. The golden rule here is to work slowly, use the proper plastic tools (never metal!), and never force anything. A little patience goes a long way and is the real secret to a successful repair.
Ready to get started? Screen Fixed has everything you need, from premium-quality replacement screens to professional-grade toolkits and expert guidance. Or, if you'd prefer to leave it to the experts, book your repair with Screen Fixed Brisbane today. Shop for your MacBook Pro parts and DIY kits today!