
Are you facing a cracked or damaged screen on your beloved Samsung Galaxy S23? Don't worry. We can solve this issue! In this guide we'll walk you through replacing the Samsung Galaxy s23 screen with the original one. It will ensure a smooth and stunning display once again.
Why is it essential to choose an original screen? Well the original screen guarantees an excellent performance, maintaining the goodness of your mobile and securing its value. Following the proper procedures and handling them carefully can restore your Samsung Galaxy S23 to its former glory.
But remember success lies in careful attention to detail and loyalty to step-by-step instructions. We'll guide you through each stage from gathering the necessary tools to testing the new screen. That's how there will be no room for guesswork or hesitation.
Are you ready for this restoration journey and rediscover the vibrant visuals of your Samsung Galaxy S23? So, let's dive in and replace that damaged screen with confidence and accuracy!

Replace Samsung Galaxy S23 Screen with Original Screen
Step 1: Gather The Necessary Tools And Materials

To start a smooth screen replacement process for your Samsung Galaxy S23, you'll need the following tools and materials:

Replacement Screen

Obtain a high-quality, original screen compatible with the Samsung Galaxy S23 model. Choosing an original screen ensures the best performance and compatibility.
Heat Gun

This is the most important tool that helps soften the sticky glue around the edges of the screen. It allows you to remove the Samsung Galaxy S23 rear glass easily.
Small Phillips Screwdriver

Another crucial tool is an exact screwdriver. A clear, accurate screwdriver must remove the screws securing the Galaxy mobile's components.
Plastic opening tool

The plastic opening pick/tool is also the important one. It helps carefully separate the screen assembly or rear glass from the phone's frame without causing any damage.
Tweezers

Tweezers help handle delicate components, such as connectors and small parts, with accuracy and control.
Adhesive/Glue

Obtain glue or adhesive that is specifically made for phone repairs. It will help to securely reattach the new screen to the Samsung Galaxy phone's frame.
Cleaning cloth

A soft lint-free cloth is important for wiping away dust, fingerprints, or dirt during the screen replacement.
However ensuring you have all these tools and materials readily available before starting is highly recommended. Please make sure you are well-prepared to tackle the screen replacement process efficiently and effectively. Let's move on to the next step.
Step 2: Power Off And Remove The Rear Glass Of The Samsung Galaxy S23

In the second step you will start the screen replacement process for your Samsung Galaxy S23. The following steps will help you conveniently proceed with the procedure.
Powering off the Samsung Galaxy S23

- To power off the Samsung Galaxy S23, locate and press the Side key on the mobile.
- Bixby, the Galaxy S23's AI assistant, will be activated by holding down the Side key.
- If you still need to set up Bixby, follow the on-screen prompts to grant it access to your phone's controls.
Remove the SIM card Tray


Now look for the SIM card tray slot. In the Samsung Galaxy s23 you will find it at the bottom of the phone. Use a SIM card ejector tool or a small pointed object to gently push into the small hole beside the tray. The tray will pop out, allowing you to remove it. You can can either remove the sim tray after removing the rear glass or just after power off galaxy s23.
Step 3: Heat And Separate The Screen Assembly Or Rear Cover

In this step we will use a heat gun to soften the glue that secures the screen assembly to the frame. By doing so we can ensure a safe and effective separation process when replacing the Samsung Galaxy s23 screen. Now, let's proceed to the instructions:
Use A Heat Gun

As mentioned we have to start carefully and aim the heat gun at the edges of the rear glass cover. Once positioned move the heat gun back and forth to distribute the heat and warm the adhesive evenly.
Soften The Adhesive

The heat will gradually soften the adhesive, separating the back glass from the frame. However practicing caution and avoiding overheating the mobile during this process is crucial.
Insert A Plastic Opening Tool

After sufficiently softening the adhesive glue you can take a plastic opening tool and gently insert it between the screen and the frame. Start at one edge and carefully slide the tool along the perimeter, applying gentle pressure.
Separate The Screen Assembly or Rear Glass Cover


It's time to move the plastic opening tool around the edges; the adhesive or glue will gradually release. It will allow you to separate the screen assembly or back cover from the frame. Be patient and work slowly to avoid any accidental damage.
Step 4: Remove The Wireless Coil, NFC Antenna, And Disconnect The Battery
Before proceeding with the screen replacement removing the wireless coil and NFC antenna and disconnecting the battery is important. These parts are necessary for the mobile's functionality and require careful handling to avoid damage. Here's how to move:
Identify The Screws

Locate the 6 Phillips #00 screws that secure the wireless charging base and NFC antenna. You can find these screws around the perimeter of the components.
Use a Phillips #00 screwdriver to unscrew each of the 6 screws carefully. Apply steady and even pressure and avoid over-tightening or stripping the screws.
Disconnect The Connector


After removing the screw you'll find a connector that connects the two antennas. Gently detach the connector by carefully pulling it apart. Take care not to force it or pull on the cables excessively.
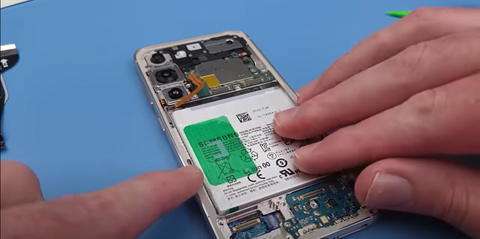
Disconnect The Battery

Find the battery connector. It is positioned near the bottom of the mobile phone. Carefully disconnect the battery connector by gently pulling it away from the motherboard. Be mindful not to bend or damage the connector during the process.
Keep Connectors Organized
To ensure ease of reassembly consider labeling or taking pictures of the connectors' positions before disconnecting them. This way you can accurately reattach them during the screen replacement process Samsung Galaxy S23.
Handle With Care
Emphasize the delicate nature of these connections. Avoid pulling or tugging on the cables forcefully, as this can result in irreversible damage to the components or the motherboard.
Step 5: Remove The Old Screen And Prepare The Replacement
After compiling the most significant steps the Samsung Galaxy s23 phone is ready for further action. Follow these simple steps ahead to continue the screen replacement process:
Remove The #00 Phillips Screws

Now it's time to remove the charging board screws. You can use a #00 Phillips screwdriver and carefully unscrew the 7 screws that secure the charging board to the rest of the phone. Please keep them in a safe place for reassembly.
Disconnect The Connectors

Locate the 3 connectors that cross from the motherboard over the batteries. These connectors are positioned in the middle of the Galaxy S23 body.
Use Your Fingers Or A Flat Tool


Deduct each connector with caution by gently pulling it apart using your fingers, a flat tool, or tweezers. Take care not to apply excessive force to avoid any damage.
Unscrew The Front Camera

Use a Phillips #00 screwdriver to remove the 5 screws that secure the front camera protector to the phone.
Remove The Front Camera

Unplug the front camera connector and carefully remove the front camera from its position. To remove the rear cameras, proceed as follows:
Remove The Rear Camera Protector

Unscrew the two Phillips #00 screws holding the rear camera protector.
Disconnect The Connectors

Unplug the three connectors of the three rear cameras by gently pulling them apart.
Remove The Rear Cameras

After disconnecting the rear camera you can carefully remove the rear cameras from their respective positions.
Step 5 Removing Charging Board, Battery, and Add-Ons
To remove the charging board from the Samsung Galaxy S23, follow these steps:
Unscrew The Docking Board


At this stage you will unscrew and open the docking board. Using a Phillips #00 screwdriver, remove the three screws that secure the docking board to the rest of the phone.
Remove The Battery


Locate the special tab provided and use it to detach the battery. Pull the tab gently to facilitate the removal of the battery from its position.
Remove Add-Ons

Remove the volume keys motherboard, ensuring it is disconnected and removed properly.

Now with the charging board, battery, and add-ons removed, the Samsung Galaxy S23 is completely disassembled and ready to replace its old or damaged screen.
Step 6: Install the new screen assembly
Now it's time to install the replacement screen assembly and bring your Samsung Galaxy S23 back to life. Follow these steps carefully:
Reattach The Battery
First carefully align the battery with its designated slot, and firmly press it into place. Ensure it is securely connected.
Now align the connectors on the replacement screen assembly with the corresponding ports on the phone's motherboard. Take your time to ensure a precise alignment.
Gently Attach The Connectors

After aligning, gently attach the connectors by firmly pressing them into place. Make sure they are securely connected to ensure proper functionality.
Check For Secure Attachment
Double-check that all connectors are securely attached and seated correctly. A loose connection can lead to display or touch-related issues.
Following these steps you can successfully install the new screen replacement on your Samsung Galaxy S23. Take time to ensure proper alignment and secure attachment for a smooth replacement process. In the next step, we will reassemble the mobile's rear cameras, front camera, and ad-ons and perform a final check.
Step 7: Reassemble The Device
Now that the new screen is in place, it's time to reassemble your Samsung Galaxy S23. Follow these steps to ensure a successful reassembly:
Put On The Add Ons And Docking Board

Now rearrange all the parts of the Samsung Galaxy s23 as you remove or detach them. First of all put back the ad-ons and docking board. Make sure your place them correctly and tighten the screw.
Reassemble The Rear And Front Cameras


It's time to reassemble the cameras. Firstly place the rear cameras and front cameras with all the correct alignments. Then reconnect them all carefully. After connecting the cameras, you can rearrange the front camera protractor correctly. Now tighten all the screws again with all the cautions. Now it's time to reinsert the sim card holder.
Double-Check All Connections
Before proceeding, double-check that all connectors, screws, and components are properly connected and in their respective places.
Reinstall The Rear Glass

It's time to use adhesive to stick the rear glass cover of the Samsung galaxy s23.
Perform A Final Check

After reassembling all the components and back cover power on your device, ensure the screen functions correctly. Test the touch response and all other features to verify the successful replacement.
Step 8: Test The New Screen
Now that you have replaced the Samsung Galaxy s23 screen successfully. Its functionality is crucial. Follow these steps to ensure everything is working correctly:
Power On The Mobile
Press the power button to turn on your Samsung Galaxy S23. Wait for the phone to boot up.
Check The Display
Observe the screen for abnormalities like flickering, dead pixels, or color distortion. Ensure the touch response is accurate and smooth.
Test Touch Sensitivity
Open different applications and navigate through menus to ensure the touch sensitivity is responsive and accurate.
Check For Uniform Brightness
Adjust the screen brightness and ensure it is uniform across the display. Look for any uneven lighting or dark spots.
Troubleshooting Tips
If you encounter any issues, try restarting the device or performing a factory reset. If problems persist, consider seeking professional assistance.
Remember, it's important to thoroughly test the new screen to identify any potential issues early on. If everything is working correctly, congratulations on a successful screen replacement of the Samsung Galaxy S23! Enjoy your Samsung Galaxy S23 with its fully functional and pristine display.
Conclusion
Replacing the screen on your Samsung Galaxy S23 with an original screen is a task that requires careful handling and following the correct procedures. Hopefully this step-by-step guide will thoroughly help you. All the tips and precautions are mentioned in this guide with step-by-step visuals. So it's time again to enjoy your working Samsung Galaxy S23 again.