
Do you know that the second most changed part of the phone is the battery! Batteries degrade naturally over a year and their performance starts to fade out. If you are having problem with the battery on your Pixel 4a, follow this guide step by step and fix it all by yourself. You will only need a replacement battery, tools, and some time.
1) Some tips before we start
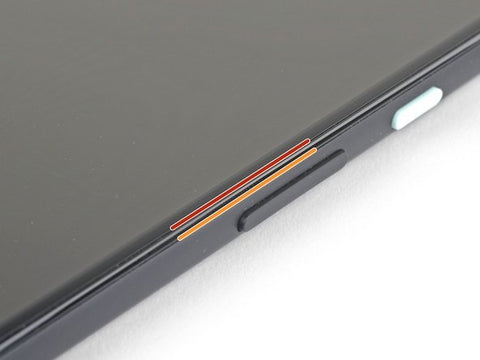
See the red line on the picture below, that's the screen seam. The screen seam separates the screen from the rest of the phone (This is the place that you should pry up when opening the front).
2) Heat the screen
Use a heat gun or a hair dryer to heat the right edge of the screen for around 30sec to soften the adhesive.

3) Insert opening pick
If your screen is badly cracked make sure to cover the whole screen with a layer of clear packing tape. Now apply the suction cup as close to the right edge of the screen as possible. Pull onto it in order to create a gap and insert the pick into that gap.

4) Insert the pick without damaging the OLED panel
Get the pick upwards to a steep angle as shown in the picture below. Then slide it below the OLED panel for about 6mm. If you feel the point hitting the ridge stop immediately.
5) Cut adhesive all around the phone
Slide the pick all around the phone in order to remove the adhesive and separate screen from the rest of the phone.

6) Open the screen
Lift the screen from the top edge and swing the screen over the bottom edge like shown on the picture below.

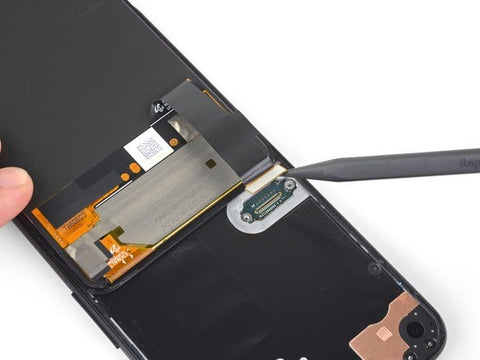
7) Uncover the display connector
Use your fingers or a pair of tweezers to peel the black tape that is covering the screen connector bracket.

8) Remove screen connector bracket
Use your T3 Torx screw driver to remove the two red circled screws that are securing the screen connector bracket. Then simply remove it.

9) Disconnect the screen connector
Use a tip of flat spudger to pry up and disconnect the screen connector from its socket.
10) Remove the screen
Simply remove the screen. Scrape off all remaining adhesive from the frame.

11) Unscrew middle frame
With a T3 Torx screw driver remove eight 4.3mm screws holding the back cover to the frame.

12) Separate back cover and midframe
Slide an opening pick all around the phone to release the plastic clips holding the back cover to the mid-frame. Once fully uncliped swing the back cover from the bottom of the phone over to the top and lay it down. 
13) Remove the whole motherboard bracket
Use the T3 Torx screw driver once again to remove seven screws securing the motherboard bracket. Then with the pair of tweezers remove the whole bracket.

14) Disconnect the battery
Use the flat end of a spudger to disconnect the battery cable from its socket.

15) Disconnect flex cables and remove the back cover
Again with a tip of spudger or your bare hands disconnect the two flex cables connecting fingerprint sensor and buttons to the motherboard. Then simply remove the back cover.

16) Remove battery adhesives
With a pair of tweezers lift battery adhesives tabs so that you can grab them with your hands. When you got grip on the pull tabs slowly pull them away from the battery towards the bottom of the phone (use as low angle as possible).

17) Remove the battery
Simply remove the battery.

18) Reassemble everything with the new battery
Your Pixel 4a is completely disassembled. Now take your new battery and reassemble your phone by following this guide in reverse order, and then test everything up to make sure you did everything properly.