
title: "How to Remove Thermal Paste From CPU Safely – Screen Fixed Brisbane"
description: "Step-by-step guide on how to remove thermal paste from CPU safely and effectively. Advice from Screen Fixed Brisbane to keep your PC cool."
Over time, thermal paste dries out, cracks and loses its ability to conduct heat. This can lead to higher CPU temperatures, reduced performance and even hardware damage. If your system has been running hotter than usual or you’ve noticed fan noise spikes, it’s time to clear out the old compound and apply a fresh layer.
Disclaimer: Intel and AMD are registered trademarks of their respective owners.
Removing thermal paste from a CPU is straightforward once you have the right approach. First, shut your PC down completely, then unplug it to kill any lingering current. Next, gently lift off the heatsink or cooler and set it aside on a clean surface.
I always keep a lint-free cloth and a bottle of 90%+ isopropyl alcohol at hand. Soak the cloth or a few fresh cotton swabs, let the solvent sit for about 5–10 seconds, and then wipe the CPU’s IHS in soft, circular motions. This lifts stubborn residue without risking scratches.
Quick Thermal Paste Removal Overview
Here’s how I break down the process for both desktops and laptops:
-
Power Off And Discharge
Shut down your system, press the power button once to drain caps, then disconnect the power cable. -
Remove Cooler
Grab the right screwdriver—crosshead or Torx—then unclip or unscrew the bracket edges. -
Clean CPU Surface
Dab a swab in 90%+ isopropyl alcohol, pause for a few seconds, and sweep in gentle circles until the IHS gleams.
This routine typically takes 5–8 minutes on a desktop build, and under 10 minutes on most laptops. It keeps risks low and prevents those hidden paste pockets that can hamper cooling. Just remember: firm but gentle pressure beats heavy-handed scrubbing every time.
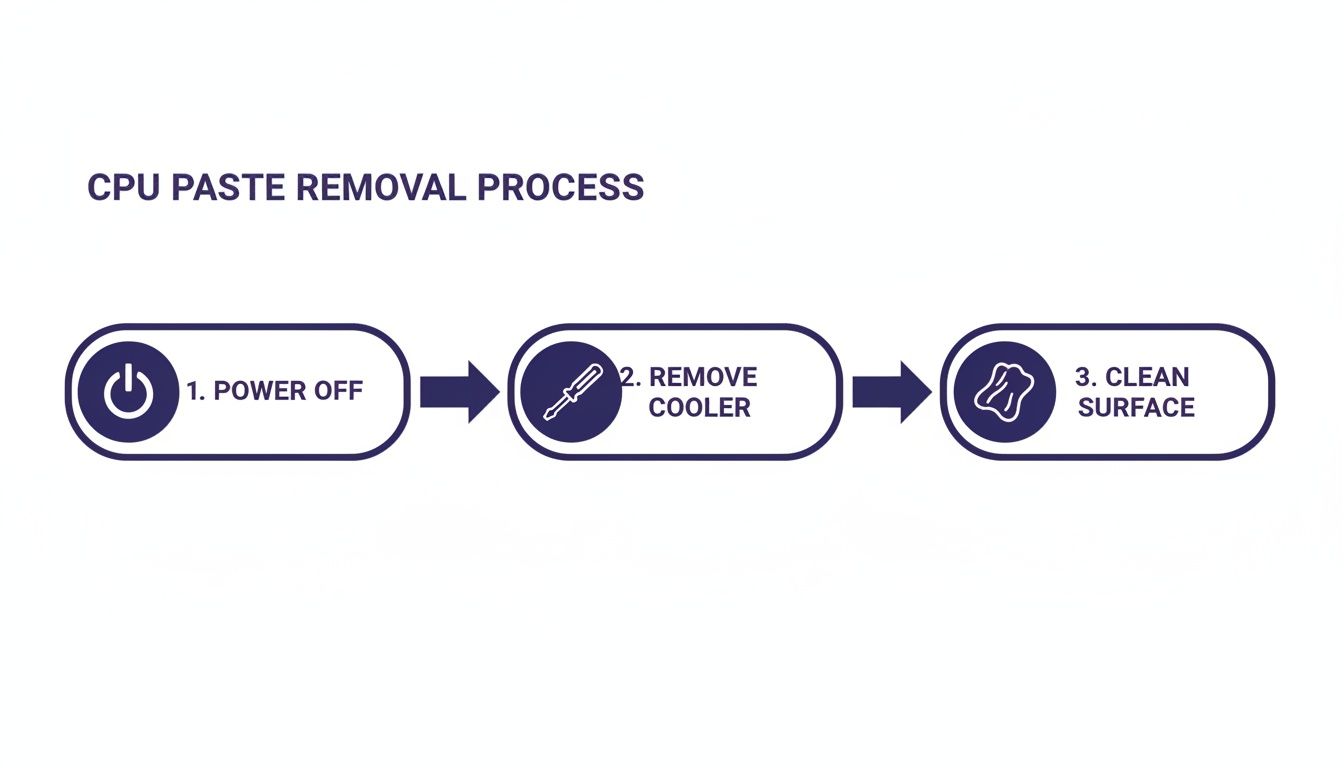
As shown in the infographic, most time is spent on solvent-based cleaning while powering off and cooler removal are quick tasks.
Comparison Of Removal Methods
Below is a quick comparison of common thermal paste removal techniques. It highlights tool needs, how long each approach takes on average, and the risk to your components.
| Method | Tools Needed | Average Time | Risk Level |
|---|---|---|---|
| 90%+ Isopropyl Alcohol | Lint-free cloth, cotton swabs | 3–5 mins | Low |
| Thermal Paste Remover Kit | Plastic scraper, specialised solvent | 4–6 mins | Medium |
| Contact Cleaner Spray | Circuit-safe aerosol, swabs | 5–7 mins | High |
Tip: Keep fresh swabs on hand and swap them at the first sign of residue.
This side-by-side view makes it easier to pick the method that fits your toolkit and confidence level. Whether you opt for pure alcohol or a dedicated remover kit, stick to the right tools and let the solvents do the work.
Materials And Safety Preparation
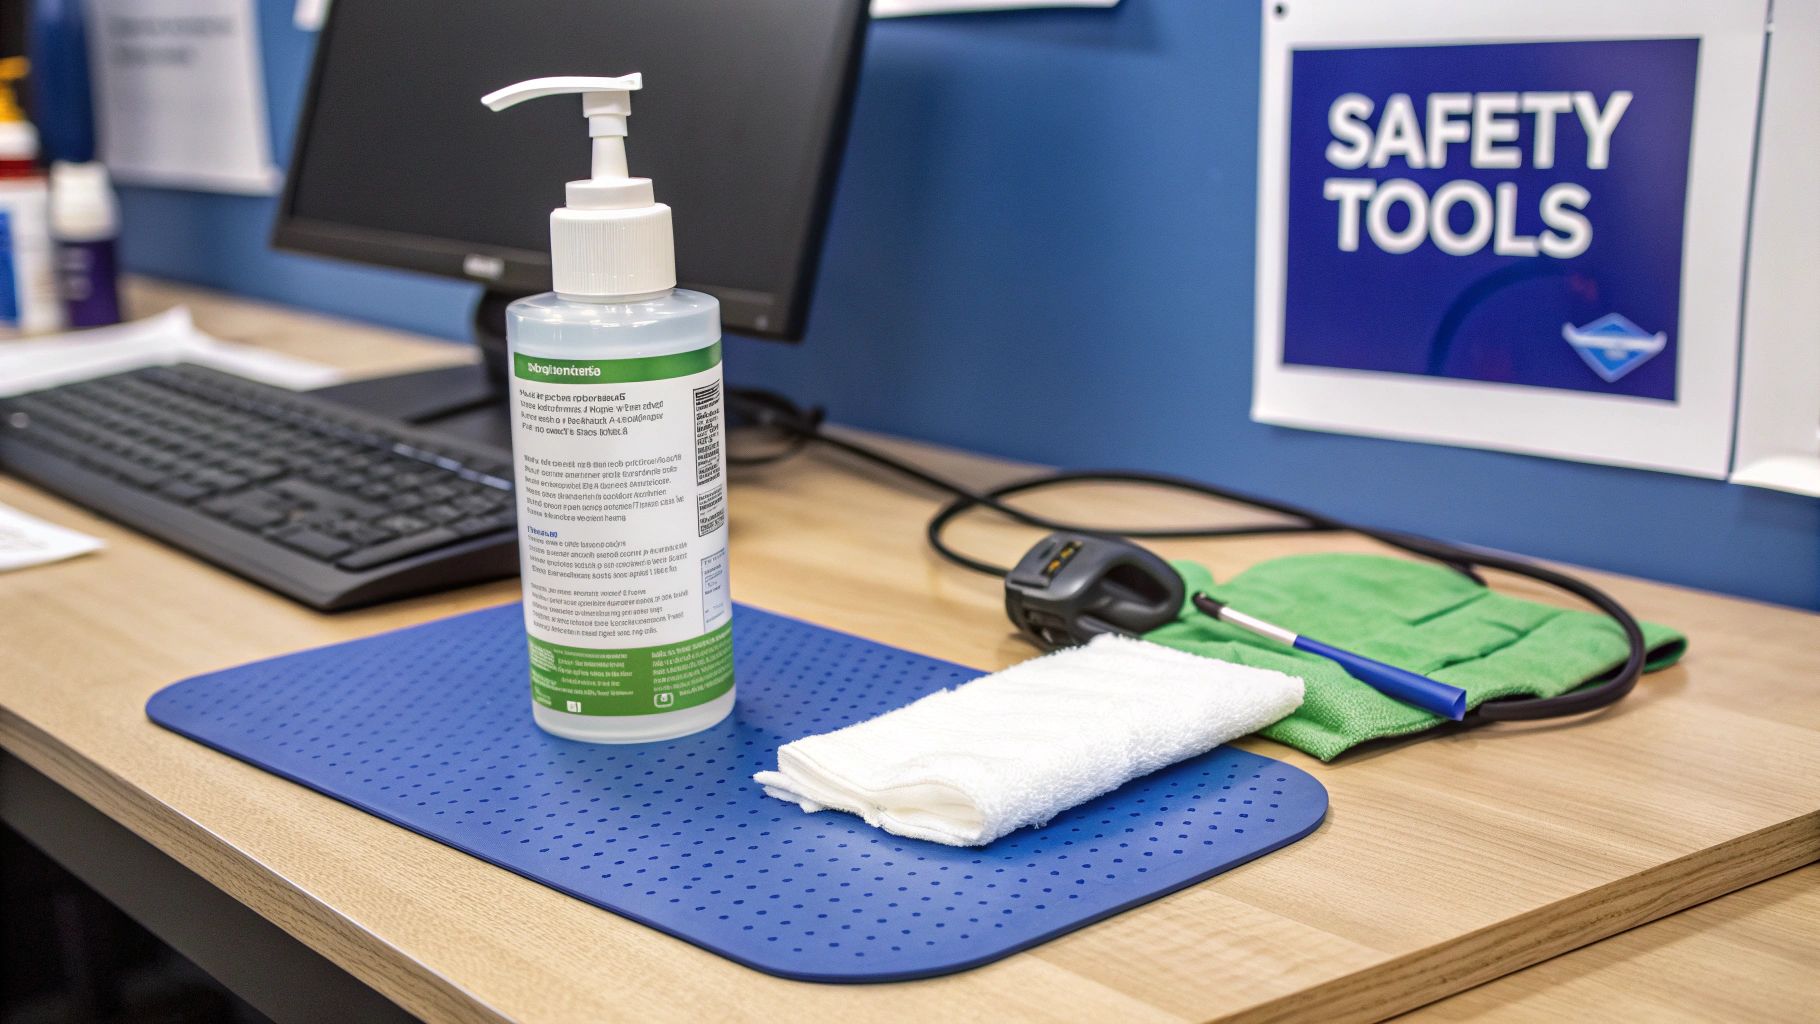
A well-lit, clutter-free bench sets the stage for a smooth paste removal. A smooth surface under bright LED lighting keeps lint at bay and tiny screws in sight.
Gather these essentials before you begin:
- 90%+ Isopropyl Alcohol – High-purity ensures drying in under a minute.
- Lint-Free Cloth or Coffee-Filter Paper – No stray fibres left behind on the CPU IHS.
- Cotton Swabs – Perfect for navigating tight crevices around socket pins.
- ESD Wrist Strap and Anti-Static Mat – Grounding essentials to discharge static safely.
Having everything within arm’s reach means you won’t be scrambling for tools mid-task.
Workspace Organisation
A small-parts tray with labelled compartments transforms a chaotic teardown into a tidy workflow.
- Magnetic screw pads stop tiny screws from rolling off the bench.
- Transparent containers make it easy to spot and sort components.
Keep a soft microfiber cloth nearby to blot any wayward solvent drops.
ESD Precautions
Static discharge can fry a CPU pin before you even realise it. Always clip your wrist strap to a grounded point and place boards on an anti-static mat. Handle the CPU by its edges, avoiding direct contact with the IHS or socket contacts.
Comparison Of Cleaning Solvents
Choosing the right solvent can make all the difference. Here’s a quick comparison:
| Solvent Type | Purity | Evaporation Time | Residue Risk |
|---|---|---|---|
| Isopropyl Alcohol (IPA) | 90–99% | <1 min | Low |
| Thermal Paste Remover | 95% | 1–2 mins | Very Low |
| Acetone | 99% | <30 secs | Medium |
This overview shows why 90–99% IPA remains a favourite—fast drying with virtually no residue.
“Using 90–99% isopropyl alcohol reduces drying time to under a minute and cuts corrosion risks,” local repair guides explain.
For a deeper dive, see the Tom’s Hardware tutorial.
Solvent Application Tips
- Use a pipette or dropper to apply small droplets exactly where needed.
- Control the flow to prevent flooding the CPU socket and motherboard.
Safety Gear Checks
- Inspect your wrist strap for frayed wires and test mat conductivity.
- Replace any worn gloves or faulty straps before you start.
Tool Cleanliness
- Ensure plastic scrapers and prying tools are free of old paste and debris.
- Rinse used tools in solvent and allow them to air-dry completely.
Waste Labelling
Collect used wipes and swabs in a sealed bag labelled “hazardous waste.” This keeps disposal compliant and your bench tidy.
For precision drivers, check out our guide to Pentalobe Screwdrivers for iPhone and MacBook repairs.
Cleaning A Desktop CPU
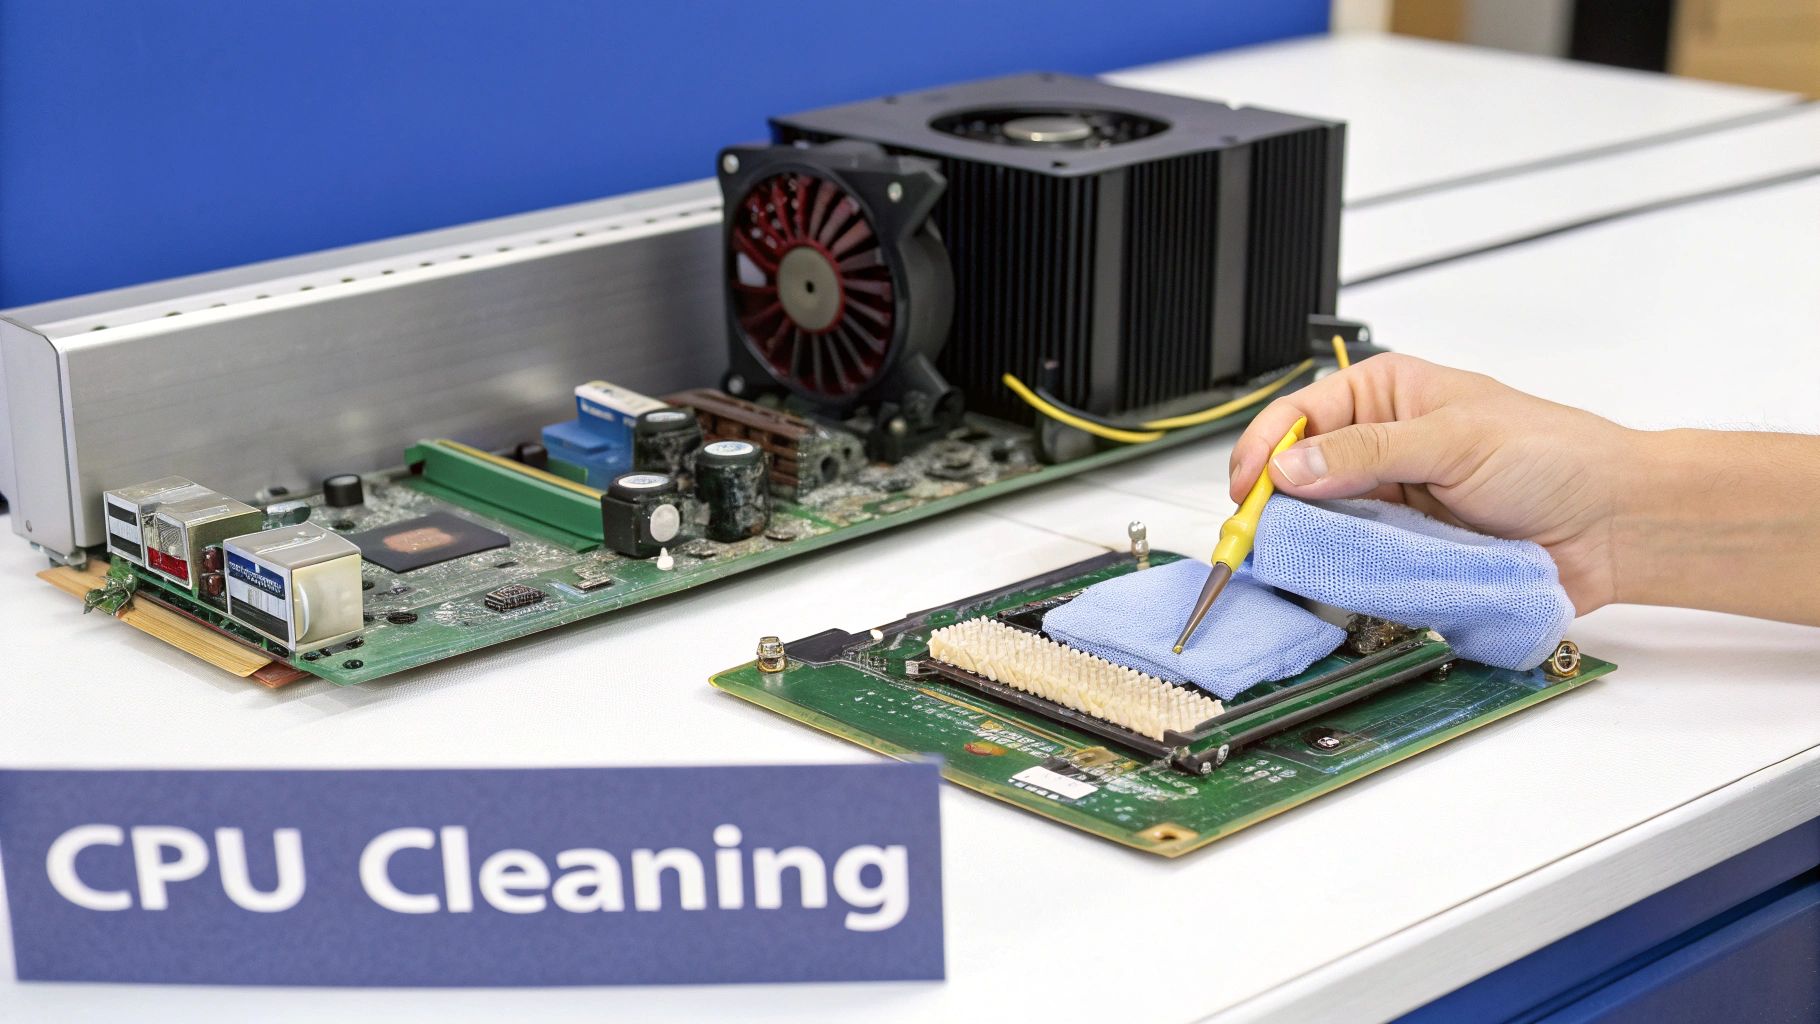
Removing the heatsink gives you a clear view of the CPU’s integrated heat spreader (IHS). You’ll often find crusty compound clinging to the edges. Tackling this systematically prevents damage and speeds up the cleanup.
A gentle scraping routine shields those delicate fins from harm. Whether you’re working on AMD, Intel or legacy sockets, this approach saves time and keeps fins perfectly straight. Tilt the heatsink slightly so gravity helps pull away stubborn paste.
- Plastic scraper or repurposed credit card
- Firm grip on the CPU’s edges
- Slight heatsink tilt for gravity assist
These simple tools cover your basic needs.
Inspecting Residue And Bent Fins
Once the bulk of paste is gone, hardened bits tend to linger along the IHS border. Corners trap compound first, so inspect those closely.
“Gently lift old paste layers instead of forcing them off,” recommends veteran PC builder Mark Hughes.
Mark’s tip is a lifesaver for home builders and technicians at service centres like Screen Fixed Brisbane.
| Residue Type | Removal Tool | Time Estimate | Risk Level |
|---|---|---|---|
| Thin film | IPA-soaked swab | 2 mins | Low |
| Thick globules | Plastic scraper | 3 mins | Medium |
| Crevice buildup | Precision cotton tip | 4 mins | Low |
Case Study: Bent Fin Recovery
Uneven pressure can bend heatsink fins, choking airflow. Here’s a quick fix shared by a Brisbane PC shop technician:
- Slip a wooden toothpick under the misaligned fin
- Warm the area with a hairdryer for 10 seconds
- Nudge the fin back into place with precision tweezers
Airflow bounced back, shaving 3–5 °C off peak temperatures. For more on this trick, check out the Tom’s Hardware guide with video instructions.
Using Solvent-Soaked Swabs
A cotton bud soaked in 90%+ isopropyl alcohol works wonders on sticky spots. Let it sit for about 5 seconds to soften the residue.
- Dab solvent lightly to avoid drips
- Spin the swab as fibres pick up paste
- Swap swabs when lint appears
With enough gentle wipes, the IHS will develop a mirror finish—ideal for an even spread of new thermal compound. Before reapplying paste, hold the CPU under bright LED light. Any streak or mark means it needs another round of cleaning.
For professional-grade kits and tools, visit Fixo’s desktop CPU cleaning range.
Cleaning Thermal Paste In Laptops And Tight Spaces
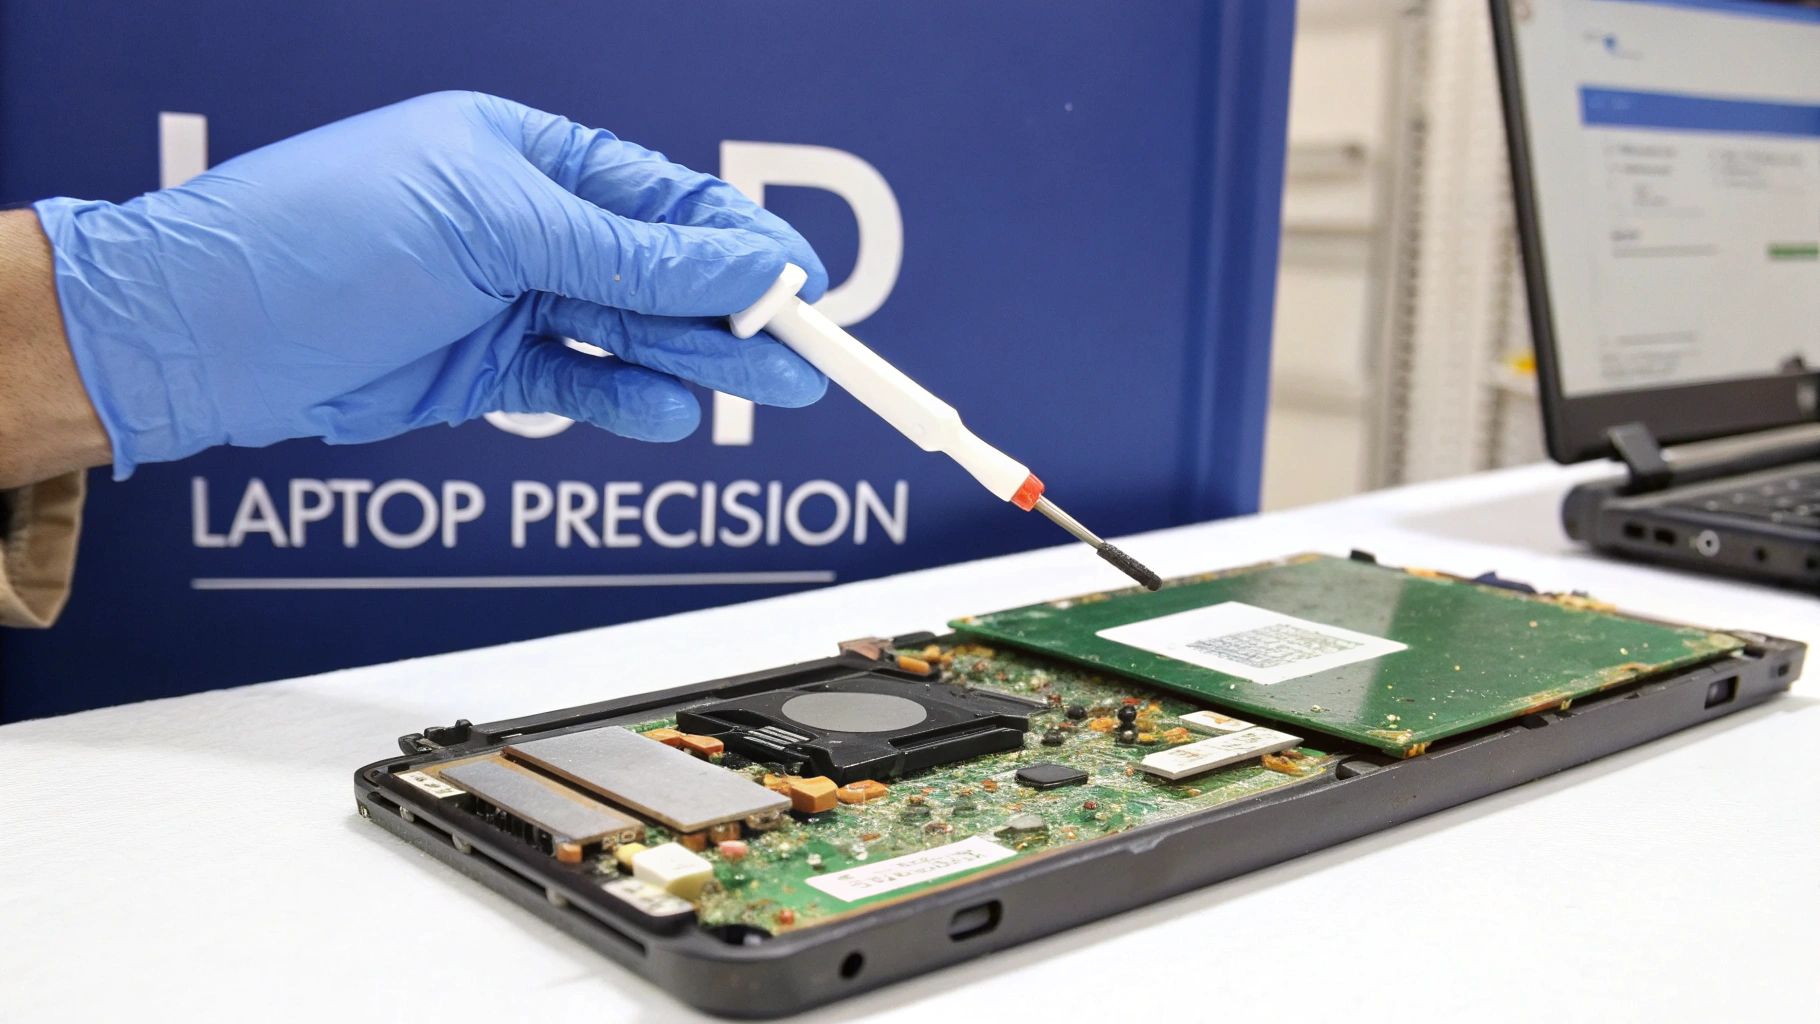
Laptop CPUs in slim notebooks demand a delicate hand. I’ve learned that a mix of micro foam swabs, precision cotton tips and a drop dispenser keeps solvent exactly where it should be—away from tiny capacitors and traces.
Injecting isopropyl alcohol straight onto the chip risks a flood. Instead, meter each drop with a dispenser. That way, you avoid wandering fluid and potential short circuits.
- Micro Foam Swabs: Lint-resistant tips slide under modules for pinpoint cleaning
- Precision Cotton Tips: Tuck into corners and around solder joints without stray threads
- Drop Dispenser: Controls 0.05–0.1ml doses at the IHS edge
- Plastic Spudger: Lifts hardened paste without scratching metal
- ESD-Safe Tweezers: Fish out stubborn bits in narrow channels
In scenarios involving a delidded or bare-die CPU, slip a plastic guard beneath the IHS. Let the solvent sit for 5–10 seconds, then draw it off carefully with a foam swab.
“Precision swabs and metered solvent drops are crucial when accessing laptop CPUs,” says a Brisbane technician.
Practice on old donor boards to master spills. For fine-detail techniques in action, see our guide on MacBook Pro display replacement.
Dispose Materials And Reapply Thermal Paste
After wiping down the CPU and cooler surfaces, gather your solvent-soaked wipes and seal them in an airtight bag. In Australia, even a few IPA-soaked rags count as regulated chemical waste.
Always double-check state EPA guidelines and your local council’s rules before dropping anything off.
“Proper disposal prevents soil and water contamination,” notes a Queensland environmental officer.
Waste Handling Rules
Rinse empty solvent bottles and label them clearly for recycling.
Keep used cotton swabs in a fire-resistant container until you can hand them over at an approved facility.
Consult the EPA chemical waste guide for drop-off locations and handling protocols.
- Seal wipes in labelled bags
- Separate plastics, metals and solvents
- Use a sharps bin for broken or heavily soiled swabs
| Paste Type | Conductivity (W/mK) | Ideal For | Price Range |
|---|---|---|---|
| Metal-based | 8–12 | High-core servers | $$ |
| Ceramic | 3–6 | Gaming desktops | $ |
| Carbon | 5–8 | Laptops, thin builds | $$$ |
Choosing The Right Compound
When you’re running a multi-core workstation or a home server under heavy load, a metal-based paste is your best bet. A ceramic formula trades a bit of performance for affordability—perfect for budget gaming rigs. And in compact laptops or mini-ITX cases, carbon-based compounds resist drying out when airflow is limited.
Reapplying Thermal Paste
First, ensure the IHS is spotless. A pea-sized dot in the centre covers CPUs up to 8 cores, but for large dies or multi-die packages, a thin line down the middle gives consistent edge-to-edge coverage. Under mounting pressure, the compound flows into every microscopic crevice.
- Position your cooler squarely over the CPU
- Hand-tighten screws in a criss-cross pattern for even pressure
- Pause for 1 minute to let the paste settle
- Wipe bracket screws clean before mounting
- Keep torque consistent with each turn
Key Takeaway
Even pressure and proper spread maximise thermal conductivity and banish hotspots.
Grab a premium thermal compound from Screen Fixed Brisbane Computer Repair Services if you need a reliable, high-performance option.
Before powering up, let the assembly rest for 2 minutes. After boot, give your PC about 5 minutes to idle—this initial run-in helps the paste fully seat itself. Monitor temperatures under load with tools like HWMonitor or CoreTemp and fine-tune your fan curves for consistent airflow.
If you’d rather leave the messy work to pros, book a repaste service at Screen Fixed Brisbane—our experts will handle everything from wipe disposal to paste selection.
Common Mistakes And Troubleshooting
When you’re elbow-deep in CPU maintenance, even a seasoned tech can miss a detail. I’ve seen tiny solvent beads sneak under the IHS and metal picks leave hairline scratches you only notice under an angle. Skipping the proper soak time? That’s a recipe for stubborn, streaky residue.
Keep an eye on these pitfalls:
- Over-applying solvent floods socket areas and risks contact corrosion
- Harsh scrubbing with abrasive tools etches the IHS and heatsink base
- Ignoring dwell time means old paste stays hard and uneven
Common Mistakes To Avoid
Pressure is just as critical as your choice of cleaner. Lean in too hard when scraping and you might bend socket pins or dent fins.
Cotton swabs work wonders, but swap them out before they fray into lint sponges. A fresh swab scores a cleaner finish every time.
Expert Insight
A gentle, circular motion under about 2 N of fingertip pressure protects both the CPU and heatsink finish.
Troubleshoot Socket And Contact Issues
Catching socket pin damage or uneven heatsink seating early can spare you a full board replacement. Shine a bright LED around each pin and frame, hunting for corrosion or hidden residue.
An infrared thermometer pinpoint hotspots from poor contact in seconds. In Brisbane’s heat, re-pasting every 2–3 years drops load temperatures by 6–12 °C under heavy tests like Prime95 or Cinebench.
Discover more about replacement intervals at Mwave.
| Issue | Symptom | Quick Fix |
|---|---|---|
| Excessive residue | Oily streaks after cleaning | Add 5–10 s dwell time |
| Bent socket pins | CPU won’t seat properly | Realign pins with a wooden pick |
| Uneven heatsink contact | High junction temps at edges | Re-seat heatsink evenly |
Key Takeaway
Regular temperature checks and gentle cleaning keep CPUs running cool, even in Australia’s harsh conditions.
If these steps don’t tame your CPU cooling woes, reach out to Screen Fixed Brisbane. Our experts will re-clean your heat spreaders to factory standards and restore peak performance.
FAQ
We often get asked about the safest ways to clear old thermal paste off a CPU. Which tools truly matter? What if you can’t find isopropyl alcohol? And how do you avoid scratching that delicate heat spreader? Let’s dive into the answers.
What Tools Do You Need?
In my workshop in Sydney, I always keep a simple kit ready:
- 90%+ Isopropyl Alcohol for dissolving stubborn paste
- Lint-Free Cloth to wipe without leaving fibres behind
- Cotton Swabs to reach into nooks and crannies
- Plastic Spudger for gently lifting hardened residue
- ESD Wrist Strap so you never fry those tiny CPU pins
“Grounding yourself is non-negotiable,” says a Brisbane repair technician I spoke with.
What If You Can’t Get Isopropyl Alcohol?
Acetone (at 99% purity) works in a pinch but dries very fast—and it’s harsh on plastics. A certified thermal paste remover kit is often the safer bet, since the solvents are formulated specifically for electronics.
How Do You Know the CPU Is Spotless?
Hold the IHS under a strong light. If it’s mirror-bright with no streaks, you’re good. Another trick: apply a fresh strip of paste to your cooler and clamp it down. Even, uniform spread means the surface was perfectly prepped.
Cleaning Pitfalls To Avoid
- Soaking the socket area in liquid—keep solvents contained
- Scraping with metal tools that nick the IHS
- Rushing—let the alcohol sit for 5–10 seconds to soften paste
- Applying heavy force; under 2 N of pressure is enough
For deeper dives, the Tom’s Hardware guide is an excellent resource.
Book your repair with Screen Fixed Brisbane today