
If you break your Samsung Galaxy S6 screen, you are not alone. Many people across Australia are having the same problem. Is it because you sat on it or you just dropped your phone from a higher place? No matter what happened, you are now stuck with a cracked screen and the only thing you can do is fix it.
When an accident like this happens, users can choose between two options. If you are inexperienced, you can take your phone to a repair store and leave the device in the hands of a professional technician and pay high prices. Or you can fix your screen all by yourself.
If you want to fix it yourself, the first thing you will need is to find a legitimate supplier of replacement screens. If you live in Australia, Fixo is the best solution. We have a wide array of screens for different mobile devices. All the replacement parts we have here are of great quality and look as good as original parts.
Change the display on your Samsung Galaxy S6 wholly by yourself. All you need is Samsung Galaxy S6 LCD Screen Assembly and some tools. Follow the instructions step by step, and you will soon be able to enjoy a working display again.
1) Turn off your phone

To get started turn off your Galaxy S6 completely to avoid damaging it during the repair To turn off Samsung Galaxy S6, you need to press and hold the Galaxy S6 Power button, and then tap Power off. If Samsung Galaxy S6 is frozen and not responsive, you can press and hold the Power button and the Volume down buttons simultaneously for more than 7 seconds to restart it.
2) Remove SIM card tray


Insert the SIM Puller (found in your phone box) into the SIM tray hole on the power button side of the phone. Apply pressure to feel the SIM drawer eject by itself and then remove it.
3) Remove rear glass


To lift the back panel you will need a suction cup, a hard plastic pick, and a heat gun (a hairdryer will also work) The back panel is glued to the frame, use a heat gun to heat the outer edges of the back panel to about 60°C (140°F). You can do it without the heat gun but it's easier with it.
Once the rear glass is hot enough, apply the suction cup near the bottom edge of the glass. Lift on the suction cup to create a small gap underneath the rear glass, and insert an opening pick into that gap. Slide the pick along the bottom edge of the phone to slice through the adhesive securing the rear glass.
Repeat the heating and cutting procedure for the remaining three sides of the phone. Leave an opening pick under each edge to prevent the adhesive from resealing. Then finally, remove the rear glass.
4) Remove midframe


Remove the thirteen 3.5mm Phillips #00 screws securing the mid-frame to the phone. Lift up on the mid-frame assembly while pushing down on the battery to separate the mid-frame assembly from the rest of the phone.
5) Disconnect battery


Use the spatula to disconnect the battery connector from its socket on the motherboard.
6) Disconnect Bluetooth & Wi-Fi


Use the same spatula to disconnect the Bluetooth and Wi-Fi antenna cable connectors from their sockets on the motherboard.
7) Disconnect the home button connector


Use the flat end of the spatula to disconnect the home button connector.
8) Disconnect display & earpiece speaker


Disconnect the display assembly cable from the motherboard. Then do the same for the earpiece speaker assembly cable connector from the motherboard.
9) Lift the motherboard

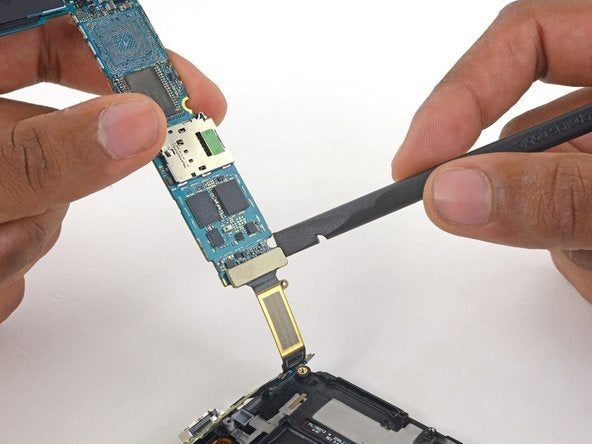

Lift the camera-side end of the motherboard to separate it from the display-frame. Don't fully remove the motherboard yet since it's still attached to the daughterboard. Lift it partly, then use the spatula to disconnect the daughterboard ribbon cable connector from its socket on the underside of the motherboard.
10) Remove front display


To lift the front panel you will need hard plastic pick, and a heat gun (a hairdryer will also work) The front panel is glued to the frame, use a heat gun to heat the outer edges of the back panel to about 60°C (140°F). You can do it without the heat gun but it's easier with it.
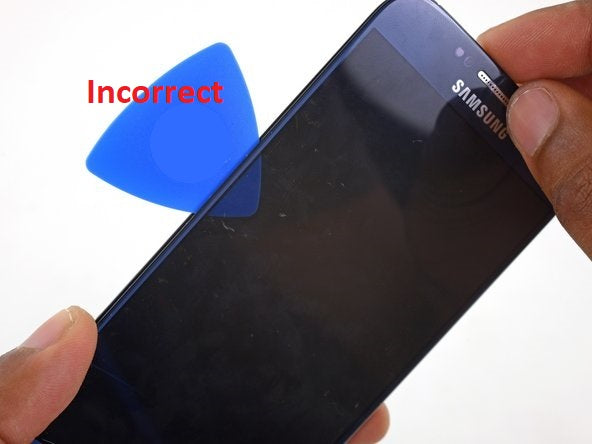
Insert the opening pick in the left edge of the phone, between the frame and display, at an upward angle. If you did it correctly, you will see a gap between the display frame and the display assembly. If it's done incorrectly, the pick will be visible through the glass. When this happens remove the pick and start again. When it's inserted correctly slide pick from side to side. Do this for all 4 sides of the phone.


Use an opening pick to gently pry the battery side of the frame away from the display. If the display and frame to not separate easily, use an opening pick to cut any remaining adhesive. If cutting is difficult, reheat the display again. When opened, remove all traces of old adhesive from the frame, while taking special care to remove any small glass fragments.
11) Reassemble with the new screen

Your Samsung Galaxy S6 screen is completely disassembled. Now take your new screen and reassemble your Samsung Galaxy S6 by following this guide in reverse order and then test everything up to make sure you did everything properly.
Test everything
Congratulations, you changed your Samsung Galaxy S6. Now just test a few things to make sure everything is working properly:
-Test the brightness of the display.
-Test the touchscreen, select an app, and drag it all around the display. If it is following your finger everything is fine.