
Change the display on your Huawei P30 wholly by yourself. All you need is Huawei P30 LCD Screen Assembly. Follow the instructions step by step, and you will soon be able to enjoy a working display again.
1) Switch off your device

To get started turn off your Huawei P30 completely to avoid damaging it during the repair. Press and hold On/Off. button then Press Power off.
2) Lift the back panel


To lift the panel you will need a suction cup, a hard plastic pick, and a heat gun (a hairdryer will also work) The screen is glued to the frame, use a heat gun to heat the outer edges of the back panel to about 60°C (140°F). You can do it without the heat gun but it's easier with it.
Place the suction cup like we did on the picture above. While lifting the screen with it, insert hard plastic pick between the frame and back glass. Press down the frame and slide the pick all around the P30 between the frame and the back glass frame. Try not to stick the pick in too far because that could damage the flexible flat display cables.
3) Remove Motherboard cover


Use Philips screwdriver to remove 10 Philips #00 screws (4.3mm length) . Then slide an opening pick under the black adhesive at the bottom right of the charging coil. Use the pick to carefully weaken the adhesive. Do the same thing for the black adhesive at the bottom left corner of the charging coil. Slide an opening pick under the left side of the motherboard cover, and unhinge the left side of the motherboard cover by slightly rotating the opening pick. And finally, remove the motherboard cover with the NFC and charging coil.
4) Disconnect battery
Use a spudger to pry up and disconnect the battery connector. When you disconnect it be careful not to dislodge the small surface-mounted components surrounding the socket.
5) Remove Daughterboard Cover


Use Philips screwdriver to remove 5 Philips #00 screws (4.3mm length). Some of these 5 screws may be hidden behind adhesive, carefully peel the adhesive to uncover these screws. Slide opening pick under the top edge of the daughterboard cover and unhinge daughterboard cover by slightly rotating the opening pick. Finally, remove the daughterboard cover.
6) Remove Main Flex Connectors


Use a plastic spatula to disconnect the left main flex cable connector from the motherboard. Then do the same for the right main flex cable connector from the motherboard.
To re-attach press connectors, carefully align and press down on one side until it clicks into place, then do the same for the other side (Do not press down on the middle!).
7) Remove the main flex cable


Use a plastic spatula to disconnect the main flex cable connector from the daughterboard. Then remove the main flex cable including charging port by lifting it upwards and then pulling it in the direction of the motherboard.
8) Remove battery


Peel the orange adhesive strip labeled with a 1,2 and 3 off the battery. The orange adhesive tape will rip along a small perforated line. Pull up the orange adhesive strip to lift the battery out of its recess. Then swing the battery up to an upright position, and peel the battery of the remaining adhesive. Finally, remove the whole battery.
Then just peel the battery's adhesive sticker off the mid-frame. This step is mandatory when you are replacing the screen. It is highly recommended to use a fresh adhesive sticker when you are installing a new battery.
9) Disconnect OLED Screen & Digitizer

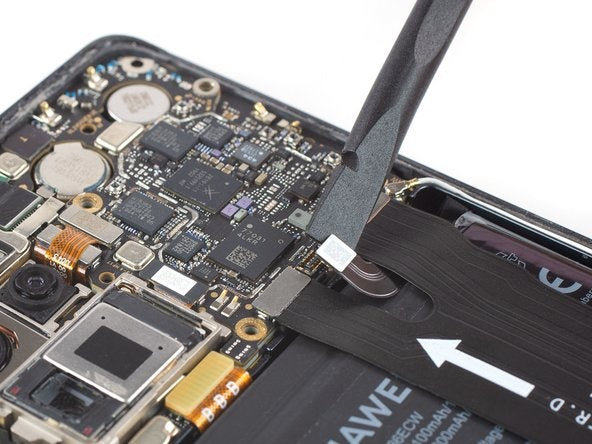
Use a plastic spatula to disconnect the display flex cable from the motherboard.
10) Remove display


To lift the panel you will need a suction cup, a hard plastic pick, and a heat gun (a hairdryer will also work). The screen is glued to the frame, use a heat gun to heat the outer edges of the display to about 60°C (140°F). You can do it without the heat gun but it's easier with it.
Place the suction cup to the left edge of the phone. While lifting the screen with it, insert a hard plastic pick between the frame and display. Press down the frame and slide the pick all around the P30 between the frame and the display frame. Try not to stick the pick in too far because that could damage the flexible flat display cables.
Thread the display flex cable through the gap in the mid-frame and remove the display. Before you install the new display, remove all traces of the old adhesive from the frame, and clean the glued areas with alcohol.
11) Reassemble with the new screen

Your P30 screen is completely disassembled. Now take your new screen and reassemble your Huawei P30 by following this guide in reverse order, and then test everything up to make sure you did everything properly.
Test everything
Congratulations, you changed your Huawei P30 screen. Now just test a few things to make sure everything is working properly:
-Test the brightness of the display.
-Test the touchscreen, select an app, and drag it all around the display. If it is following your finger everything is fine.