
You dropped your phone and it landed on the back? Now your camera lens is broken? Eventually, you have two options: go into the mobile repair shop and pay expensive repair, or read this guide and succeed to fix it yourself.
Change the camera lens on your LG G7 ThinQ wholly by yourself. All you need is the LG G7 ThinQ rear camera and some tools. Follow the instructions step by step, and you will soon be able to enjoy sharp and clear photos again.
1) Turn off your phone

To get started turn off your LG G7 completely to avoid any possible damages during the repair. To do that hold the power button on the side of the phone until the "Power off" appears, then tap to confirm and wait until the phone is turned off completely.
2) Remove back of the phone


Back cover itself is heavily glued to the chassis. In order to remove it, you need to head the device evenly with hot air to soften the glue. Hairdryer should be efficient but if you have a heat gun use it. As the rule of thumb, you should still be able to touch your device without it being uncomfortably hot.
Once you heat the rear glass, place the suction cup near the bottom edge of the glass. Lift the suction cup in order to create the small gap underneath the rear glass, and insert an opening pick into that gap. Slide that pick along all the edges of the phone to slice through the adhesive securing the rear cover. Then gently lift the back cover.
3) Remove mid-frame


Use Phillips screwdriver to unscrew 7 x 3.5 mm Philips screws that are holding the cover. The cover itself is hooked into the housing. Lever it with a tool under the plastic frame and lift the frame upwards and remove it.
4) Disconnect the battery

Use a nylon spatula to carefully disconnect the battery contact from the motherboard.
5) Remove the speaker


Unscrew 7 x 3.5 mm Philips screws that are securing the speaker and then remove it. To remove it, it's easiest to use your fingernail to pull it up.
6) Remove the SIM card tray

Insert the SIM Puller (found in your phone box) into the SIM tray hole on the top of the phone. Apply pressure to feel the SIM drawer eject by itself and then remove it.
7) Remove the motherboard


Use a nylon spatula to carefully disconnect the highlighted connectors from the motherboard. They connect the front camera, screen, and various antennas. Then use a spatula to carefully lever up the bottom side of the board until you notice the connector coming loose. Finally, carefully remove the motherboard (Make sure it doesn't get caught on the connector you already disconnected).
8) Remove the camera


Take the whole motherboard and carefully disconnect the connector of the camera module.
9) Install the new camera


Take the new camera module and connect it to the motherboard. You can use two fingers to better connect the connector.
10) Install motherboard back


Take the motherboard and carefully insert it into the device. Do it carefully since you may pinch cables. When you positioned the motherboard correctly connect all the connector you previously disconnected.
11) Install the SIM card tray
Insert the SIM card tray back into its place. If it's stuck, don't push it with force, just check if you positioned the motherboard correctly.
12) Install the speaker
Place the speaker back into its place (back over the USB port), then press it down and screw it with 7 x 3.5mm Philips screws.
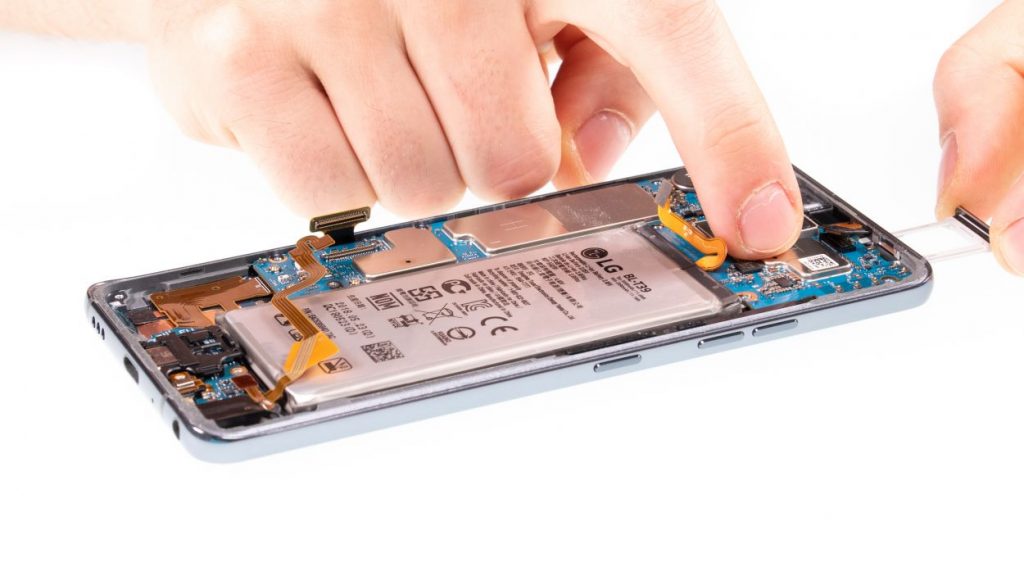
13) Connect the battery

Use the tip of your finger to connect the battery to the motherboard. Press it down gently until you hear it click into the place.
14) Install the mid-frame

Put the mid-frame cover with the antenna back in the enclosure after sliding it under the speaker at the bottom. Then just press the cover until it clicks and fasten the Philips screws.
15) Attach the back cover


Since the adhesive on the back cover is still intact we will seal the device without using a new adhesive for the frame. Put the back cover in its original position, and press it down on all the sides so the glue will stick.
Test everything
Congratulations, you changed your LG G7 camera. Now just test a few things to make sure everything is working properly:
-Test the brightness of the display.
-Test the touchscreen, select an app, and drag it all around the display. If it is following your finger everything is fine.
-Test the camera itself. Go into the Camera application and shot some photos to see if they are sharp & clear.