
It's really amazing to think that it's already been 4 years since the iPhone SE series came out. The iPhone SE shares the same physical design and dimensions as iPhone 5S, and upgraded internal hardware.
This means that there are a lot of iPhone SE users even now in 2020. So if you have your iPhone SE broken and want to fix it wholly by yourself all you need is a iPhone SE DIY LCD Glass Screen Repair Kit. Follow this guide step by step and you will soon be able to enjoy a working display again.
1) Switch off your device

Before you even start, discharge your iPhone SE battery below 25%. A fully charged lithium battery can catch fire or explode if accidentally punctured. Then press and hold the side button until the power off slider appears. Drag the slider to the right and wait 30 seconds for your device to turn off.
2) Remove the enclosure screws

You will need a pentalobe screwdriver to open the iPhone SE. Eliminate the two pentalobe screws at the lower part of the enclosure. They are on the left/right side of the lightning connector.
3) Lift the display


Press an suction cup onto the screen, simply over the home catch. Hold the iPhone down with one hand, and pull up on the cup to marginally isolate the home buttons end of the front board from the back case. At that point utilize a plastic opening instrument, tenderly pry the edges of the back case down, away from the front panel, while you pull up with the suction cup.
Finally, Pull the plastic nub to release the vacuum seal on the suction cup, and remove the suction cup from the screen.
4) Remove the Touch ID cable bracket

Open the phone just enough to reveal the home button cable bracket. Use the tip of a spudger to push the bracket free and remove it with tweezers.
5) Disconnect the home button cable connector


Use the tip of a spudger to pry the home button cable connector up out of its socket. At that point connector has been released, pull the button end of the assembly away from the back case. Open the display to about a 90º angle, and lean it against something to keep it propped up while you are fixing it.
6) Remove battery connector bracket

Remove the two 1.6mm Philips screws securing the metal battery connector bracket to the motherboard, and then remove it.
7) Disconnect battery

Use the nylon spatula to disconnect the battery connector from its socket on the motherboard.
8) Remove motherboard bracket

Remove four Philips screws securing the front panel assembly cable bracket to the logic board. Remove the front panel assembly from the logic board.
9) Disconnect front-facing camera
Use a nylon spatula or fingernail to disconnect the front-facing camera and sensor cable.
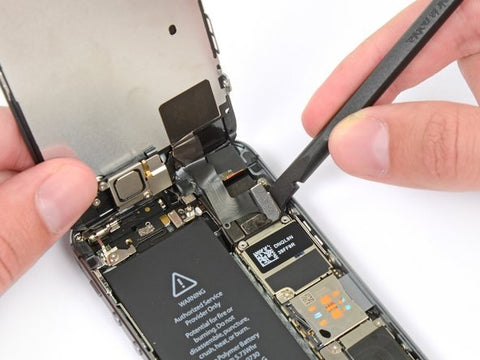
10) Disconnect LCD cable connector

Keep spatula in your hand, and disconnect the LCD cable connector.
11) Disconnect Digitizer cable connector

Disconnect the digitizer cable connector. Finally, remove the whole front panel assembly from the rear case.
12) Remove the home button


Unscrew the single Philips screw securing the home button cable. Then remove the two 1.4mm Philips screws from the home button bracket. Then remove the home button bracket from the display assembly. Use a plastic spudger to pry the edge of the home button ribbon cable up from the display. Then pry up and remove the home button from the display assembly.
13) Reassemble with the new screen

Your iPhone SE screen is completely disassembled. Before installing a new display, make sure to remove all traces of the old adhesive from the frame and any small glass fragments. Now take your new screen and reassemble your iPhone SE by following this guide in reverse order and then test everything up to make sure you did everything properly. Make sure to transfer over the LCD shield, home button, front facing camera assembly, front facing camera lens bezel and earpiece speaker to your new part.
Test everything
Congratulations, you changed your iPhone SE. Now just test a few things to make sure everything is working properly:
-Test the brightness of the display.
-Test the touchscreen, select an app, and drag it all around the display. If it is following your finger everything is fine.